


| FAQ |
| Members List |
| Social Groups |
| Calendar |
| Search |
| Today's Posts |
|
#21
 03-29-2014, 12:31 PM
|
||||
|
||||
|
http://forums.highperformancepontiac...-mini-starter/
Seems others have had the same issue. Can try calling them and see if they can sell you just a mounting block maybe, can't be too expensive. Either that, or live with it. I'm guessing it will wear sooner than later, will just have to deal with it one way or the other. Bummer. .
__________________
. 1970 GTO Judge Tribute Pro-Tour Project 535 IA2 http://forums.maxperformanceinc.com/...d.php?t=760624 1971 Trans Am 463, 315cfm E-head Sniper XFlow EFI, TKO600 extreme, 9", GW suspension, Baer brakes, pro tour car https://forums.maxperformanceinc.com...ght=procharger Theme Song: http://www.youtube.com/watch?v=7zKAS...ature=youtu.be |
|
#22
03-29-2014, 12:39 PM
|
||||
|
||||
|
Thanks for that info. Are pro-tork and IMI the same people? As much as this whole starter thing has been a PITA with the 4 week wait for the one that never showed up and now this I guess I have to deal with it now. It just holds things up more but to have to deal with it later will really suck!!
|
|
#23
03-29-2014, 12:48 PM
|
||||
|
||||
|
No clue, but they could repackage IMI starters too. If the mounting block says IMI, pretty certain IMI will support it. And I understand they have good support. I rebuilt the last one I had, the parts were fairly inexpensive, talked with me several times on the phone, and shipped pretty quick.
Summit starters are $185 and in stock, can grab one and egay that one you have. That or find a local shop that can cut the mounting block. Yeah, does suck, but it's all part of the hobby. Take the bad with the good. .
__________________
. 1970 GTO Judge Tribute Pro-Tour Project 535 IA2 http://forums.maxperformanceinc.com/...d.php?t=760624 1971 Trans Am 463, 315cfm E-head Sniper XFlow EFI, TKO600 extreme, 9", GW suspension, Baer brakes, pro tour car https://forums.maxperformanceinc.com...ght=procharger Theme Song: http://www.youtube.com/watch?v=7zKAS...ature=youtu.be |
|
#24
03-29-2014, 12:52 PM
|
||||
|
||||
|
Well the reason I didn't buy a Summit or I could have gotten a db electric for $80 was the issues of alignment. I wanted to be able to get some good support as opposed to being told send it back we'll send you another. But thanks for the info.
|
|
#25
03-31-2014, 08:52 PM
|
||||
|
||||
|
Well I removed the starter and hooked up to a battery hoping when it was energized it would pull out further but no luck. I emailed IMI last night but no response. I guess I'll call them tomorrow.
|
|
#26
04-01-2014, 08:50 PM
|
||||
|
||||
|
Spoke with IMI today. The starter is not IMI but the mounting block and mid plate are. The block has a K stamped on it which means it's a kit sold to Pro- Tork. He said he can sell me a mid plate that has been milled which basically brings the starter closer to the flywheel or I can get mine milled locally. Based on the fact that I'm getting 50% engagement he said its enough that milling will get me 70-75% which he says is enough. I told him I would get back to him as I need to check my backlash first to see if I need any shims also and I need to see if I can just get this milled locally. Anyway I checked my backlash and cannot get a large paper clip in there although there is daylight. How critical is this?
|
|
#27
04-02-2014, 10:16 AM
|
||||
|
||||
|
Good info. And nice they helped!
Backlash is pretty important, it controls engagement, and you can eat a gear up in no time if it's way out. I believe the spec to shoot for is like .020, but pulling that from the top of my head (which is close to bald now!). You need to make sure it engages properly, when starting, and sometimes, that's more or less than .020. I start at .020, and go by sound, move it as needed. When it's too tight, you can hear the starter kind of bind, and too loose, it grinds. There has to be some room between the starter gear pinion/tooth valley and the ring gear so it can engage properly, if you can pic that. Ok, just looked at some install notes for a couple other mini starters, just as a reference. The Summit Protorque instructions are pretty good and can be used as a reference: Step 1 - Inspection: Remove lower flywheel housing cover and examine the entire flywheel for visual problems. (Worn, chipped or broken teeth; bent flywheel and/or incorrectly cut teeth) • Step 2 - Check Clearance: Insert a screwdriver behind the starter drive. Move starter drive assembly out toward flywheel so that starter pinion and ring gear teeth mesh. • Step 3 - Measure Clearance: Center the pinion tooth. Check clearance (looking for .025” - .060”). A convenient plug gauge is a common paper clip, which typically measures approximately .035”. Important - Check at least 3 ring gear locations 120° apart for proper clearance. Shim as required at minimum clearance location. After measuring clearance, push starter drive back into original position. • Step 4 - Proper Shimming: To increase clearance: Use entire shim across both holes. .015” shim increases clearance approximately .0075”. This moves the starter down and out, away from the flywheel (use no more than 6 shims). To decrease clearance: Use 1/2 shim only on the outer mounting bolt hole from oil pan. This moves the starter in and toward the flywheel. .015” shim decreases clearance approximately .010” Note: The Summit Protorque starter is designed to cross the flywheel between .400” and .500”. This is quite sufficient for this type of unit with proper shimming. I grabbed a pic as an example too, it has different measurements, and think it's from HPPontiac. There needs to be a gap between the top of the tooth and the ring gear. Yeah it is: http://www.highperformancepontiac.co.../photo_15.html .
__________________
. 1970 GTO Judge Tribute Pro-Tour Project 535 IA2 http://forums.maxperformanceinc.com/...d.php?t=760624 1971 Trans Am 463, 315cfm E-head Sniper XFlow EFI, TKO600 extreme, 9", GW suspension, Baer brakes, pro tour car https://forums.maxperformanceinc.com...ght=procharger Theme Song: http://www.youtube.com/watch?v=7zKAS...ature=youtu.be Last edited by HWYSTR455; 04-02-2014 at 10:23 AM. |
|
#28
04-02-2014, 01:21 PM
|
||||
|
||||
|
The used mini I bought a few years ago was supposed to be for a Pont but truned out to be chev. It was a CMI brand I believe. I was able to buy another mounting block from the company. The only issue was it wasn't drilled for the infinite clocking locations. Only like 2 or 3 up and the same down. The only one that seemed to work was with the sol up. I actually had to bend the flange on the pan rail near one of the pan bolts so it would bolt up flush against the block but it works. It would be much easier to access the wiring if the sol was clocked below for sure.
I wonder if anyone makes a additional cover plate to cover the open space left in the inspection plate since the minis have a smaller snout?
__________________
Robert 69 Firebird-462/Edel round ports/currently running the Holley Sniper/4sp/3.23posi/Deluxe Int/pwr st/vintage air/4wl disc( a work in progress-always ) http://youtu.be/eaWBd3M9MN4 |
|
#29
04-02-2014, 05:19 PM
|
||||
|
||||
|
Thank you for that information.
|
|
#30
04-16-2014, 08:27 PM
|
||||
|
||||
|
I received mounting block and altered intermediate plate from IMI. When swapping the old plate with new I figured I should add a little grease in there since I'm losing some by swapping plates. The grease in there is blue. Anybody have any idea what is good to use? They also sent me a new gear, it looks like it's held in place by a small snap ring, is that what holds it in?
Thank you. |
|
#31
04-16-2014, 10:49 PM
|
||||
|
||||
|
The guys at IMI got it on the money. I am now able to get a paper clip in between the gears. I checked the paper clip and it measures .045. I have read the backlash should be .020-.030. They forgot to send me shims but I have some stainless I can cut that measures .030. I guess I would need to shim the side away from the block to push it in. Or should I install the new gear instead first which is not worn at all.
|
|
#32
04-17-2014, 08:40 AM
|
||||
|
||||
|
I would install the gear since once you get it right, they last forever. If you don't change it, that thing will sit on a shelf for years and you will forget what it was for!
I used the red chassis grease on mine, the syn stuff. Think that's all the blue stuff is anyway. .
__________________
. 1970 GTO Judge Tribute Pro-Tour Project 535 IA2 http://forums.maxperformanceinc.com/...d.php?t=760624 1971 Trans Am 463, 315cfm E-head Sniper XFlow EFI, TKO600 extreme, 9", GW suspension, Baer brakes, pro tour car https://forums.maxperformanceinc.com...ght=procharger Theme Song: http://www.youtube.com/watch?v=7zKAS...ature=youtu.be |
|
#33
04-17-2014, 08:43 AM
|
||||
|
||||
|
I need to look and see how to remove the existing gear.
|
|
#34
04-17-2014, 08:45 AM
|
||||
|
||||
|
It is the clip on the end of the shaft. As I recall, mine was just a ring, not an e-clip or anything.
.
__________________
. 1970 GTO Judge Tribute Pro-Tour Project 535 IA2 http://forums.maxperformanceinc.com/...d.php?t=760624 1971 Trans Am 463, 315cfm E-head Sniper XFlow EFI, TKO600 extreme, 9", GW suspension, Baer brakes, pro tour car https://forums.maxperformanceinc.com...ght=procharger Theme Song: http://www.youtube.com/watch?v=7zKAS...ature=youtu.be |
|
#35
04-17-2014, 08:48 AM
|
||||
|
||||
|
Is it the clip on the outside. Looks like a bitch to get out, very tight space. That's the only way I would think from looking at it but was hoping there was a simpler way.
|
|
#36
04-17-2014, 11:20 AM
|
||||
|
||||
|
I think there's a way to put a pin in the sol to hold the rod the gear is on out, but yes, the one on the end. There's a spring behind the gear that holds it forward against the cup the ring is in.
Maybe call them, they may be able to give you tips on replacing it. .
__________________
. 1970 GTO Judge Tribute Pro-Tour Project 535 IA2 http://forums.maxperformanceinc.com/...d.php?t=760624 1971 Trans Am 463, 315cfm E-head Sniper XFlow EFI, TKO600 extreme, 9", GW suspension, Baer brakes, pro tour car https://forums.maxperformanceinc.com...ght=procharger Theme Song: http://www.youtube.com/watch?v=7zKAS...ature=youtu.be |
|
#37
04-17-2014, 11:42 AM
|
||||
|
||||
|
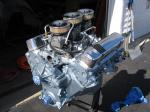
I'll check it out later. I have attached a picture of what they actually mill. If you look at the ridge I am pointing at with the paper clip. That is what they take off. They also take out material from inside the mounting block as this intermediate plate now will sit deeper into the block. I can't figure it but that small amount which is not even 1/8" gave me 100% engagement where if you look at the first picture I posted showing engagement I was almost 50%. That somehow gave me 1/4" more engagement.
|
|
#38
04-17-2014, 05:47 PM
|
||||
|
||||
|
Well I changed the gear and it's basically a three handed job and the whole thing had to come apart but it's done. Also I realized how they got full engagement. They didn't just take down the raised edge but they took down the whole face also. I have added a picture of both plates and you can see the difference.
Thanks for the input. |
|
#39
04-17-2014, 05:56 PM
|
||||
|
||||
|
Heh-heh! 3 hands eh!?! I feel your pain! It's like doing a lock plate on a steering column with no tool!
Glad you got it ironed out, sure you're relieved! Now just keep an eye on the cable and that blue boot on the side. That boot would cook on mine because it was too close to the header, fyi. .
__________________
. 1970 GTO Judge Tribute Pro-Tour Project 535 IA2 http://forums.maxperformanceinc.com/...d.php?t=760624 1971 Trans Am 463, 315cfm E-head Sniper XFlow EFI, TKO600 extreme, 9", GW suspension, Baer brakes, pro tour car https://forums.maxperformanceinc.com...ght=procharger Theme Song: http://www.youtube.com/watch?v=7zKAS...ature=youtu.be |
|
#40
04-17-2014, 06:04 PM
|
||||
|
||||
|
I brought it in the house on a nice piece of cardboard, figured sit at the kitchen table(wife was not home) but I protected the table , had rubber gloves on and everything. Well when I took that spring clip off and it shot across the kitchen floor I knew this was going to be just like everything else has been. Well when it was all done, one of my fingers was bleeding, one glove was on and ripped and the internals from this bitch were wrapped in a rag and in the vise. Its done though. I will look at that header issue though, not sure where it is when installed.
|
| Reply |
|
|
The PY Online Forums is the largest online gathering of Pontiac enthusiasts anywhere in the world. Founded in 1991, it was also the first online forum for people to gather and talk about their Pontiacs. Since then, it has become the mecca of Pontiac technical data and knowledge that no other place can surpass.


 Linear Mode

