


| FAQ |
| Members List |
| Social Groups |
| Calendar |
| Search |
| Today's Posts |
|
#1
 07-16-2019, 04:59 AM
|
||||
|
||||
|
First of all, apologies. I stole this blatantly from some post on a Chevy board somewhere. But I've never seen it here on the Pontiac forum. It's a simple idea, really.
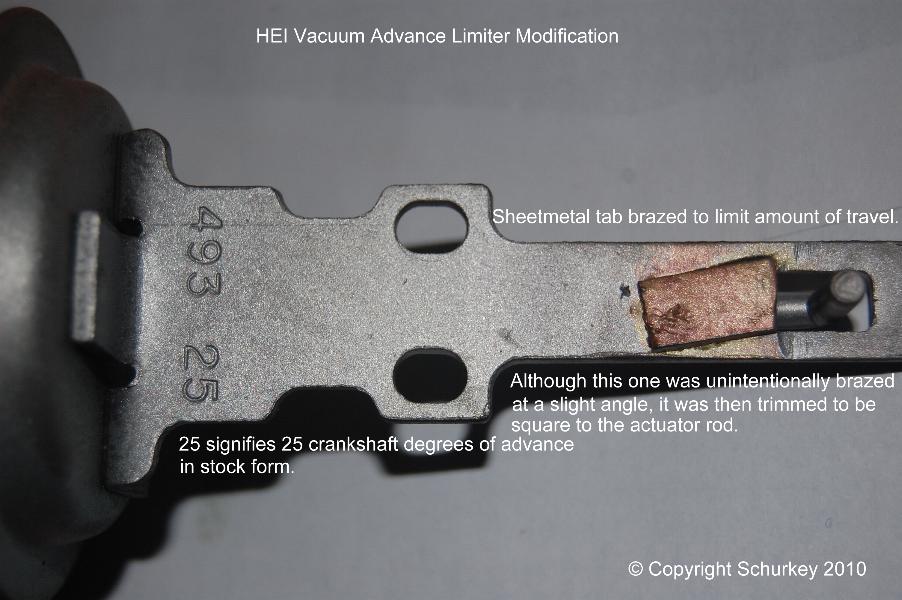
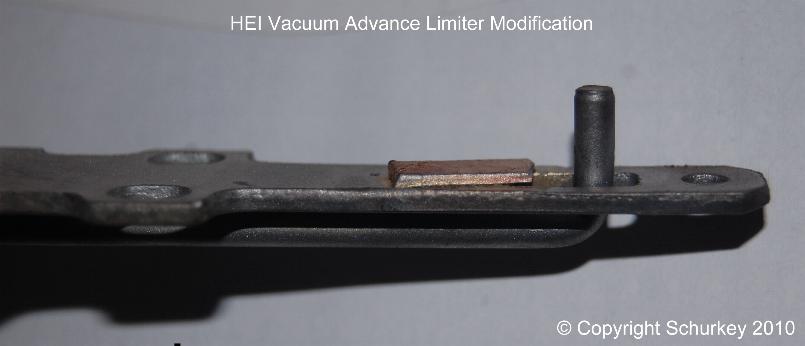
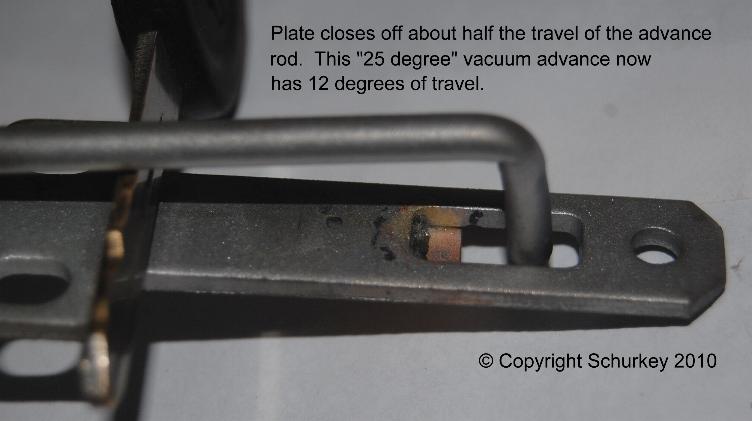
The problem being that the vac cans often give you more advance than you want. Often guys will weld the slot shorter but two problems for some of us are: 1. The need to be able to weld 2. It's not easy to try different settings The adjustable cans often come with a cam to allow limiting but it limits at the wrong end if installed as per directions. Instead of limiting the travel it "pre-loads" the spring. This means that when you only want to limit travel you get stuck adding extra spring tension you didn't want and raising the amount of vacuum required to move the advance. The solution takes just a drill, a spare small screw and a few minutes. Here's a stock can with the modification Here's my adjustable can installed with the modification Again, I didn't come up with this but I found it very helpful so just boosting the signal. This is how you should do your vac advance limiting.. Sam
__________________
-- Sam Agnew Where you come from is gone; where you thought you were going to, weren't never there; and where you are ain't no good unless you can get away from it. Ministry - Jesus Built My Hotrod |
|
#2
07-16-2019, 05:08 AM
|
||||
|
||||
|
That works fine but you MUST make sure the screw doesn't protrude thru too far and lock up the unit when you bolt it in place and tighten the mounting screws down.......Cliff
__________________
If you can read this, thank a teacher. If you can read this in English, thank a Veteran! https://cliffshighperformance.com/ 73 Ventura, SOLD 455, 3740lbs, 11.30's at 120mph, 1977 Pontiac Q-jet, HO intake, HEI, 10" converter, 3.42 gears, DOT's, 7.20's at 96mph and still WAY under the roll bar rule. Best ET to date 7.18 at 97MPH (1/8th mile), |
|
#3
07-16-2019, 05:09 AM
|
||||
|
||||
|
Quote:
Sam
__________________
-- Sam Agnew Where you come from is gone; where you thought you were going to, weren't never there; and where you are ain't no good unless you can get away from it. Ministry - Jesus Built My Hotrod |
|
#4
07-16-2019, 04:52 PM
|
|||
|
|||
|
Or MIG, TIG, braze a tiny bit of sheet steel into position. File or grind as needed to achieve desired advance.
|
|
#5
07-16-2019, 11:10 PM
|
||||
|
||||
|
Guess I'm cheaper than the other posters, and simply use a stiff piece of coat hanger wire. You don't want to use the thinner hangers, and have to raid the wife's closet for a thicker hanger to cut up. The vacuum advance movement is way weaker that the wire and I've never had one move once bent and set. Basically make a loop for the screw to go through at the far end of the advance assembly and bend a J-hook that limits the movement towards the pot. A pair of long nose pliers can reshape the bend either tighter or looser while the distributor is on the machine or in the car. It's free and takes less than two minutes once you've done a few.
__________________
Mick Batson 1967 original owner Tyro Blue/black top 4-speed HO GTO with all the original parts stored safely away -- 1965 2+2 survivor AC auto -- 1965 Catalina Safari Wagon in progress. |
|
#6
07-17-2019, 08:24 AM
|
||||
|
||||
|
Just to piggyback onto this, what is ideal for added total timing of vacuum advance on the crank? With the canister unplugged I go from about 12* initial to 35-37* on the crank. Which is about where my engine made the most power on the dyno. But what should I be looking for optimally with the canister connected? Another 20* on the crank? Less? Its been a while since i checked but I suspected mine added too much.
__________________
1967 Firebird 462 580hp/590ftlbs 1962 Pontiac Catalina Safari Swapped in Turd of an Olds 455 Owner/Creator Catfish Motorsports https://www.youtube.com/@CatfishMotorsports |
|
#7
07-17-2019, 08:43 AM
|
||||
|
||||
|
Quote:
Sam
__________________
-- Sam Agnew Where you come from is gone; where you thought you were going to, weren't never there; and where you are ain't no good unless you can get away from it. Ministry - Jesus Built My Hotrod |
|
#8
07-17-2019, 08:56 AM
|
||||
|
||||
|
Quote:
__________________
1967 Firebird 462 580hp/590ftlbs 1962 Pontiac Catalina Safari Swapped in Turd of an Olds 455 Owner/Creator Catfish Motorsports https://www.youtube.com/@CatfishMotorsports |
|
#9
07-17-2019, 10:18 AM
|
||||
|
||||
|
In almost all cases I find that you only need about 10-12 degrees of additional timing added with the vacuum advance if the engine is pretty efficient, has some compression, and running pump gas.
If you add it all together, ideally you want somewhere around 44-48 degrees all in at light throttle cruising conditions. This seems to be a safe area for most engines. So for instance if your engine is making best power on the dyno at 36 degrees of total timing (no vacuum advance) Then adding another 10-12 degrees with the vacuum advance for your light throttle cruising conditions would work just fine and should be more than enough. On most of these cans and breaker plate combos I find that limiting the travel to about .200" will give you 10-12 degrees at the crank. However that might change ever so slightly depending on the combination of parts you have. But that distance will get you in the ball park. Another helpful tip. The rated working vacuum of these cans all vary quite a bit, and since the good vacuum cans that are more sensitive for guys running decent camshafts are drying up, I prefer to use the adjustable units and set the spring tension very light so it starts to work around 6-8 inches and is all done by 10-12 inches, just like the factory performance cans worked. Then limit the travel. They work excellent in this configuration once the mods are done. I prefer to weld them here. Last edited by Formulajones; 07-29-2019 at 11:19 PM. |
|
#10
07-17-2019, 03:07 PM
|
|||
|
|||
|
Quote:
Yeah, 10--15 degrees of vacuum advance is a good starting point to tune from. |
|
#11
07-17-2019, 05:03 PM
|
|||
|
|||
|
Another benefit of putting the limiter on the pull side is that changes to how much is limited does not result in changes to base (vac hose off) timing
Sent from my SM-T817V using Tapatalk |
|
#12
07-19-2019, 08:38 AM
|
||||
|
||||
|
Quote:
I never had luck running more than 10 degrees vac, and my total was in the 32-34 range. Round port e-heads @10.7 SCR. I know many say they need more lead, but in my situation that wasn't the case. .
__________________
. 1970 GTO Judge Tribute Pro-Tour Project 535 IA2 http://forums.maxperformanceinc.com/...d.php?t=760624 1971 Trans Am 463, 315cfm E-head Sniper XFlow EFI, TKO600 extreme, 9", GW suspension, Baer brakes, pro tour car https://forums.maxperformanceinc.com...ght=procharger Theme Song: http://www.youtube.com/watch?v=7zKAS...ature=youtu.be |
|
#13
07-19-2019, 09:23 AM
|
||||
|
||||
|
Quote:
__________________
1967 Firebird 462 580hp/590ftlbs 1962 Pontiac Catalina Safari Swapped in Turd of an Olds 455 Owner/Creator Catfish Motorsports https://www.youtube.com/@CatfishMotorsports |
|
#14
07-19-2019, 09:37 AM
|
||||
|
||||
|
Quote:
So I just prefer to modify the breaker plate for total timing and the curve I want and leave that alone, then modify the vacuum advance from the other end to limit it's travel, that way the rod stays in it's normal location at rest and doesn't monkey with the other timing variables. |
|
#15
07-19-2019, 09:47 AM
|
||||
|
||||
|
Quote:
I run his from manifold vacuum, and the car idles around 12 inches of vacuum up here at 5,000 feet. So most of the time the added timing is there at idle, until he touches the throttle and vacuum dips then it will go down and come back up gradually as the engine load lightens. To answer your question, even at 36 total, another 10-12 from the vacuum advance is fine. Some engines love to have as much as 50 degrees at light throttle cruise applications. If you look at factory timing tables for an LS engine for example, the factory has as much as 48 degrees in some light load light throttle areas of the timing table, and those engines are very efficient. But on our engines, with pump gas, and the high compression ratios we build our engines with, I keep things a pinch conservative. If you end up with anything around 44-46 degrees all in with vacuum, you're probably okay. My Z is 11:1 with iron heads, I run 36 total on that engine with an additional 12 from the vacuum can. Cam has a quite a bit of overlap too so that helps. The engine loves the extra timing at light cruise. Each engine is a little different. |
|
#16
07-19-2019, 10:18 AM
|
||||
|
||||
|
Quote:
I have 2nd design 87cc round ports, and although I've heard many needing more advance than I ran, I found it ran all around better, and safer than the 36-38 many run. So I experienced the same as you did/do. Just to say, rear gear/final drive does make a diff on how sensitive your engine will run on vacuum. (and of course cam selection too) .
__________________
. 1970 GTO Judge Tribute Pro-Tour Project 535 IA2 http://forums.maxperformanceinc.com/...d.php?t=760624 1971 Trans Am 463, 315cfm E-head Sniper XFlow EFI, TKO600 extreme, 9", GW suspension, Baer brakes, pro tour car https://forums.maxperformanceinc.com...ght=procharger Theme Song: http://www.youtube.com/watch?v=7zKAS...ature=youtu.be |
|
#17
07-19-2019, 10:51 AM
|
||||
|
||||
|
Quote:
When my car runs again, Im going to experiment and try to get the vacuum dialed in.
__________________
1967 Firebird 462 580hp/590ftlbs 1962 Pontiac Catalina Safari Swapped in Turd of an Olds 455 Owner/Creator Catfish Motorsports https://www.youtube.com/@CatfishMotorsports |
|
#18
07-19-2019, 11:00 AM
|
|||
|
|||
|
Thanks for starting this tread. I'll be "stealing" some of the ideas. "Honor among thieves." Btw, that looks like a Cutlass louvered hood in the first picture. Thanks again.
|
| Reply |
|
|
The PY Online Forums is the largest online gathering of Pontiac enthusiasts anywhere in the world. Founded in 1991, it was also the first online forum for people to gather and talk about their Pontiacs. Since then, it has become the mecca of Pontiac technical data and knowledge that no other place can surpass.


 Linear Mode

