


| FAQ |
| Members List |
| Social Groups |
| Calendar |
| Search |
| Today's Posts |
|
#41
 08-21-2012, 07:45 AM
|
|||
|
|||
|
Quote:

|
|
#42
08-21-2012, 08:41 PM
|
||||
|
||||
|
Quote:
__________________
Your car must be very fast ! Because you were haulin ass when I passed you in my GTO.
|
|
#43
08-31-2012, 08:01 AM
|
|||
|
|||
|
Quote:
OK, so I managed to get the body off the chassis....just took me and my wife with the use of an engine hoist and an engine sling. Took a cutting torch and cut the trunk floor pan out. Once that was done I realized how much work needed to be done. So with a little enthusiasm, the work began. Pix...... 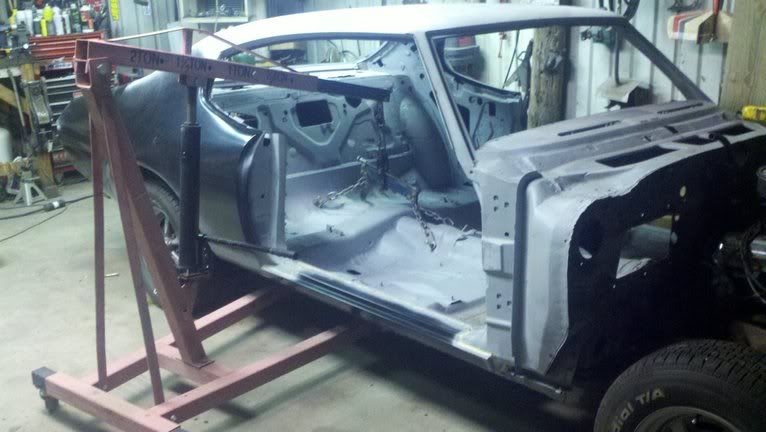 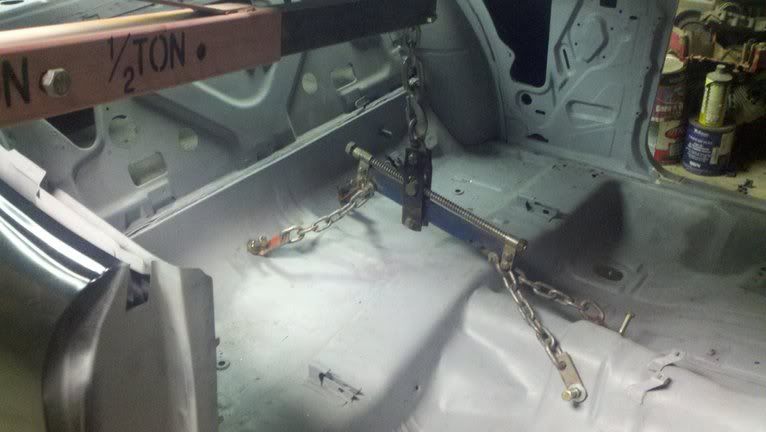 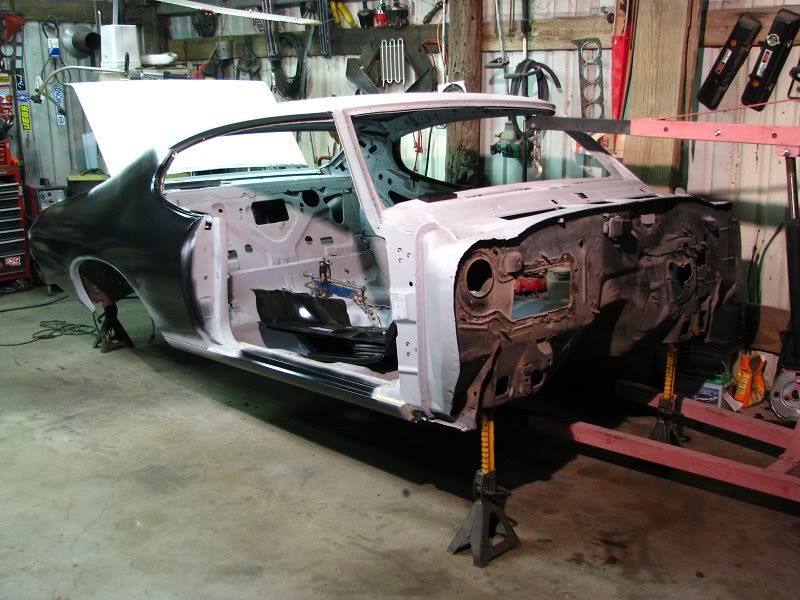 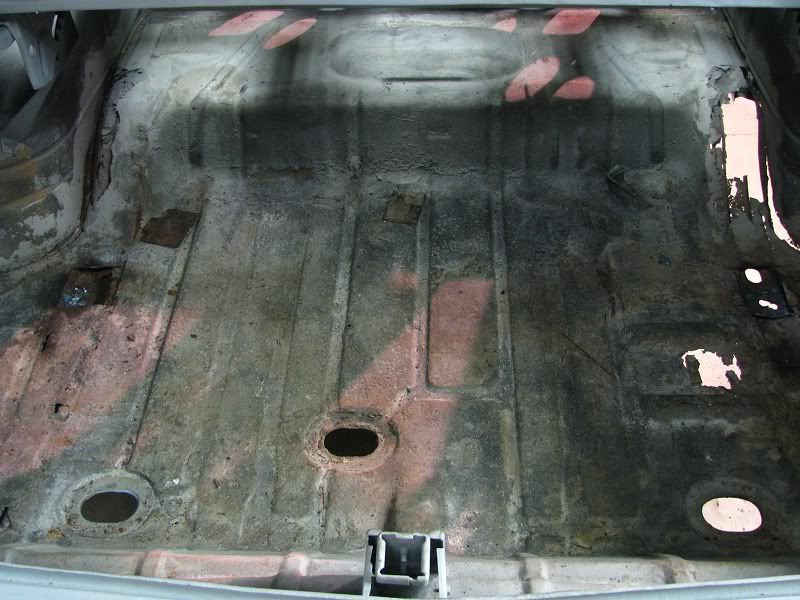 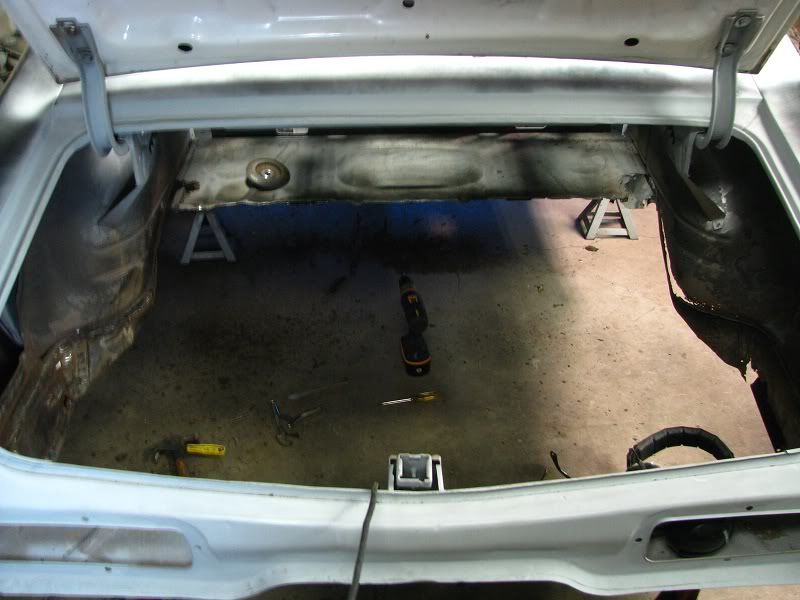 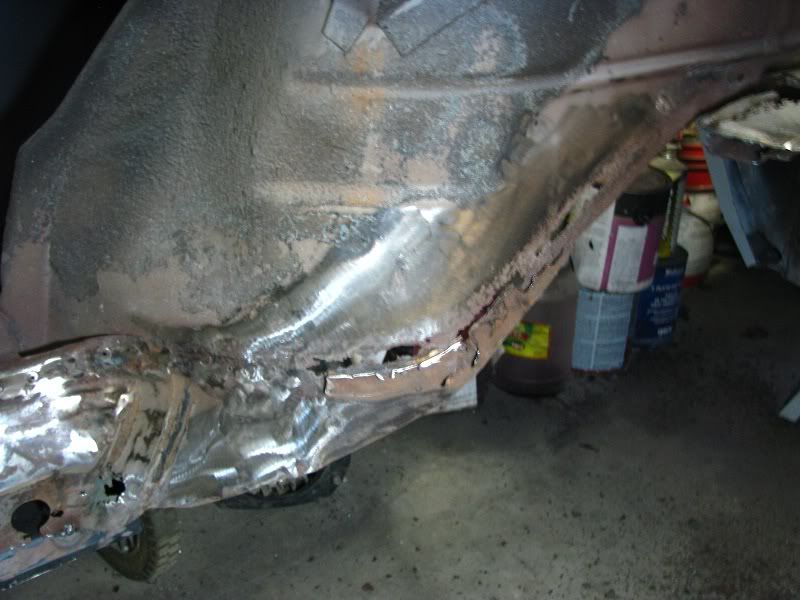 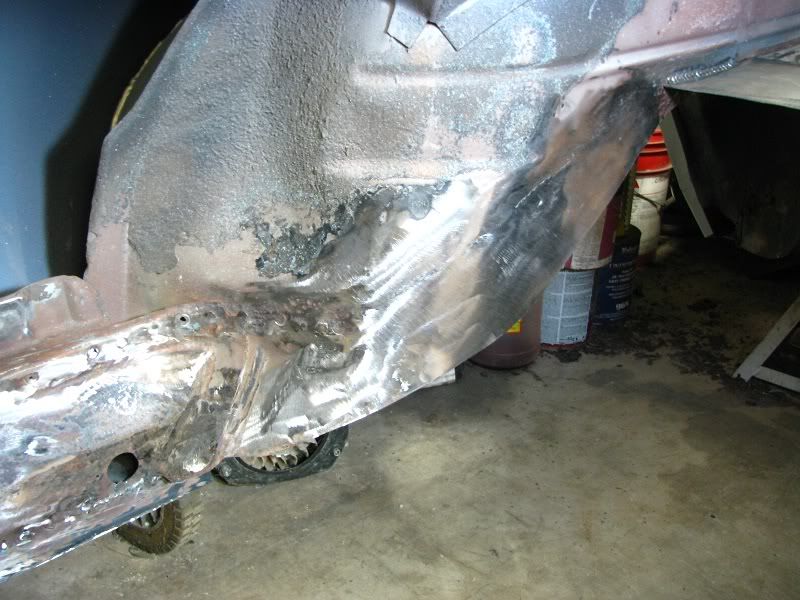 With that done, I used the 7 piece floor pan kit from PY...from all the reading I had done, the pan fit quite well..... 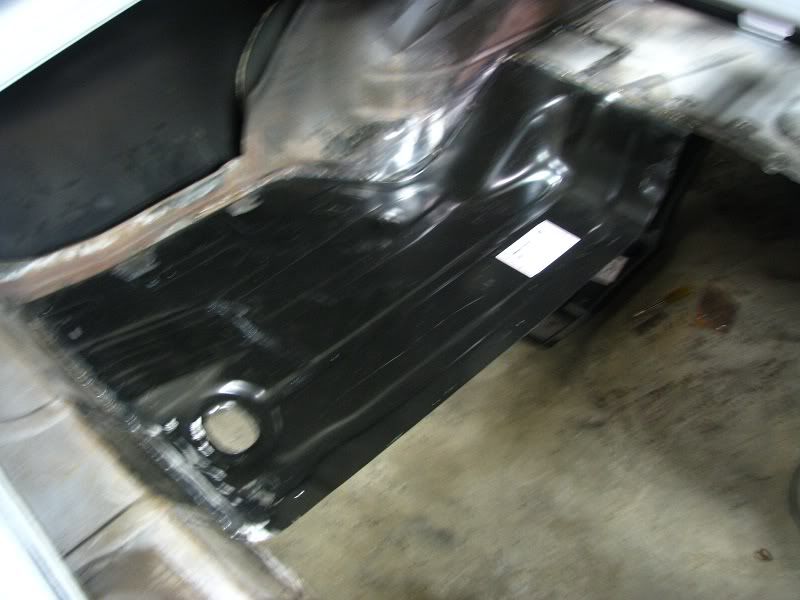 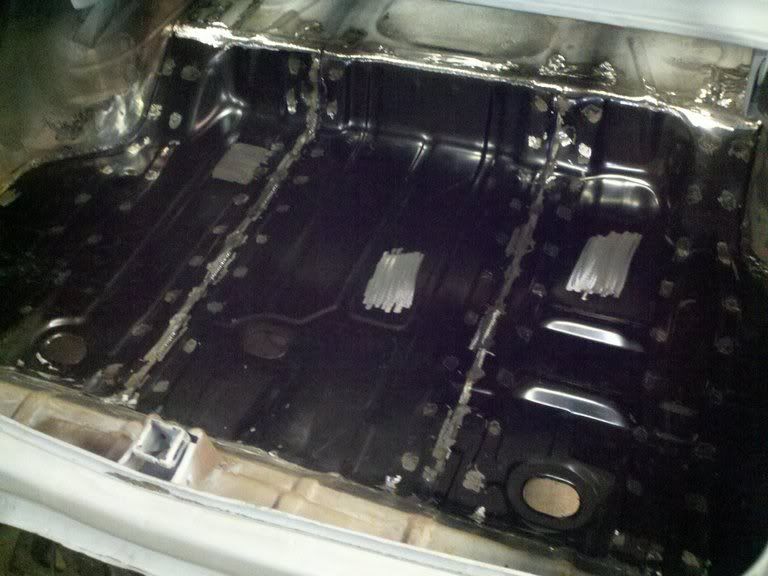 Now I have a few more things to take care of on the front floor pan, make a few general repairs on one of the floor braces, then I can clean up the frame and get the two back together. 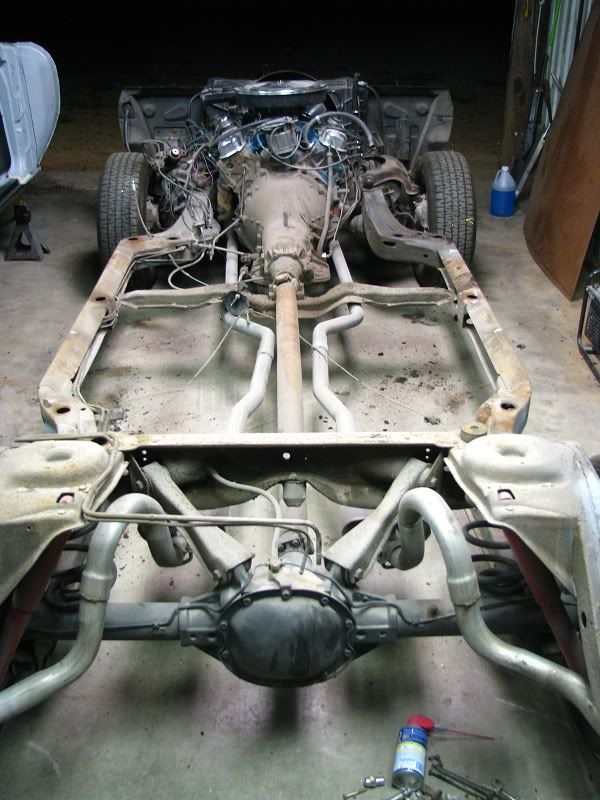
|
|
#44
08-31-2012, 11:45 AM
|
||||
|
||||
|
Great build. The trunk has to be the biggest pain in the butt.
Keep her going.
__________________
Send it! Its going home on a trailer. |
|
#45
09-03-2012, 11:29 PM
|
|||
|
|||
|
Quote:
Ok, I had an almost 3 full day weekend to do nothing but perform solid work on the ole goat. Most of which, I took full advantage of. I really kicked around the idea of not using a rotisserie, but I'm glad I went ahead and got one. One of the best hands I have ever used. With that said, it helped me tackle the rear floor pan. The entire rear floor pan did not really need to come out....just the rear pass side needed some patching, but once I was able to visually see how much rot was there, I decided to pull the entire rear pan and fix the rust since I had the parts. The rear floor pan brace was the worst part. There was alot of rot on the inner rocker panel as well, so I addressed that too. Installed the new pan and rear brace.....looks damn good if I say so myself. Pictures really don't do this justice as there is so much underneath that you can't see, but here are the pix anyway...... 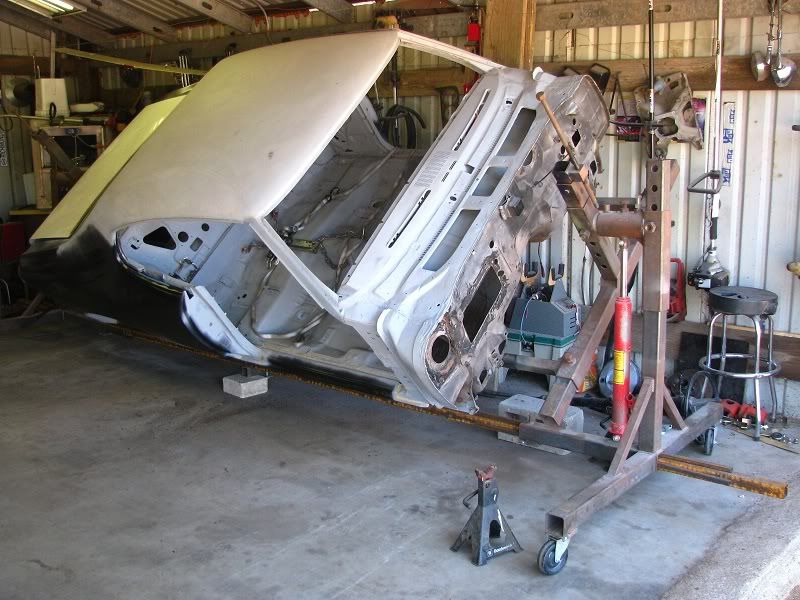  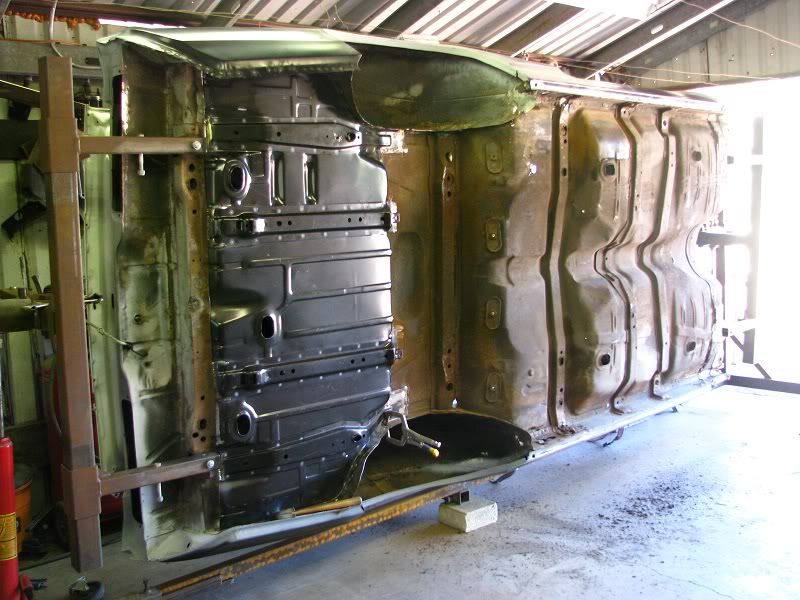 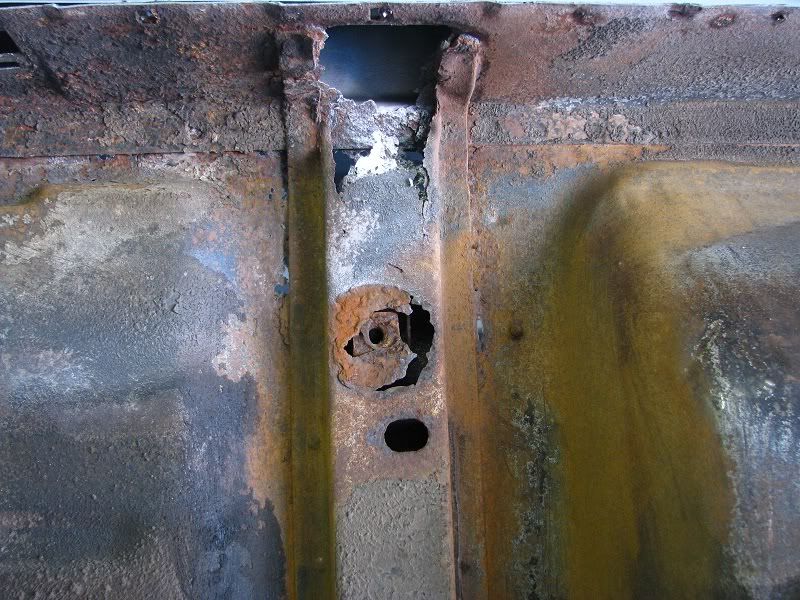 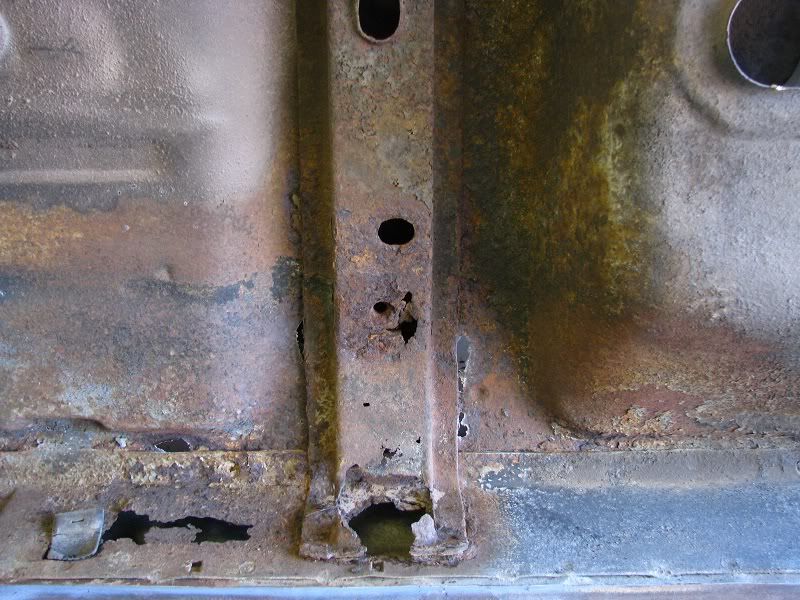 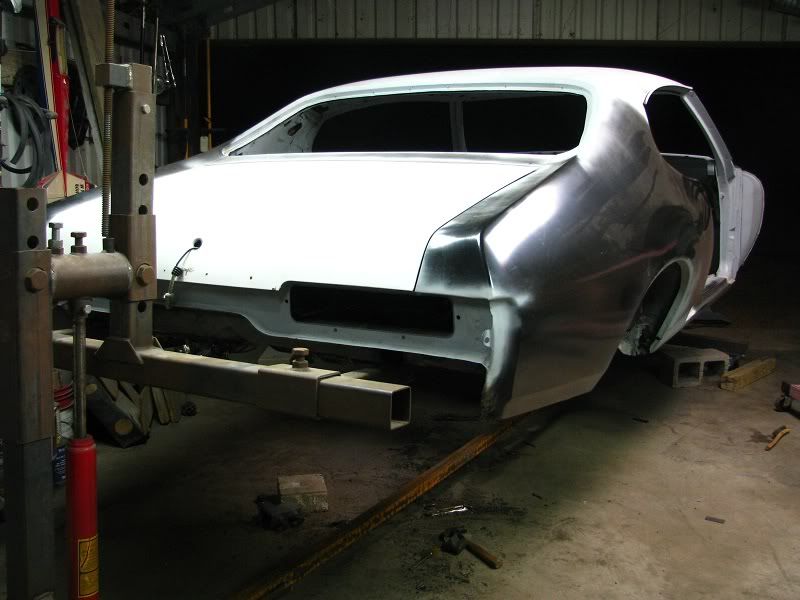 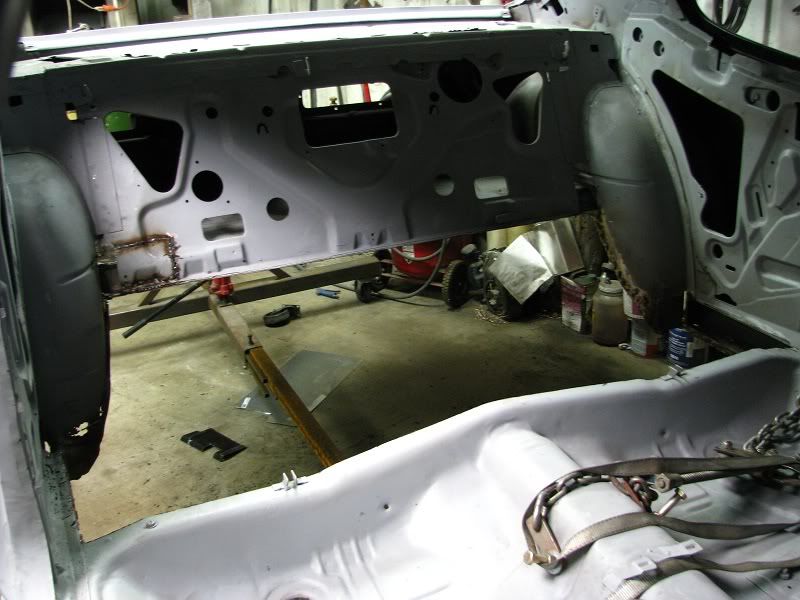 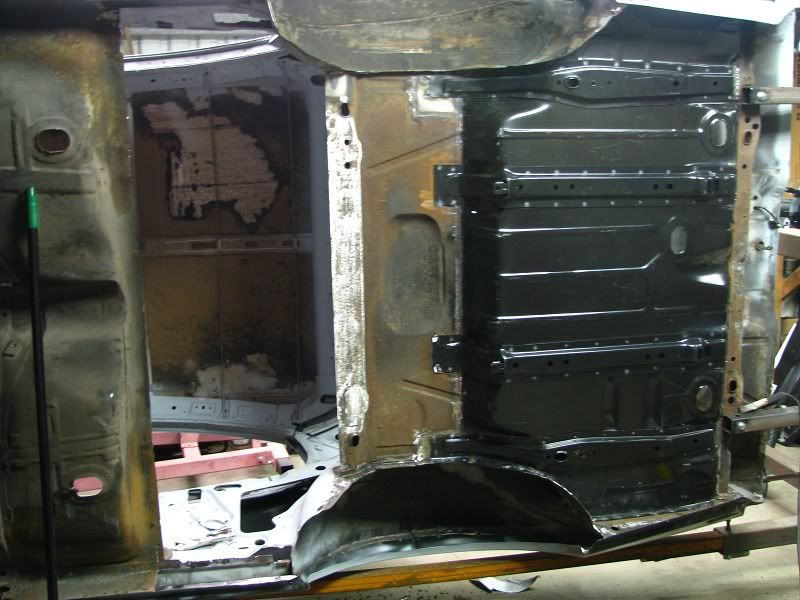 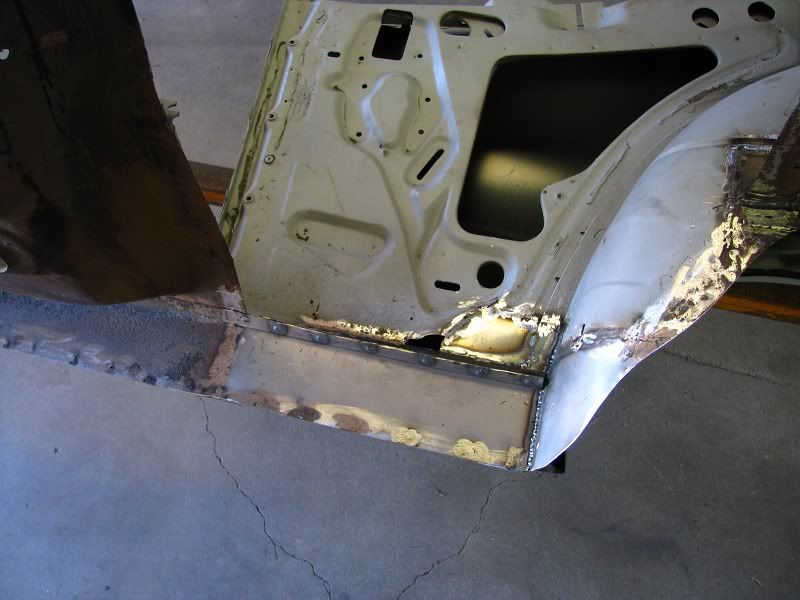 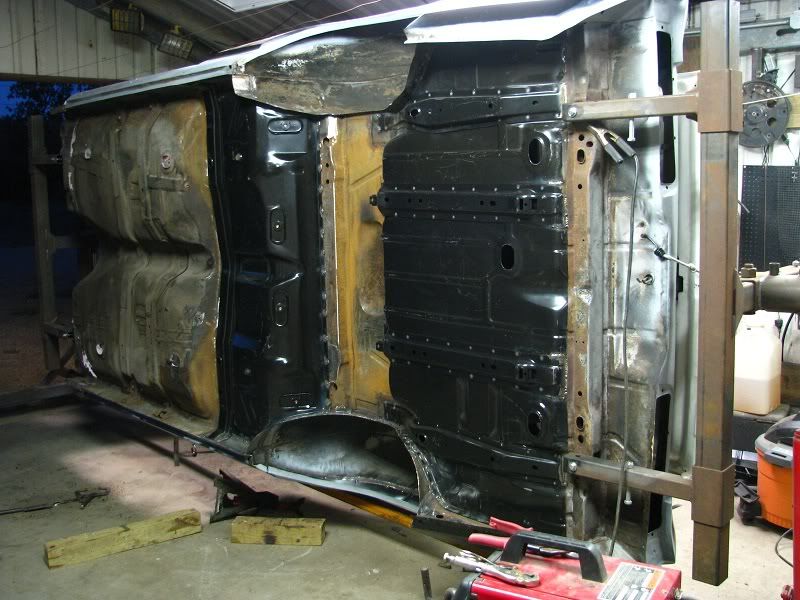 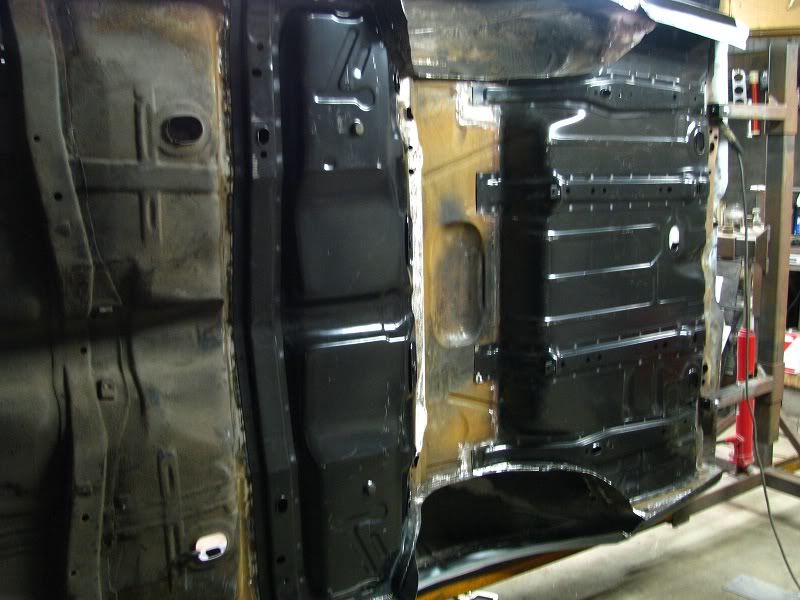 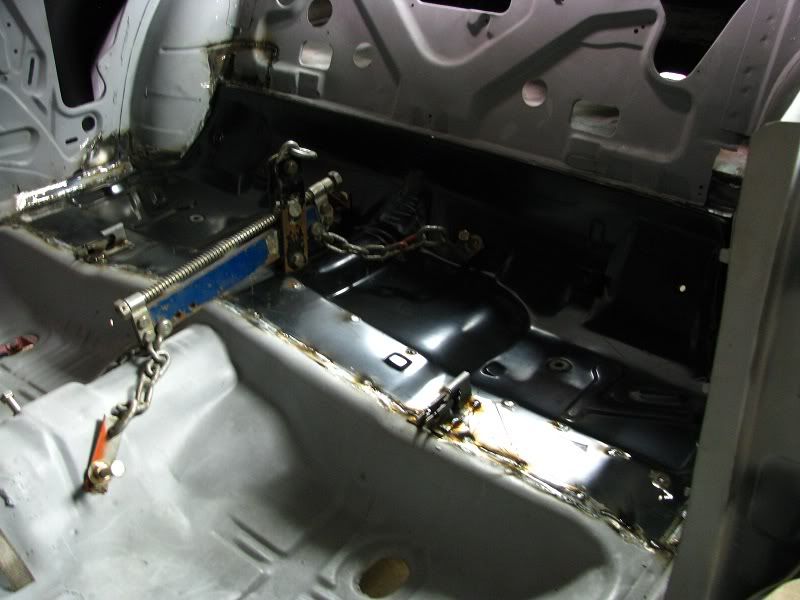 More to come....... |
|
#46
09-09-2012, 01:53 AM
|
|||
|
|||
|
Ok, it's been one hellova long week. Working 12 hour days and then working 4~5 hours on this car per night can really wear a guy out. Regardless, I made alot of progress. I'm thinking I got about 98% of all the rust removed from this car. The other 2% is basic normal surface rust here and there. I managed to get the rear floor pan done as noted in my last update, but this week I got both front floor pan patches done. Those 2 were the single easiest things to do on this car so far. The rotisserie made it a breeze.
Once all/most of the metal work was done, I spent the next few evenings scraping and grinding off all the grease, grime, road dirt, sticky asphalt someone drove thru at one point, and surface rust and anything on the belly of the car so I could get it ready for a nice coat of POR-15. Once that was done I had to clean all surfaces with thinner/alcohol, then went over all body seams inside and out with 3M seam sealer, then laid down 2 nice thick coats of rust preventative (POR-15).....man it looks great! 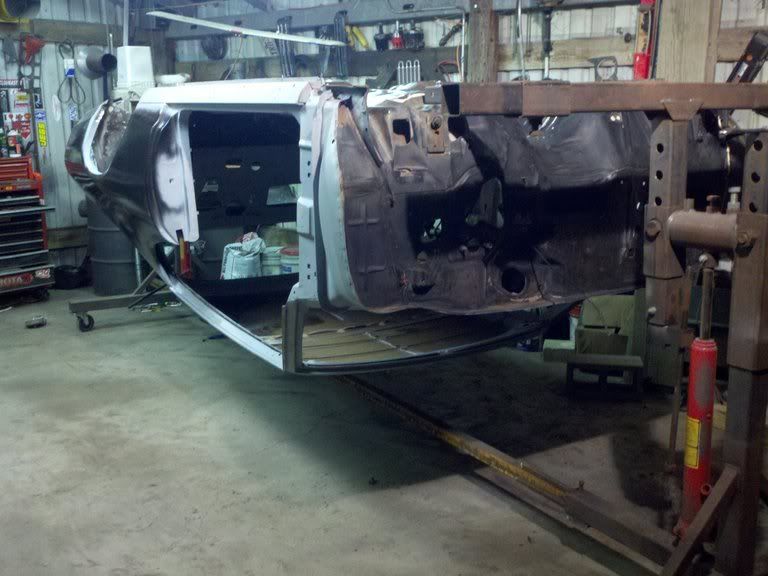 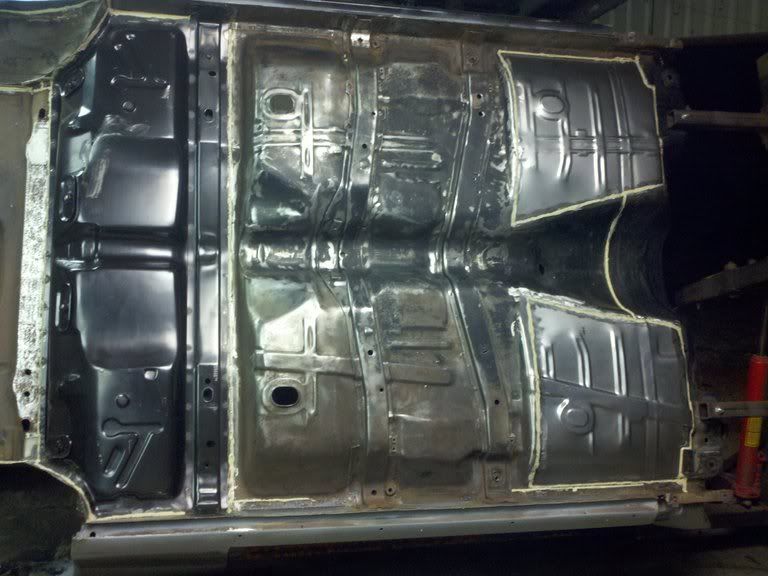 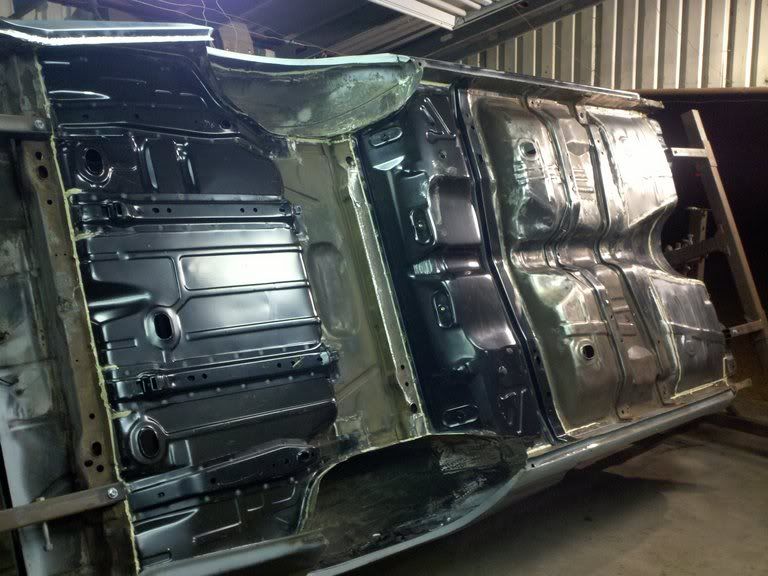 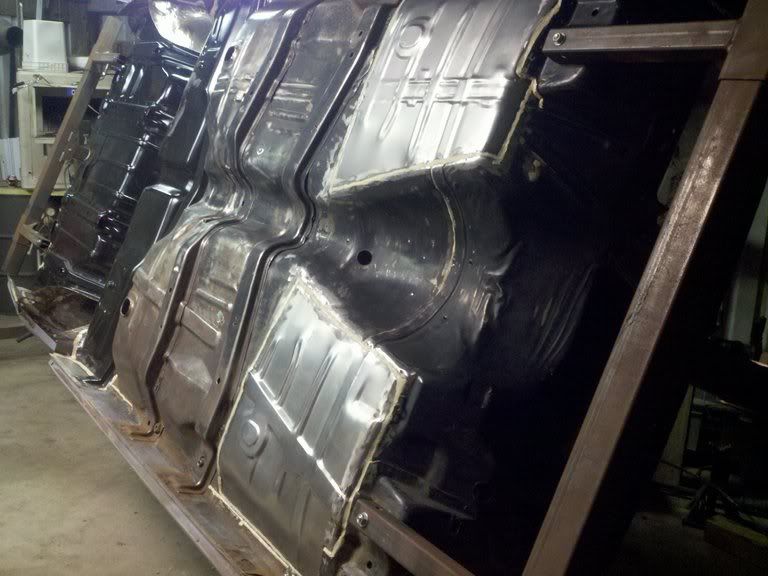 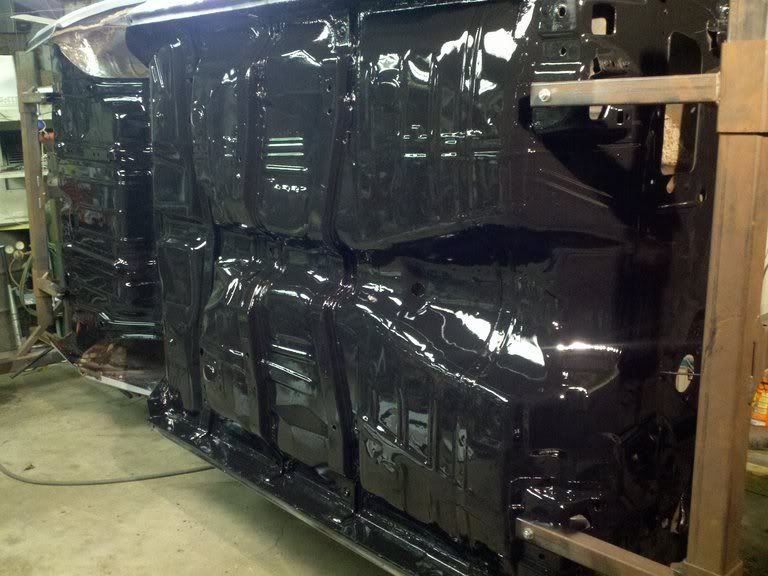 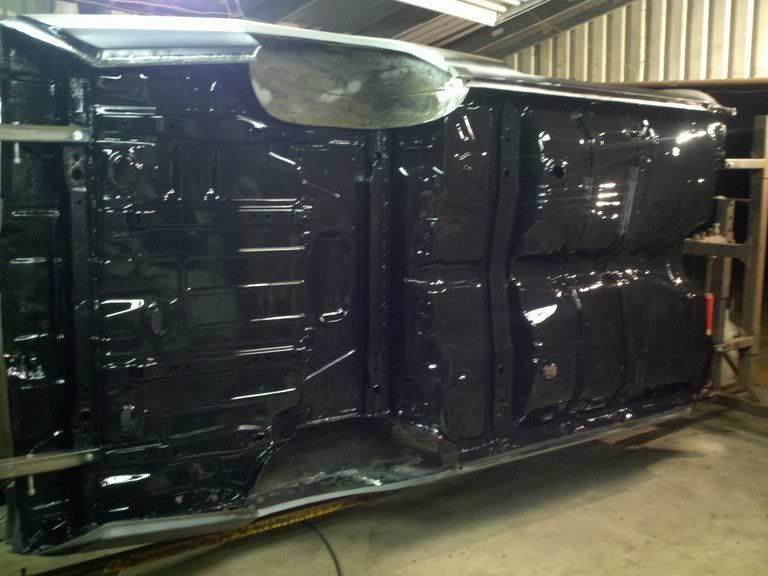 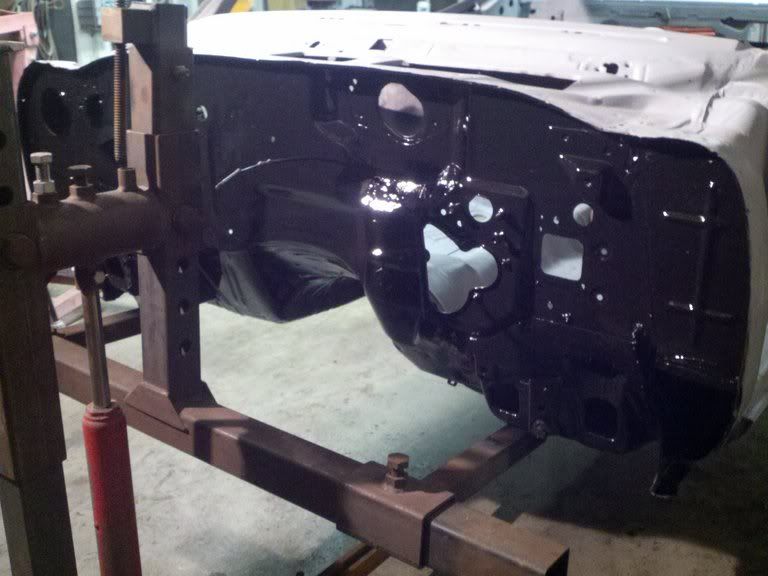 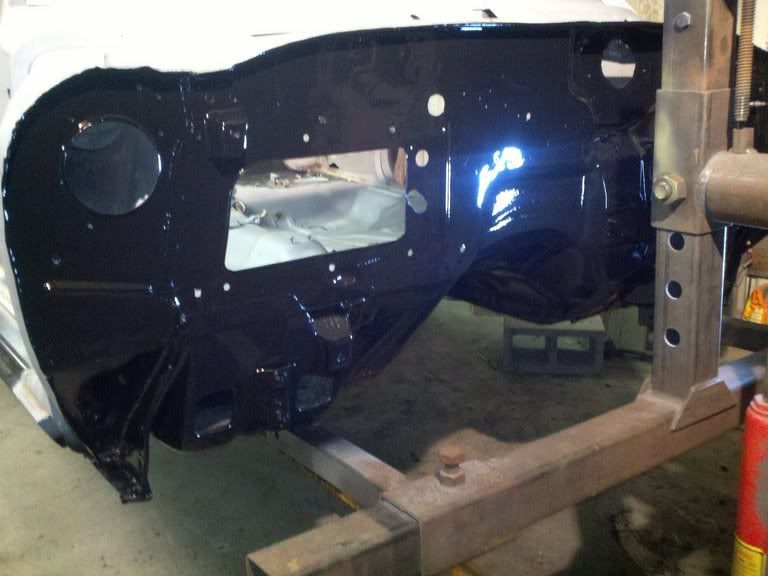 
|
|
#47
09-09-2012, 04:10 AM
|
||||
|
||||
|
It's unbelievable how fast you are tearing through that car. It's looks great! Looking forward to future updates.
__________________
Ken '68 GTO - Ram Air II 464 - 236/242 roller - 9.5 TSP converter - 3.55 posi (build thread | walk around) '95 Comp T/A #6 M6 - bone stock (pics) |
|
#48
09-09-2012, 12:15 PM
|
||||
|
||||
|
I agree with Ken, man, what am awesome job and you are really kicking butt getting through it! Looking forward to seeing you go through this and hearing your dads reaction when you are done.
Thats a really great thing to do for your Father! Good luck with the rest of the project. Dennis
__________________
The beatings will continue unless morale improves. 69' Judge R/A III 4-speed, Mayfair Maize/black interior. |
|
#49
09-17-2012, 12:50 AM
|
|||
|
|||
|
Quote:
Quote:
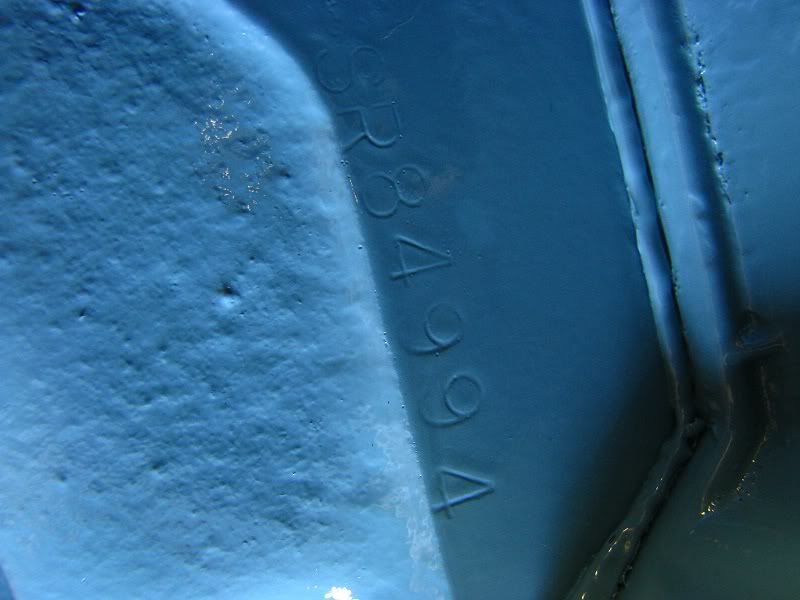
Ok gents, a small update. Got some good progress done this week. Once I got the belly of the Goat POR15'd, I got er off the rotisserie, set her down on the floor and commenced work on the chassis. The ole frame was in pretty good shape other than a couple places where the body mounts....found some rust issues there, but it was a very quick fix. Spent a few days pulling things apart and scraping any dirt/grease off the frame and getting ready for more POR15. I didn't take any before pics, but I did manage to get a few after's. Once done, the body went on the frame with all new bushings, bolts and washers. Also, today I spent the day cleaning up the ole 400. I prolly would have left it alone, but the previous owner painted it FORD blue. I honestly wanted the throw up when I looked at it, so I had to make the change....and I'm glad I did. She's gonna look great!!! 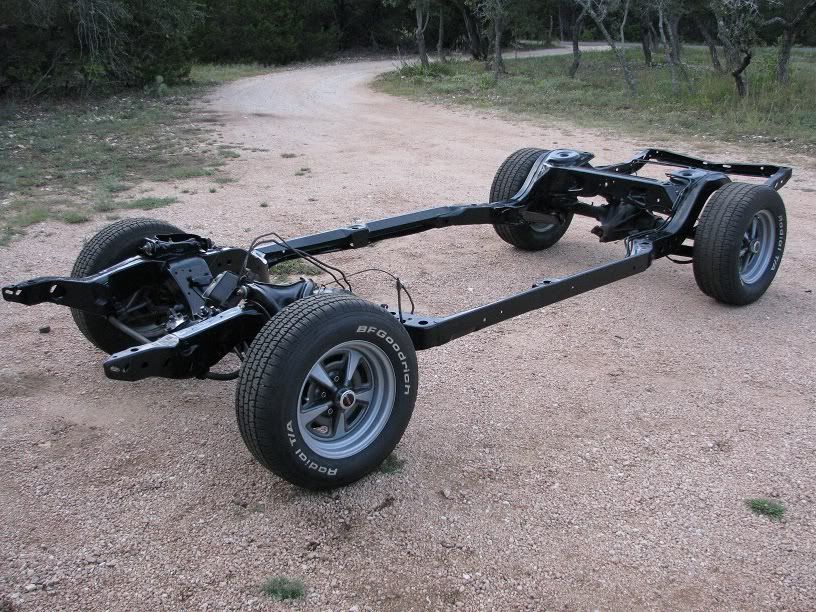 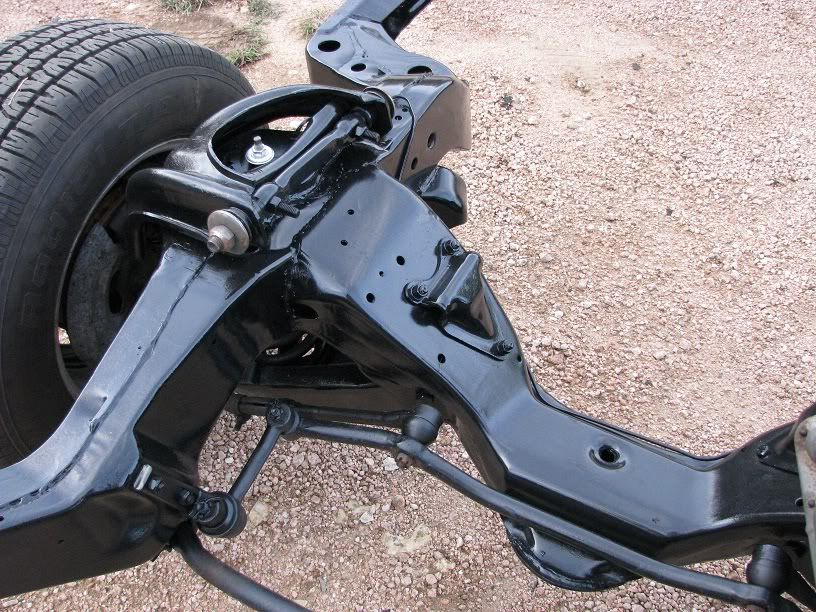  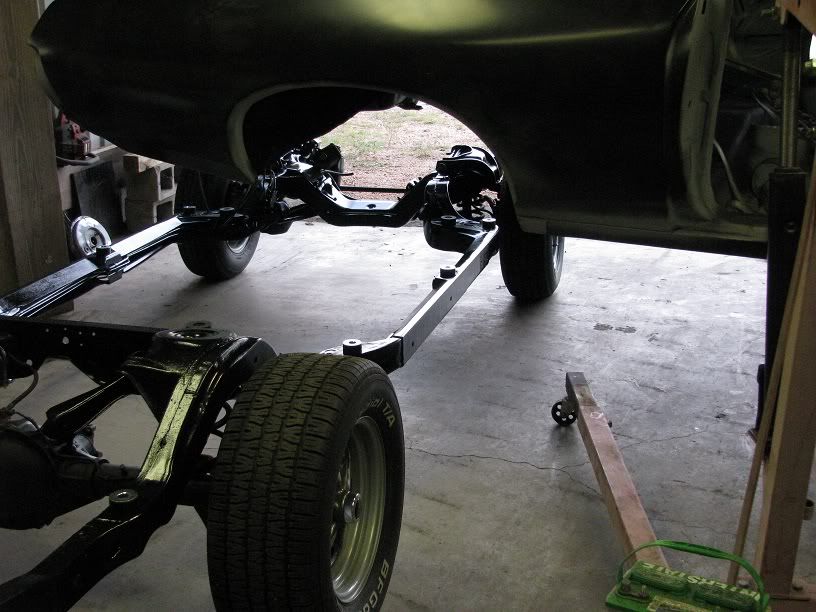 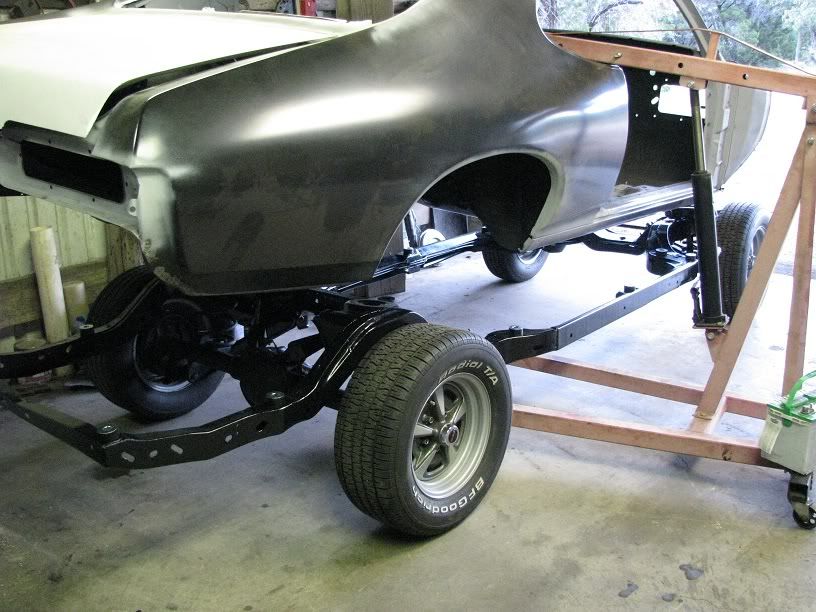 Sadly, I did not get any pics of the body on the frame...my batteries croaked and when I got new ones, I forgot to snap a few. I'll get to that later I'm sure. Motor before with FORD BLUE  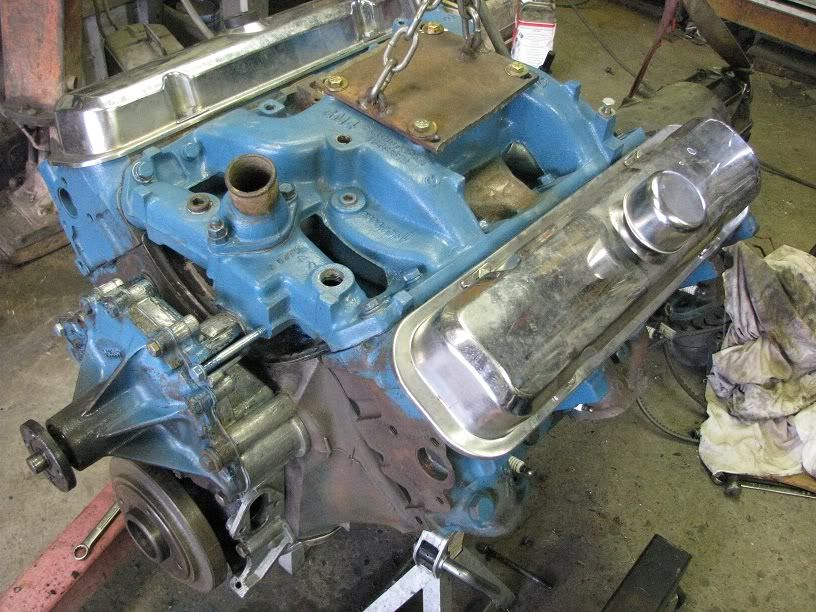 About 8 hours later... 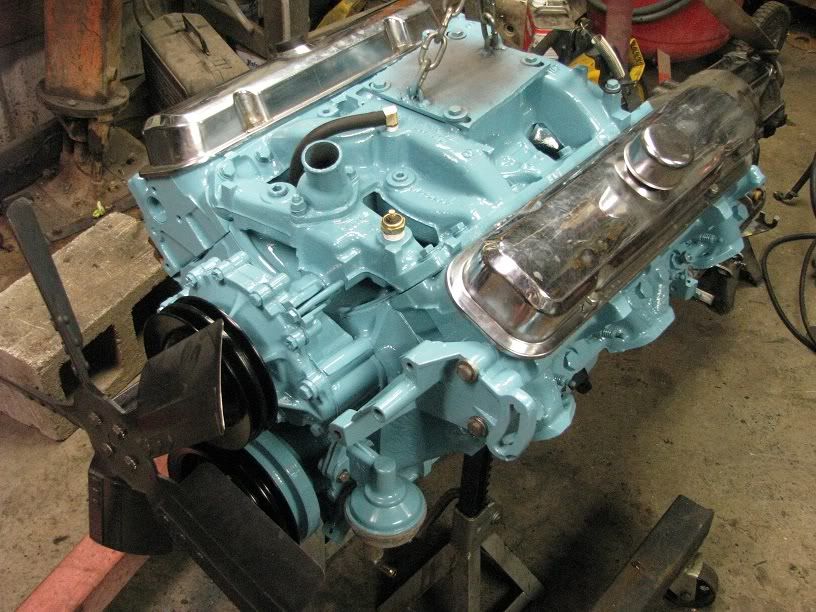 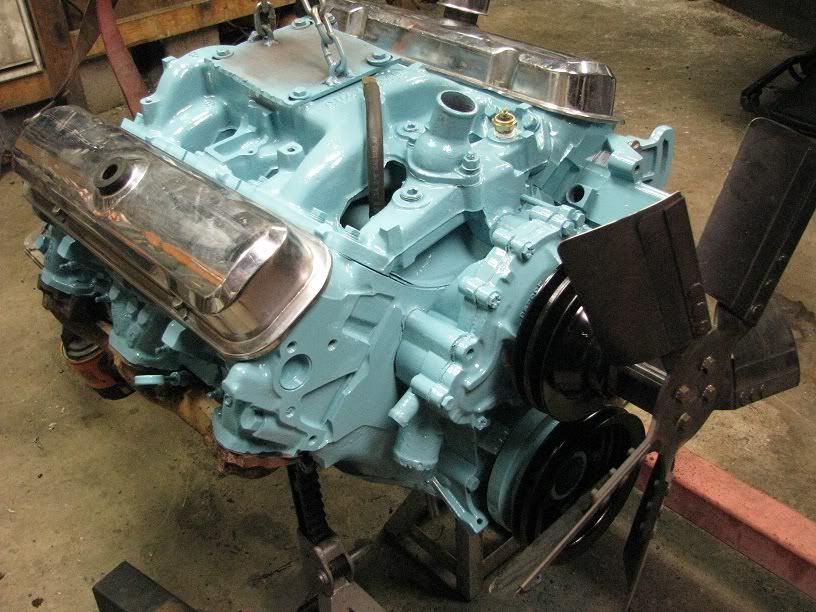 On a side note, I found the transmission in this car is the born with trans. Found the numbers on the pass side of the trans.... 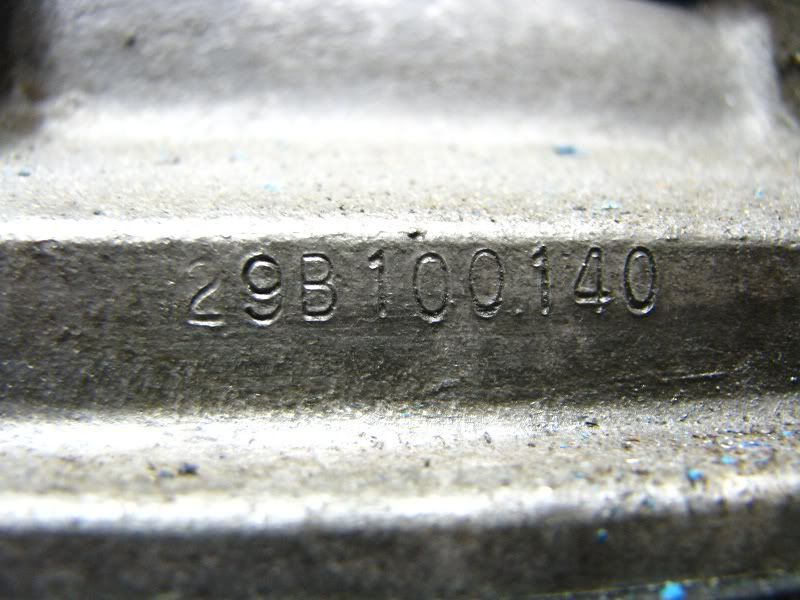 Which match the VIN#.... 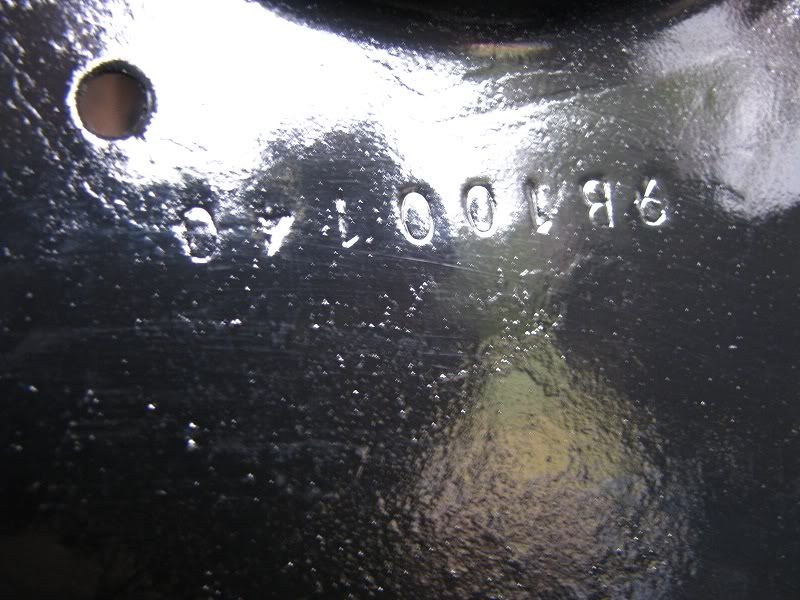 Sadly, the engine is not numbers matching. Sux, but at least I have a good running mill. Not real sure of how to decipher what year it is or what it came out of. I took a pic of every casting number/stamp on it, can someone help me? Also, found this on the rear left outside of the frame....  I was not able to locate a VIN# stamped on the top of the frame anywhere in this location. Seems I read that not all frames were stamped??? I'm absolutely sure the frame is original since, #1, it looked like the body had never been off the frame, and #2, the frame dates (July 22nd of 1968) seems to be the appropriate date to the VIN# of the car (oo140)....very early build number. Cool stuff. Anyway, like always, more to come! Thanks for checkin' my old junk out! ~Joe Last edited by Kokamo; 09-17-2012 at 12:56 AM. |
|
#50
09-17-2012, 02:07 AM
|
|||
|
|||
|
Isn't that engine color a '72 up color? '69s are supposed to be silver blue.
|
|
#51
09-17-2012, 10:31 AM
|
||||
|
||||
|
Yeah, that's either the earlier or later model light blue. Looks great though.
My partial VIN is on top of the left frame rail, right behind the point it starts to curve up over the axle. What is that inverted VIN in the photo above stamped on? As for the engine numbers, the important ones are the date code cast near the distributor hole, the large engine casting number cast on the passenger side along the edge where it mounts to the transmission (right below the head) and the two letter stamping right below the passenger side head on the front of the engine. Also, the VIN stamped on the engine block is usually stamped (very lightly) vertically along the edge of the timing gear cover right beneath the water pump lower inlet hose.
__________________
Greg Reid Palmetto, Georgia |
|
#52
09-17-2012, 12:10 PM
|
|||
|
|||
|
Quote:
Quote:
Sorry about not knowing about Poncho motors. I've been a Chebby guys all my life and I'm accustom to how those numbers work. Now that I look at it, I see a stamp revision/correction on this block and it threw me off. At the time I was not aware that I was looking at the block casting number..... 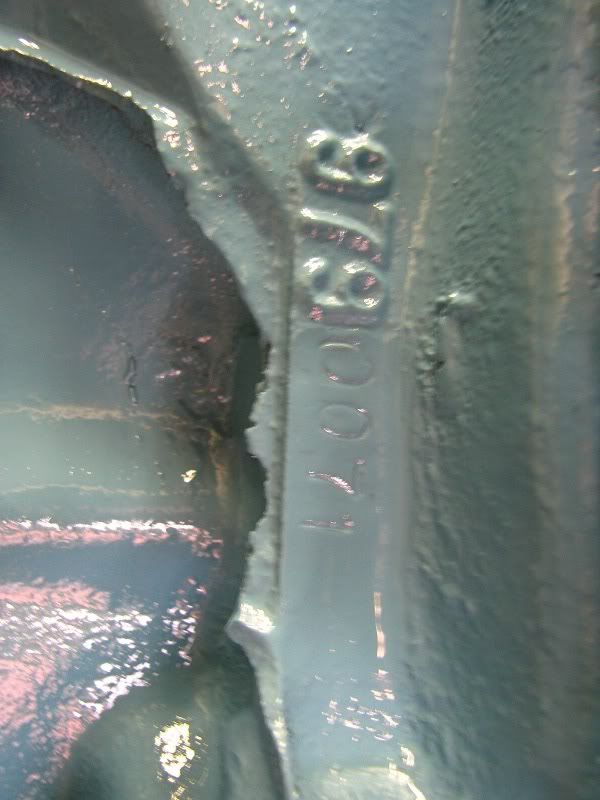 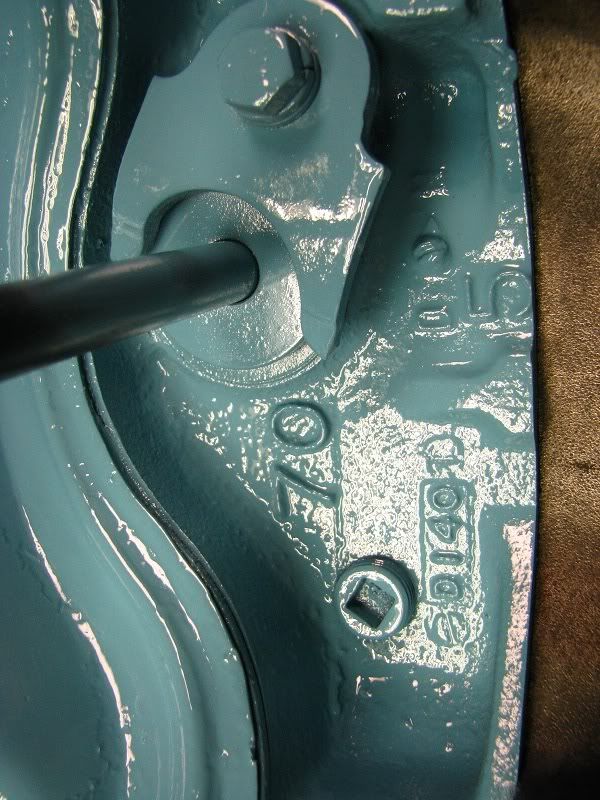
|
|
#53
09-17-2012, 04:05 PM
|
||||
|
||||
|
If you like the color, I say go with it. Actually, I've always very slightly preferred the duck egg blue color to the metallic....although the metallic is mighty fine too...
As for the VIN on the frame rail....could be that some didn't get it...Just like my car didn't get the VIN on the firewall...I can't say with any authority. and as for engine numbers... looking at that number by the distributor...it's pretty clear that it's a '70 model.....but that block casting is kinda weird. I can't find it for '70...Just '68 and '69. That's not a 4-bolt main engine or anything like that is it? What is the two letter code on the front of the engine?
__________________
Greg Reid Palmetto, Georgia |
|
#54
09-17-2012, 07:35 PM
|
|||
|
|||
|
Kokamo, thats a PMD Service Replacement (SR) Block.
Cast on April 14 1970. They grind the casting numbers as needed and stamp whatever remaining part of the appropriate casting number is needed. This block would have been casted as 9799914 most likely. It is a "correct" SR for a 1968 or 1969 2bolt main 400 CID. One of the next best things to have if its not the #'s matching block anymore. Usually they have SR stamped on passenger front face, and a 4 or 5 digit number. Instead of an application code like WS WT YS or YZ. SR's usually don't have the VIN stamped in them anywhere. With any luck maybe it still has the original heads and intake in place. The ID number on heads is on the center exhaust ports - like these #62's. Heads will have a date code that resembles the style/format of the D140 like on your block date code. Intake date code is next to thermostat housing. Let us know what all you discover on the parts, or post pix if in question. Good Luck |
|
#55
09-17-2012, 08:18 PM
|
||||
|
||||
|
Great build !! The work and time frame your running is amazing.
Just my .02, change the engine color.
__________________
Send it! Its going home on a trailer. |
|
#56
09-18-2012, 12:34 AM
|
|||
|
|||
|
Quote:
Quote:
 And you sir are right on the money! It is in fact an "SR" block. I never paid attention to it as at first glance I thought it was a "58". Now what does the other numbers mean? lolz. On that same note, now I recall the PO I bought it from telling me about a factory replacement engine. I was blowing it off as selling jargon, but now I know it was in fact true. So from looking at all the dates in the pics below, they are all correct for an early build 69 Goat. One question....I think I have a motor that has 2 different heads on it. The left side has a #62 head (July17/68) and the right side has a #16 head (July08/68). Date codes are 9 days apart, but I'm not so sure #16 and #62 heads are the same (I did not take them apart) Quote:
Some date pics. All seem to be within the correct time frame of an early build 69 (low VIN# or 140, first day of production)....... Intake (May27/68) 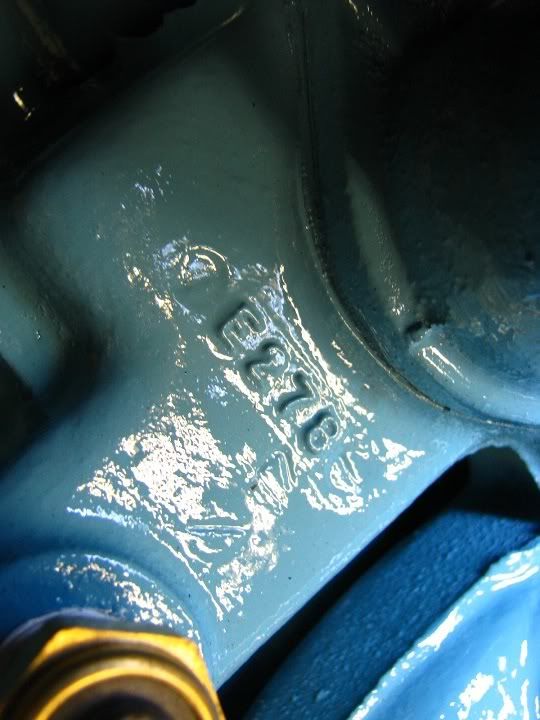 Right exh manifold (July17/68) 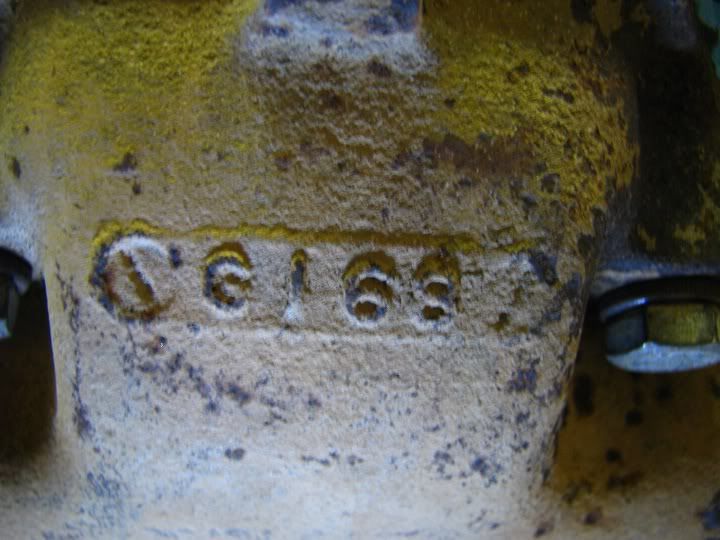 Left exh manifold (July01/68) 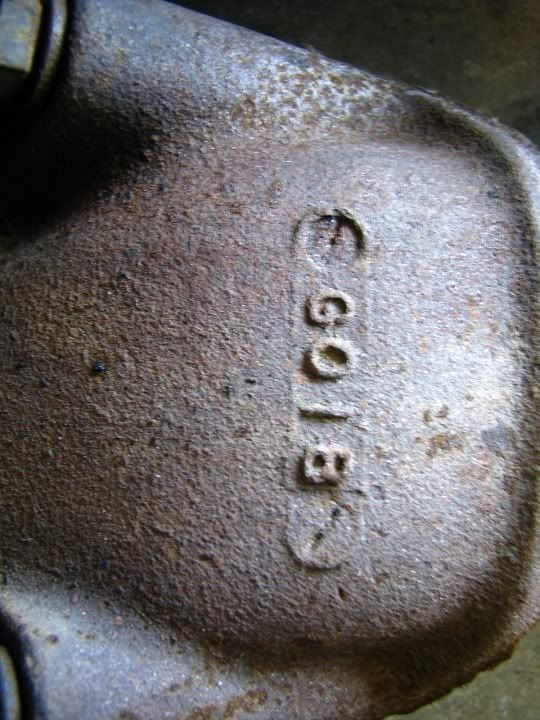 Water pump (April10/68)?.... 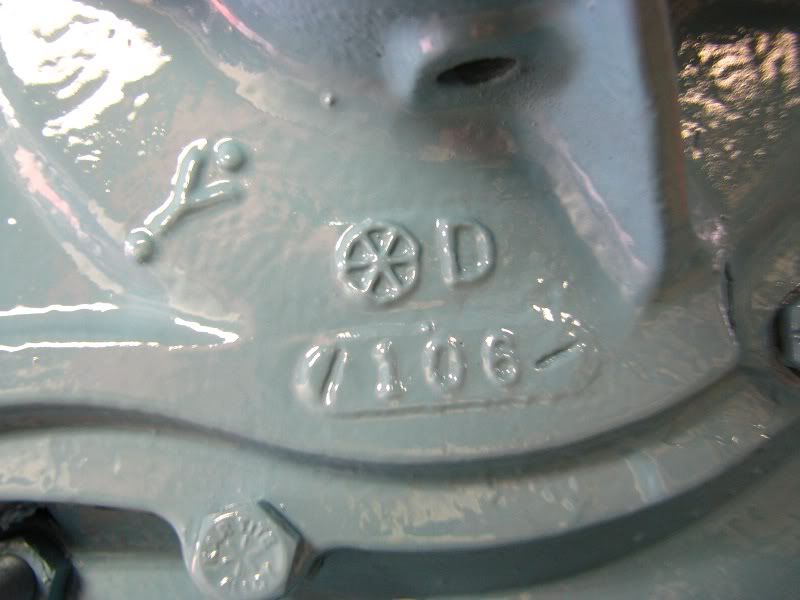 "SR" block #.....
|
|
#57
09-18-2012, 03:08 AM
|
||||
|
||||
|
I like it. The 'correct' SR block gives it character....or maybe provenance is a better word?
__________________
Greg Reid Palmetto, Georgia |
|
#58
09-18-2012, 07:33 AM
|
||||
|
||||
|
I'm loving this story - keep up the great work, looking forward to the unveiling!
__________________
Some guys they just give up living And start dying little by little, piece by piece, Some guys come home from work and wash up, And go racin' in the street. Bruce Springsteen - Racing In The Street - 1978 |
|
#59
09-18-2012, 02:43 PM
|
|||
|
|||
|
It might be my weak internet, but can only see the intake and water pump pics.
Water pump is more than likely an aftermarket replacement. GM Wpump will have a 7 or 8 digit part number, and a similar/familiar date code jargon. A 4bolt main would have been stamped 9792506 for 68-69 SR. 9799915 for 70 SR. It still "might" be drilled and tapped for 4bolt, with 2bolt caps installed. A lot of 70 blocks were done that way. 16 head is for 1968 performance 400 D-Port engines across the board, except RamAir 1. It "might" have also been "Service Replaced" when the block was done. The late date coincides with "what could have been" SR casting batch at end of run ... Amongst other possibilities ... Doubtful it came off the line with 2 different heads from factory ,,, not totally impossible ,,, but 99.979 % unlikely. 16 = 72cc chamber 62 = 75cc chamber wouldn't touch it until there was just nothing left to play with - if ever, even. Possible they shaved/surfaced the 62 head at time of repairs to make it "match" the 16 replacement head. 62 is the correct head for an Automatic YS 350hp GTO. (along with other apps too) What is the body build date on your cowl/trim tag ? This example is 1B = January, second week Yours might be 8C or 9B or something like that. If there are any numbers stamped into face near about the SR stamp - they usually correlate with an ID tag such as this one - tagged 7856 Last edited by Baron Von Zeppelin; 09-18-2012 at 02:48 PM. |
|
#60
09-18-2012, 07:28 PM
|
|||
|
|||
|
The other pics started working for me.
I "think" the Intake is dated too early for a mass produced engine like a 69 YS. Its still well within 68 production timeframe. What is the casting part number on the intake ? The heads will have their own date codes - like in this picture. I mistook your listed dates as being the heads, instead of manifolds. oops Some of the dates might start synching into groups once we get the right date codes from the heads, and the build date from the trim tag. Carb should be a 7028262 None of this is crucial, its just tidbits of factoids/data if you're interested. Very Righteous project you're doing ! |
| Reply |
|
|
The PY Online Forums is the largest online gathering of Pontiac enthusiasts anywhere in the world. Founded in 1991, it was also the first online forum for people to gather and talk about their Pontiacs. Since then, it has become the mecca of Pontiac technical data and knowledge that no other place can surpass.


 Linear Mode

