


| FAQ |
| Members List |
| Social Groups |
| Calendar |
| Search |
| Today's Posts |
|
#1141
 05-09-2010, 08:53 PM
|
||||
|
||||

Steve,
In one of your pictures I noted you didn’t have the metal bracket that holds the wiring harness at the top left bellhousing bolt. The wires that run down to the transmission and have clip taped to the wires. I have a extra bracket if you need it? If so PM your address and I’m mail it to you. Pat  
|
|
#1142
05-11-2010, 07:42 PM
|
||||
|
||||
|
I just didn't like how the repro vinyl welting was fitting and looking on the front flares, especially around the curve under the fender edge. So I ended up cleaning and painting the original welting for the fronts. The rear flares' welting was too damaged to re-use.
(Anybody have a nice original pair of rear welting?) Why can't anyone reproduce the welting in the correct original material - it was a flexible, rubbery, latex-like material molded in color, - almost the same material as refrigerator door seals and not a hard, grey plastic/vinyl.  
|
|
#1143
05-11-2010, 08:00 PM
|
||||
|
||||
|
Steve that welting fits as well as any I have seen....
|
|
#1144
05-11-2010, 08:04 PM
|
||||
|
||||
|
Quote:

|
|
#1145
05-11-2010, 10:03 PM
|
||||
|
||||
|
To avoid any confusion, the photos I posted above are the "after" photos, after I removed the repro vinyl welting and installed the repainted, original, 38 year old, welting.
|
|
#1146
05-22-2010, 10:12 PM
|
||||
|
||||
|
Thanks to a tip from Keepat and his resto thread, I installed the correct temp sender wire retainer. I found some extra brackets in that box of free 72 T/A stuff I got a month ago. I also located an original one of the special black straps in my toolbox drawer (I never throw anything away...ever). I installed those four original valve cover bolts I got in that free box of parts, too.

Last edited by njsteve; 05-22-2010 at 10:25 PM. |
|
#1147
05-22-2010, 10:55 PM
|
||||
|
||||
|
The beak is finally in paint:
 
|
|
#1148
05-26-2010, 07:54 PM
|
||||
|
||||
|
Hood finaaly in paint and awaiting wetsanding:
  
|
|
#1149
05-27-2010, 01:59 AM
|
|||
|
|||
|
hmmm mid-year vette with bird nose and TA hood ...interesting project steve ))
going sweet, goign to have to commission you to finish of my fugly thug. |
|
#1150
05-29-2010, 05:12 PM
|
||||
|
||||
|
Picked up the beak today and installed it. The 70-72's are pretty easy. The 73's are the hard ones since they have a ton (literallly) or extra 5 mph impact bracing inside the nose.
I just attached the little bracket do-hickies to the inside of the nose and then hung it in place with the bolts. The beak lined right up. I guess all that playing and realigning of the fenders a few months back, worked out well. The real trick is to have the car jacked up by two floor jacks under the rear of the subframe. You want the front wheels to be off the ground and hanging. This way the front of the car is warping down. You attach the urethane nose, line it up and bolt it down. Then when you let the car off the jacks, it pulls the urethane nose closer to the fenders. If you try to attach the urethane nose while the car is on the ground, it tends to leave a gap between the fender edges and the nose. I then took her for a ride around town. Definitely have to get used to these low revving Pontiacs. They don't seem to rev up very fast but they do have a ton-o-power! It was fun to see the shaker working, too, when you stomp the gas pedal.   
|
|
#1151
05-29-2010, 06:25 PM
|
||||
|
||||

Looks great Steve! It's almost done and only a few years late. LOL
__________________
Bob Woodard Brighton, MI 2012 SRT8 Charger - 12.70 @ 111mph |
|
#1152
05-29-2010, 08:14 PM
|
||||
|
||||
|
Looks like you need to talk to Norwood about that Hood Latch?
|
|
#1153
05-29-2010, 08:54 PM
|
||||
|
||||
|
The latch is correctly plated just not as professionally done as Norwood does. He is the man of a thousand plated parts! :-)
|
|
#1154
05-29-2010, 09:01 PM
|
||||
|
||||
|
My latest connundrum will be getting the front spoiler installed. Once the valance is bolted up, how do you put the front spoiler on, since both ends of the spoiler have about 3 inches that interlock with the hollow portion of the flares. Logic would dictate that you remove one of the flares and slide the spoiler in, and then reinstall the flare.
The problem arises when you try to remove or reinstall the flares as you have to be able to access the two large bolts that go in from the inside of the fender, into the flare. With the valance on, you cant access the front bolt. It's like a Catch-22 situation. I was thinking about removing the bottom fender-to-radiator support bolts and pulling the bottoms of the fenders apart to slide the spoiler in, but they dont move more than an inch or so. Any suggestions from you Wil-E-Coyote super-geniuses out there? :-) |
|
#1155
05-29-2010, 09:08 PM
|
||||
|
||||
|
Connundrum #2 is the fact that Stencils & Stripes no longer sells the hood portion of the stripe kit. I think that is pretty much the politically correct way to describe the fact that since August of 2009 I have been calling, emailing, and dealing with the owner who has not been able to get his supplier to make up the hood decals no matter what he tried. I feel sorry for the guy because he is a very nice person and attentive to his customers but when you can't get a product for 9 months you need to take it off of your catalog/website as as stocked item.
So does anyone have an NOS hood stripe section they want to sell? |
|
#1156
05-29-2010, 09:50 PM
|
||||
|
||||
|
Quote:
I had no problem with access to the front wheel spoiler bolts. The lower bolts you can get through the turn signal and the top bolt from the top with the battery out. Pat |
|
#1157
05-29-2010, 09:54 PM
|
||||
|
||||
|
Thanks!
See, I knew someone smarter than me would have the answer! |
|
#1158
05-31-2010, 08:21 AM
|
||||
|
||||
|
Quote:
__________________
http://www.starspangledbannerchallenge.com/ |
|
#1159
05-31-2010, 09:33 AM
|
||||
|
||||
|
Steve, Sorry to here about the probs with S&S, Must be all the 70-72 stripe bussness I pushed his way. I have been told that PG has corrected thier already correct ( in there opinion) white stripe, don't know about the blue. This might have to be an option.
I think you really need to detail that latch..... 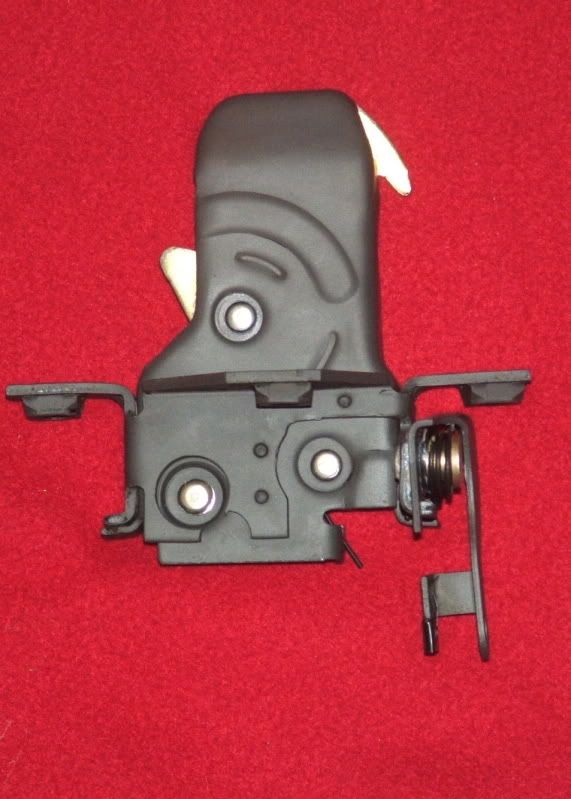
|
|
#1160
06-02-2010, 10:20 PM
|
||||
|
||||
|
Does anyone have the correct dimensions for the hood stripe section? I know the roof section is supposed to be 18-1/4 wide, but isn't the hood tapered differently?
Stencils and Stripes is refunding my money for the "partial" stripe kit they sold me 9 months ago. It is unlikely that they will ever get the hood stripe since they cant get their manufacturer for the stripes to make them any more. So if anyone was considering using their kit, they may want to rethink it. One of the members here indicated he has a hood section stripe with "Scotchcal Marking Film 3M" backing paper that he got from Year One in 2006 and it is 16-1/2 inches wide. Neither of us know if that means it is a correct original, or a correct repro or an early incorrect Phoenix version? Any input would be appreciated. Has anyone ordered a recent kit from Phoenix Graphics lately? Have they improved since Norwood's bad experience from several years ago? Last edited by njsteve; 06-02-2010 at 10:31 PM. |
| Reply |
|
|
The PY Online Forums is the largest online gathering of Pontiac enthusiasts anywhere in the world. Founded in 1991, it was also the first online forum for people to gather and talk about their Pontiacs. Since then, it has become the mecca of Pontiac technical data and knowledge that no other place can surpass.




 Linear Mode

