


| FAQ |
| Members List |
| Social Groups |
| Calendar |
| Search |
| Today's Posts |
|
#201
 05-25-2012, 11:58 PM
|
||||
|
||||

Nice job...very clean underneath!
__________________
Regards, Leigh Pontiacs I’ve owned…. 1960 Laurentian 283 1963 Laurentian 283 1976 Trans Am 400 1977 Trans Am 400 1951 Chieftain Flat head 6 1967 Firebird 400 convertible 1967 Firebird 400 coupe 1979 Trans Am 403 1971 Formula 455 (clone) 1969 Firebird 350 1968 Firebird 428 manual. Sydney, Australia |
|
#202
05-26-2012, 10:25 AM
|
||||
|
||||
|
Quote:
Nice work - car looks mostly very clean.
__________________
keith k 70 Trans Am RA III / T400 / Lucerne Blue / Bright Blue 70 Trans Am RA III / M20 / Lucerne Blue / Sandalwood 70 Formula RA III / M21 / Lucerne Blue / Bright Blue |
|
#203
05-26-2012, 10:42 AM
|
||||
|
||||
|
That car is SICK........If I drive over how much to do the bottom of my undercoated back in 76 car. I really would like to see what mine looks like under that coating, but I'm just to damn old to tackle that one.
|
|
#204
05-26-2012, 09:43 PM
|
||||
|
||||
|
Today I tackled the trunk area. This car was Ziebart rustproofed back when it was new and that stuff is nearly impossible to remove. Solvents just smear it. It's almost like roofing tar and it's about 1/8" thick. A different, and thicker, but equally adhesive version was over-applied later, on the GM replacement quarters and tail panel that were replaced in the 1980s. The hot water seemed to work but VERY slowly. Like around 5 seconds of close up blasting to remove one square inch. It was mind-numbing and carpel tunnel initiating to say the least.
Here's the before shots:   
|
|
#205
05-26-2012, 09:45 PM
|
||||
|
||||
|
And after about 6 hours of blasting.
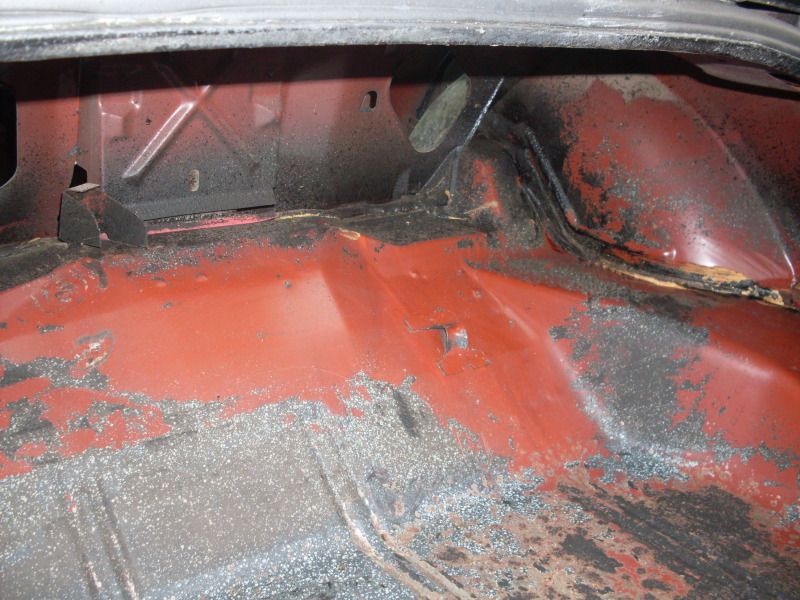    I tried to save as much of the original splatter paint but in some spots it came off very eaily while in other areas, it was hard as rock. The Ziebart stuff worked as the only rust I found in the trunk floor were the four tiny pinholes in the lower right of this photo to the left of the drain plug. The rest of the dark areas are due to the surface not being completely dried off yet. 
|
|
#206
05-26-2012, 09:48 PM
|
||||
|
||||
|
Quote:
|
|
#207
05-26-2012, 09:50 PM
|
||||
|
||||
|
When I was done with the trunk I spent an hour or so with a rag soaked in a little diesel fuel to clean off the reside on the underside of the floor pans. Here's what they looked like with a little elbow grease appled:
 
|
|
#208
05-26-2012, 10:05 PM
|
||||
|
||||
|
In looking at the frame rail damage/rust it doesn't appear to be as bad as I initially thought. (I hope).
The undersides of the lowest portion of the rear rails by the front leaf spring pocket both have the outer layer corroded on the bottom and sides. It is also evident on both inner and outer sides of that area, next to the E-brake cable. There are three separate panels that sandwich together at that point and it looks like just the outer one held the crud and rusted, as this is the lowest point on the rail (lower than the drainage hole unfortunately). It also didn't help matters that the delivery truck driver used that spot as the hold down for his cargo chains.  Pass side:  Driver's side: 
|
|
#209
05-26-2012, 10:06 PM
|
||||
|
||||
|
The other rail problem was in the rear where the aftermarket exhaust had all it's weight on the tailpipe hangers after the crummy, universal hangers that were sheetmetal screwed into the rear bulkhead, ripped out. It appears that the reinforcement section of both rails were not properly tack welded in originally, as the pass side area pulled away and cracked the frame under the panel.
Pass side:  Driver's side: 
Last edited by njsteve; 05-26-2012 at 10:26 PM. |
|
#210
05-26-2012, 10:10 PM
|
||||
|
||||
|
And the solution:
I bought a pair of the new reproduction frame rails to use for donor sections.   I also bought a set of the repro sway bar mounting brackets as the ones on the car have been welded so many times, they actually welded a bolt across one of them to keep it together. 
|
|
#211
05-26-2012, 10:53 PM
|
||||
|
||||
|
Grats Glad you found those brackets. I couldnt find the guy through ebay.
There are numbers stamped in them you may want to fill with some solder,brass.. The 3 piece front area of the rear frame is also attached to the rocker and actually completes the frame. rear to rocker, to subframe in front. Make sure that its not rusted and or welded to the rocker there correctly . That is the frame strength of the car. Looking great. Keep up the good work! PS. The trunk, the dark areas not dry yet are a bit pitted, I would consider coating it with some POR15 after etching it. any other paint would just trap it and make it rust through the spatter paint. Just my 2 cents... |
|
#212
05-27-2012, 03:27 AM
|
||||
|
||||
|
See, thats what happens when you tie a car down to the body...the body bounces on the springs, the tie downs load and unload and cause damage where they're attached.
You'd think a professional would know better. You always tie down the unsprung part of the car...the rear axle, front suspension etc...that way the car is secured, but the springs can do their job and take the loads while the body moves around.
__________________
Regards, Leigh Pontiacs I’ve owned…. 1960 Laurentian 283 1963 Laurentian 283 1976 Trans Am 400 1977 Trans Am 400 1951 Chieftain Flat head 6 1967 Firebird 400 convertible 1967 Firebird 400 coupe 1979 Trans Am 403 1971 Formula 455 (clone) 1969 Firebird 350 1968 Firebird 428 manual. Sydney, Australia |
|
#213
05-27-2012, 06:36 AM
|
||||
|
||||
|
Quote:
Yup, I was planning that same route with the POR15 on the pits. Here's that link to the brackets: http://www.ebay.com/itm/70-73-Camaro...9#ht_500wt_922 |
|
#214
05-27-2012, 11:24 AM
|
||||
|
||||
|
Quote:
The Carrier who moved Steves car only did what was originally done. The cars metal wasnt up to it, this has happened to me too. On cars in a carrier, or enclosed for long distance, you do not want the car moving, or the cars springs much. In the rear of the car, this is the strongest part of the frame. 
|
|
#215
05-27-2012, 05:20 PM
|
||||
|
||||
|
Interesting contraption there.
It also didn't help that it had to travel around 3500 miles to get here. That's a lot of stress on a 40 year old (car, that is). :-) Today's project was getting the heater core out. It actually went rather well. You have to remove the pass side inner fender to do it properly in order to access the lower studs and the heater hoses. Otherwise you will spend hours with extensions, lost sockets and scraped hands. It took me ten minutes to pull the inner fender and then another ten minutes to get the nuts off the studs. Once inside the car you have to pull the glove box door, glove box and the A/C ducts from one side to the other. That way the heater assembly comes out easier. In total it took about an hour to get everything out of the car. Now I have to wait for the new core to arrive.... While the heater was out I was able to see the VIN stamped in the firewall which was a reassuring thing. I then wiped the giant black seam sealer waterfall away from the area and was able to do a pencil tracing of it. Remember it is upside down and backwards since it was stamped from the engine side - so don't have a heart attack if you try this on your car and it at first doesn't match. Take your tracing and hold it up to mirror and it will magically transpose. Or you can always just flip the photo in your photo editor program. 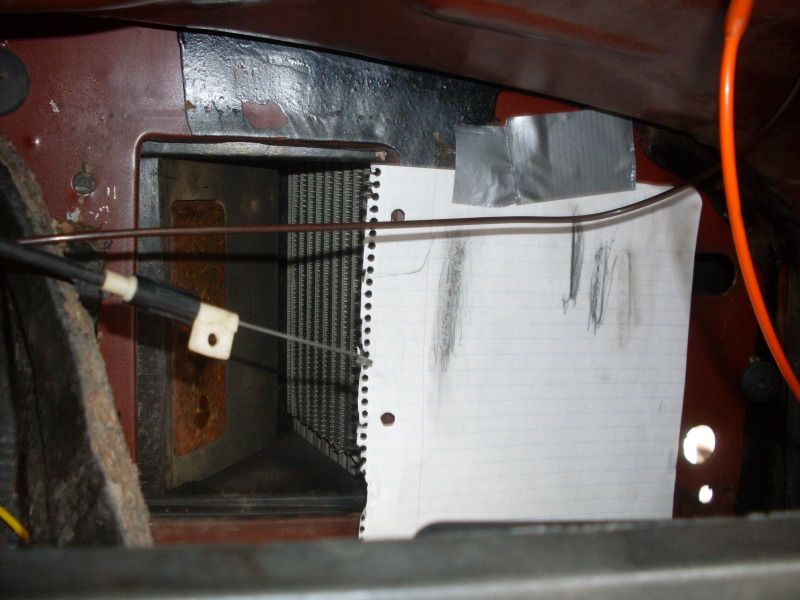 
|
|
#216
05-27-2012, 05:26 PM
|
||||
|
||||
|
After the heater core removal was accomplished I crawled back under the car and started scrubbing some more with the diesel fuel and a rag. That took the rest of the day.
Here's a shot of one of the sway bar mounting brackets. Looks like a junior high school shop project on "Learn How To Weld Day." They acually tried so many times that they burned through the rail under the bracket. 
|
|
#217
05-27-2012, 05:34 PM
|
||||
|
||||
|
And here is the final result. After these photos were taken I snaked the old exhaust back over the axles and reattached it so at least I can drive the thing again. I will probably be getting the Gardner Exhaust for this car like I did with the 72 T/A. I'll have to wait til after the frame repairs get done, though. Though they go together very easily, that is one system that you want to install once and not take apart again. (looks too pretty to risk scratching it up).
You can see the original black overspray nicely, in these shots...and the spots I missed under the fuel/brake lines. I'll wait til its time for the frame repairs to remove those lines and clean underneath.    
|
|
#218
05-27-2012, 05:35 PM
|
||||
|
||||
|
wow you are movin right along!
That bracket looks like a stick weld ( ugh) Did you test the AC in your car Steve>? |
|
#219
05-27-2012, 05:42 PM
|
||||
|
||||
|
And the final item of the day was adjusting the clutch, which was grabbing way too high. On a hunch, I pulled the actuating rod and noticed the same wear that was on my other car. This groove was cut halfway through, eventually it would have snapped off. I will be replacing both rods: the bellcrank to fork rod, as well as the pedal to bellcrank rod as they both tend to exhibit the same wear patterns.

|
|
#220
05-27-2012, 06:02 PM
|
||||
|
||||
|
Quote:
Things I still need: 1) correct expansion valve with short capillary tube (the replacement all have this way-too-long tube that really looks bad.) 2) correct condensor 3) metal tab that goes on the bracket that holds the "trumpet-looking hose" to the front of the compressor 4) metal hold down tab that retains the metal hose coming from the POA valve. |
| Reply |
|
|
The PY Online Forums is the largest online gathering of Pontiac enthusiasts anywhere in the world. Founded in 1991, it was also the first online forum for people to gather and talk about their Pontiacs. Since then, it has become the mecca of Pontiac technical data and knowledge that no other place can surpass.




 Linear Mode

