


| FAQ |
| Members List |
| Social Groups |
| Calendar |
| Search |
| Today's Posts |
|
#301
 02-24-2014, 03:48 PM
|
||||
|
||||

 https://www.google.com/search?q=gopr...icial&tbm=shop This one even has a remote so you can be in the car when you turn it on! 
__________________
Some guys they just give up living And start dying little by little, piece by piece, Some guys come home from work and wash up, And go racin' in the street. Bruce Springsteen - Racing In The Street - 1978 |
|
#302
02-24-2014, 08:29 PM
|
||||
|
||||
|
Help Wanted
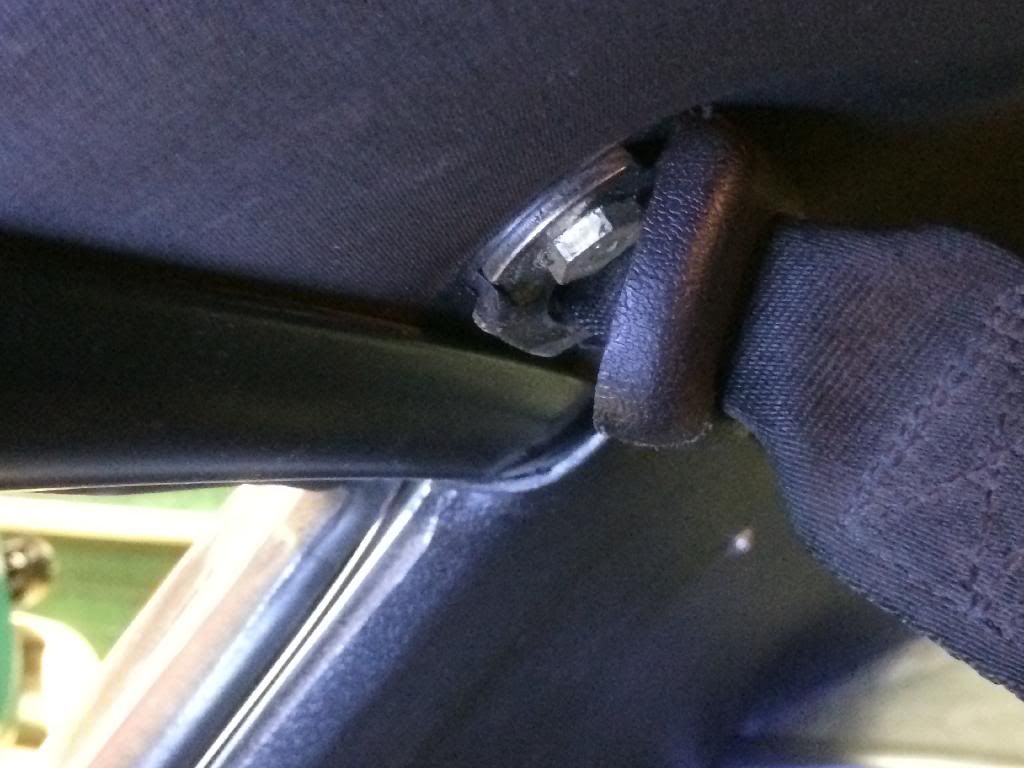
Ok, I need a little help. First, I need to replace the elastic on my shoulder belts and would like advice on the best way to remove the plastic trim pieces that dress out the roof mounted anchors for these belts. I'm sure they just snap on (I think), but before I start prying on 42 year old plastic I want to know if there are any tricks to removal. I want to take the belts off to get new elastic sewn in and to clean and possibly re-dye the belts. Here's a picture. Are these trim pieces reproduced?
I have seen on here that the retention for the shoulder belts changed around December 1971 production. The Black Car was built January 11, 1972 and has the old buckle retainer and elastic.  Secondly, I need to replace a grommet in the core support. There is a picture below. Is this part repo'd or does anyone have a source or suggestion? I appreciate all the help. 
|
|
#303
02-24-2014, 11:27 PM
|
||||
|
||||
|
The car is a 12B car built during the second week of December but delivered in January, so the belts are the originals. If I remember correctly, those black plastic covers are just snapped over the chrome bracket with four little "fingers", so you can gently pry the edge with a plastic pry tool.
That grommet is a common piece used in several locations around the front end of the car, and during the entire span of the second generation era. |
|
#304
02-25-2014, 12:13 AM
|
|||
|
|||
|
parts
...I have the same belt set up..those black covers are reppoped and snap on the hinge is on the top AMES page 32 #223B..perhaps P.Y. as are the clear plastic clips for securing the chrome buckles...the rubber grommet is not reproduced.(trust me I have looked) mine to has a slit in it as though it was designed like that?
Last edited by transam1972; 02-25-2014 at 12:38 AM. |
|
#305
02-25-2014, 02:58 AM
|
|||
|
|||
|
hardware
BOB..it looks as though you are missing a rear coot hook..I have 2 new ones I can send you if you like they are close, even though they advertise as an exact reproduction they are not..however they are GM S.R.that I got quite awhile ago..just let me know.if you could do me a huge favor the next time you take some engine pics (I like the way yours are gigantic!)..could you take a shot of your harness route by the front of your drivers side valve cover.(I added a 1976 wire shield and would like to see how an original was done)...I also have a rear alternator bracket and any shots of that would be helpful, is there a spacer involved?..lastly a fuse box pic would be tops, I have the coated screws(from Inline Tube), actually new repops with the coating and my radio surpressor is not in place..my idle stop solenoid bracket looks differant than yours..included are some of mine for reference..let me know on coat hooks..thanks!!your engine compartments looking nice!..and I have my new engine colour thanks to your thread!.
Last edited by transam1972; 02-25-2014 at 03:07 AM. |
|
#306
02-25-2014, 07:04 AM
|
||||
|
||||
|
Quote:
My bad on the production date. I got lazy and instead of looking at the trim tag, just looked at the GM Canada document which was right in front of me and lists 1/11/1972 as the production date. Is it unusual that there would be almost a month between production and delivery? There is another thread on here regarding the method of should belt retention and when the change in methodology occurred. December had been referenced as the date of change. On the grommet, it is good to know they were widely used. Maybe that will increase the likelihood of someone knowing where one can be obtained. Quote:
|
|
#307
02-25-2014, 08:56 AM
|
||||
|
||||
|
BTW, from the photo, the grommet looks fine, just dirty. Those grommets are supposed to have the slit in them from the factory.
I remembered another thing about the black cover - I think it is hinged at the rear with one half of the flange under the metal bracket and the other half that snaps onto the metal as a decorative cover. So be careful not to rip the hinge. Is your garage heated? You could also use a heat gun to warm up the plastic before you pry. That way it won't crack. |
|
#308
02-25-2014, 05:35 PM
|
|||
|
|||
|
GROMMET AND COAT HOOK
here are some pics of my grommet and coat hook..as you can see mine also has a slit so that may be the way its made..this is an original coat hook..AMES lists 2 different ones for 67 to 72..page 65FA808 look to be the right ones..I ordered FA807 for whatever reason and must have sent them back..sorry
|
|
#309
02-25-2014, 06:35 PM
|
|||
|
|||
|
What's a coot hook?
 Quote:
|
|
#310
02-25-2014, 07:57 PM
|
||||
|
||||
|
Quote:
BJ
__________________
1971 GTO 455 HO 4-speed - Cameo White, White Vinyl Top, Jade Green Interior, Ram Air Hood, AC, Honeycombs and 8-track 1974 Formula 455 I Owned in 1975-1976. Now Own Its Twin From Same Dealership 
|
|
#311
02-25-2014, 10:10 PM
|
||||
|
||||
|
Quote:
 
|
|
#312
02-26-2014, 01:29 AM
|
|||
|
|||
|
Bob your shoulder belt mount plastic clips on the upper part. It will fold down not backward. If you take a small screwdriver and press outward on the top corners you will see.
|
|
#313
02-26-2014, 02:22 AM
|
|||
|
|||
|
seat belt bolt cover
I happened to check mine today..the plastic hinge is on the top..if you look closely at it the hinge is on the top...I then snapped it down to lock...this was the drivers side I checked..I did not check the passenger side
Last edited by transam1972; 02-26-2014 at 02:28 AM. |
|
#314
02-26-2014, 06:48 AM
|
||||
|
||||
|
Thanks all for the suggestion that my grommet might just be dirty. I took it off last night and it cleaned up fine, although it definitely has some age on it and has lost most of its' elasticity. I did get it reinstalled, but the line is not centered up in the core support hole and the fit leaves something to be desired. A softer grommet might fit a little better, so I'll leave the BOLO request open, but at least it looks better than it did.
Bill and Glenn - thanks for the feedback on the anchor cover/escutcheon. I'll play around with it tonight and see what I can do. I need a little information on the length of the elastic on the shoulder belt. Should the elastic have any extra length between the two points where it is sewn onto the belt, or should the length of the elastic closely approximate the distance between the two points where it is sewn onto the belt? The elastic on the belts now is so stretched out and dry rotted that it's of little help in making that determination. Here's the Grommet... 
|
|
#315
02-26-2014, 09:47 AM
|
||||
|
||||
|
Quote:
__________________
"If the best Mustang is the Camaro, the best Camaro is actually the Firebird" David Zenlea |
|
#316
02-26-2014, 10:00 AM
|
||||
|
||||
|
Gator, Can you post a picture of belt in place? Length of elastic too. You got elastic at hobby lobby if I recall?
__________________
Mike/Illinois |
|
#317
02-26-2014, 10:01 AM
|
||||
|
||||
|
Quote:
|
|
#318
02-26-2014, 06:57 PM
|
|||
|
|||
|
1972 UPPER BELT
|
|
#319
02-26-2014, 07:18 PM
|
||||
|
||||
|
Quote:
I did purchase the elastic at Hobby Lobby…there are two types there…I used the one with the ribs that seems to more closely approximate the original elastic. I think it's called braided (rather than knitted). The original elastic looks like it's 5/16, but only 1/4 and 3/8 is available. I chose 3/8 because for durability and because it looks better.
__________________
"If the best Mustang is the Camaro, the best Camaro is actually the Firebird" David Zenlea |
|
#320
02-26-2014, 08:41 PM
|
||||
|
||||
|
Winner, winner, chicken dinner...
So the should belt anchor covers on the Black Car hinge up and not down. I am betting that their orientation is original, but NJSteve might weigh in differently. This is probably another example that the guys who assembled these cars were more concerned about a cold beer at lunch than they were about a bunch of old Coots trying to figure out the proper original assembly method 42 years later...
|
| Reply |
|
|
The PY Online Forums is the largest online gathering of Pontiac enthusiasts anywhere in the world. Founded in 1991, it was also the first online forum for people to gather and talk about their Pontiacs. Since then, it has become the mecca of Pontiac technical data and knowledge that no other place can surpass.










 Linear Mode

