


| FAQ |
| Members List |
| Social Groups |
| Calendar |
| Search |
| Today's Posts |
|
|
|
#1
 01-13-2015, 01:05 PM
|
||||
|
||||

Quote:
Quote:
Walking into our modest garage I literally walk past the factory box containing a set of new never used Competition Engineering #C3114 Bolt-In Frame Connectors for 1976-81 Firebird as shown below... 
|
|
#2
01-13-2015, 09:58 PM
|
||||
|
||||

Quote:
 Quote:
|
|
#3
01-09-2015, 06:42 PM
|
||||
|
||||
8tny3-g~~60_35.JPG)
|
|
#4
01-09-2015, 07:37 PM
|
||||
|
||||
|
Quote:
|
|
#5
01-11-2015, 10:08 AM
|
||||
|
||||
|
Quote:
__________________
Some guys they just give up living And start dying little by little, piece by piece, Some guys come home from work and wash up, And go racin' in the street. Bruce Springsteen - Racing In The Street - 1978 |
|
#6
01-11-2015, 03:21 PM
|
|||
|
|||
|
Really fun to follow this thread!
__________________
Trans Am's, Formula's, Mustang, GN... |
|
#7
01-11-2015, 03:30 PM
|
||||
|
||||

Quote:
Quote:
Quote:
 Another reason to love PY and the various contributors - the creme continues to rise - as Boss is the perfect example of that here (thanks Boss). Another reason to love PY and the various contributors - the creme continues to rise - as Boss is the perfect example of that here (thanks Boss).Seriously though - several years ago here on PY someone was repopping the stamps, and may have been offered FS via PY for short period of time... One poster commented that he took the design he wanted to local sign/stationary shop and ordered one from them.. |
|
#8
01-11-2015, 08:08 PM
|
||||
|
||||
|
Quote:
Quote:
Well, a pretty productive weekend. We started out fresh on the lower ball joints and it went much better today. I used Moog ball joints and MPD mic'ed them and they were .014" larger in diameter than the old ones. That certainly made it harder. Also, the control arm ball joint hole probably had 8 coats of paint since I painted them black first and then taped off and painted the tips. After putting the ball joints in an -18 degree deep freeze and removing the paint we finally got them pressed in using a 20 ton press, but it wasn't easy. This was and is a learning experience. The A/C compressor is also done and it looks a lot better. I'm not thrilled with how the decal adheres, and may try another one, but what a difference. I can't wait to get this thing back together. Lastly, all the core support and cowl fasteners are removed and mounted in cardboard, now I just have about 2 days of cleaning, wire wheeling and clear coating. Here are a few pictures.     
|
|
#9
01-12-2015, 08:43 PM
|
||||
|
||||
|
Quote:
http://www.forums.maxperformanceinc....d.php?t=534024 |
|
#10
01-10-2015, 09:12 PM
|
|||
|
|||
|
Are those rivet head bolts specifically made for ball joints?
I believe ball joint bolts are supposed to grade 8, so if those are not, I wouldn't take a chance with them. If you could dimple them like that, I have my doubts as to their hardness. Just trying to save you from a potential problem.
__________________
Steve F. |
|
#11
01-11-2015, 11:18 PM
|
|||
|
|||
|
turned out nice
__________________
 1972 Formula 455HO 1979 W72 Fire Am 1975 455 4 speed TA |
|
#12
01-12-2015, 07:34 PM
|
||||
|
||||
|
BOB COMPRESSOR TURN OUT AWESOME!!!!! CAN'T WAIT T SEE THIS BABY BACK TOGETHER.
|
|
#13
01-13-2015, 12:19 PM
|
|||
|
|||
|
Bob, maybe I missed it, but what clutch will you be running?
__________________
1972 Formula 455HO 1979 W72 Fire Am 1975 455 4 speed TA |
|
#14
01-13-2015, 12:30 PM
|
||||
|
||||
|
Quote:
|
|
#15
01-14-2015, 11:39 PM
|
|||
|
|||
|
Thank you Bob and Alvin.
__________________
1972 Formula 455HO 1979 W72 Fire Am 1975 455 4 speed TA |
|
#16
01-18-2015, 09:31 PM
|
||||
|
||||
|
Well. after weeks of pulling things apart and taking grease, oil and paint off the car, paint is finally going back on. We got everything masked off and got fresh paint on the firewall and cowl. It looks really. I used SEM trim paint and the gloss was a great match for the factory gloss. There is one spot on the cowl that needs to be wet sanded and reworked, but it feels so good to be moving forward again.
Here's a few pictures:      
|
|
#17
01-19-2015, 07:54 AM
|
||||
|
||||
|
Nice work and that gloss looks very on!
__________________
Mike/Illinois |
|
#18
01-19-2015, 09:53 AM
|
||||
|
||||
|
Very nice - bare steel under the trim tag huh?
__________________
Some guys they just give up living And start dying little by little, piece by piece, Some guys come home from work and wash up, And go racin' in the street. Bruce Springsteen - Racing In The Street - 1978 |
|
#19
01-24-2015, 08:41 PM
|
||||
|
||||
|
Well, a long day, but a lot got done. The steering shaft got all cleaned up and refinished is now ready to go back on. It looks great. The cowl is now all put back together with the exception of the wipers, and the wiper motor/pump got refreshed and installed. I also put the trim tag back on and after much deliberation did so without repainting it. It's really cool to start putting parts back on the car. Much more fun than taking them off.
The top of the core support has also been sanded and is getting primed. I had problems with the first primer (Rustoleum High Build) as it reacted with the existing paint and got hairline cracks. I then tried SEM high build and it did the same. I had the same problem with a few spots on the cowl and the only thing that would hold was Duplicolor Filler Primer, but I used it all. I ended up going to NAPA to get a couple cans, and just like on the cowl it is holding, but I have a lot of work and sanding to do. Here's a few pictures.  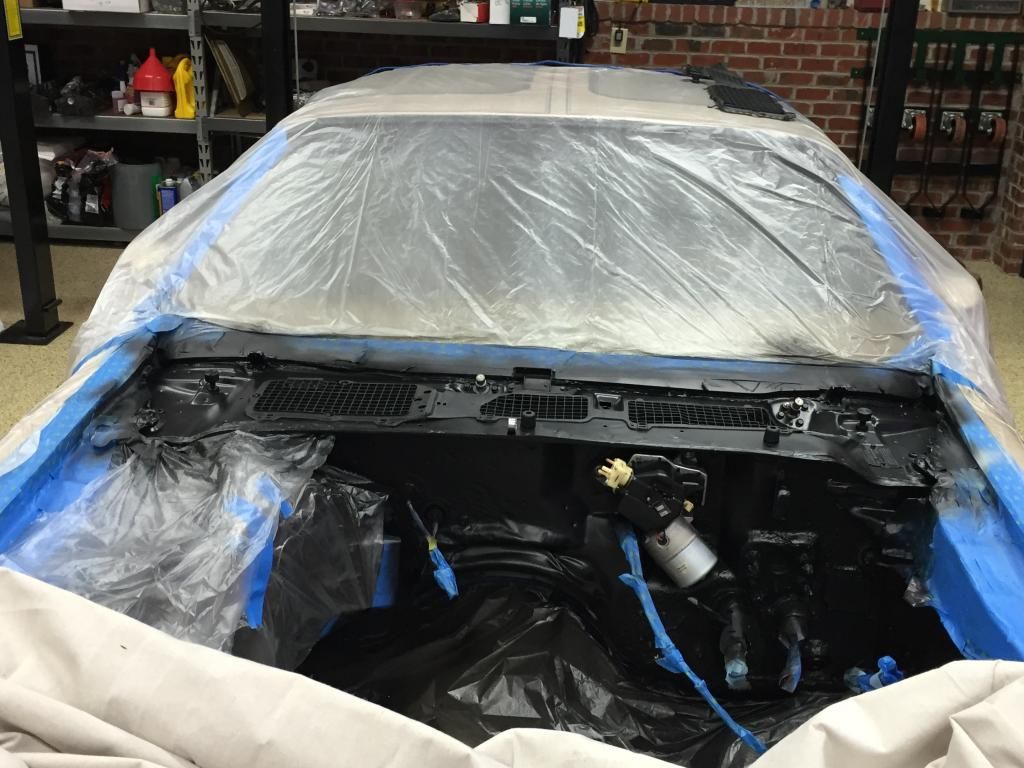       
|
|
#20
01-24-2015, 08:56 PM
|
||||
|
||||
|
Looking good!!!!!
|
| Reply |
|
|
The PY Online Forums is the largest online gathering of Pontiac enthusiasts anywhere in the world. Founded in 1991, it was also the first online forum for people to gather and talk about their Pontiacs. Since then, it has become the mecca of Pontiac technical data and knowledge that no other place can surpass.




 Being an "Old School" '78 Guy, 1st thing I noticed is the Grey color of the repop center spoiler...and not the OEM original gold color molded ABS factory issue that has gone the way of the DoDo Bird - just one "little" more thing to keep you up @ night?





 Hybrid Mode
