


| FAQ |
| Members List |
| Social Groups |
| Calendar |
| Search |
| Today's Posts |
|
#421
 12-28-2014, 07:44 AM
|
||||
|
||||

On the control arms, I knew they were dip painted and the evidence of that on the Gold Cars control arms was obvious. My real question was is it better to paint them before or after the installation of he buhings and ball joints. I went ahead and painted them and will touch them up as needed once they are installed. I used Eastwood Chassis Black and once it cures I need to figure out the best way to tape a straight line on such a convoluted surface and will spray the ball joint end silver. They cleaned up nicely and the black looks good.
  
|
|
#422
12-28-2014, 07:58 AM
|
||||
|
||||
|
Looking good !!!
|
|
#423
12-28-2014, 09:51 AM
|
||||
|
||||
|
A few more parts ready for reassembly....
 
|
|
#424
12-28-2014, 11:18 AM
|
||||
|
||||

I appreciate and like how you make everything you are doing seem so easy, especially sitting in front of an electronic device on our end; aka: the sign of a master: making it look like a piece of cake to do the same!
Gotta ask: Why the focus w the Rad w specific tag? When so many other areas have been changed, seems more likely to save "correct" rad for when the #'s matching engine goes back in after good time was had by all w modified XX engine. Not intended to be critical, just interesting the path WE ALL take to perfecting our rides to our personal tastes...such as my fitting replacement 4-core Rad yrs ago in my W72's   The attachment below is info thought you might be interested in clear coating bare metal - Clear Diamond - which reminds me of IIRC Eastwoods' Diamond Clear? Keep up the great work and excellent adventure! |
|
#425
12-28-2014, 12:24 PM
|
||||
|
||||
|
Alvin - thanks for the comments. On the radiator, the old radiator was shot and needed replaced. I don't think FD radiators will become any easier to track down over time and it seems like a good idea to get one now, and I prefer not to buy two radiators. Also, despite not having the original engine in the restored engine bay, everything will be correct except the VIN on the block, and all parts that are being replaced are being replaced with NOS or repro parts that are as correct as possible. For the most part the items being replaced are wear items - belts, hoses, bushings, ball joints, wire harnesses.
The Diamond Clear looks worth further research. I wonder how, or if, it differs from the Eastwood Diamond Clear? I have been spraying all bare metal that is not a friction or wear point with the Eastwood product. |
|
#426
12-28-2014, 02:46 PM
|
||||
|
||||
|
Quote:
Your Y88 build is reminiscent to me of becoming a NMCA or Pure Stock Drag appearance build - certainly nothing wrong with that, and certainly fits the the general format IMO. No knowledge or use of the Clear Diamonf product other than Hemmings ads, did find this http://www.autobody101.com/forums/vi...c.php?p=106855 that is pretty interesting and may provide you more info. |
|
#427
12-29-2014, 12:30 AM
|
||||
|
||||
|
A lot more got done today, but tomorrow it's back to the "real world" and the other work. Some people say they work to live, I work to live in the garage.
The two main accomplishments were getting the coil springs media blasted, getting the spindles cleaned and prepped, and getting everything painted. It all turned out well. MPD did a great job polishing the spindle and cleaning the machined surfaces, and the coils blasted great and look like new. The pictures are pretty amazing, but it probably only took 20 minutes of blasting for each coil. The media cabinet is definitely one of the top 5 tools I have. The lift, pedestal grinder with wire wheels, parts washer and vise probably round out the list. In addition, for Christmas MPD had Joey The Welder make me a rack to hold the wheel assemblies for the lift. This way the assemblies are off the floor and safe from falling over and damaging something. The rack got blasted, painted garage green and hung today and it looks and works great. The list is getting shorter, but there is still plenty to do before the short block arrives in the next 7 to 10 days. Then the real fun starts. Here's a few pictures.        
|
|
#428
12-29-2014, 10:35 AM
|
||||
|
||||
|
As previously stated by thread participants (and lurkers know) you guys do excellent work.
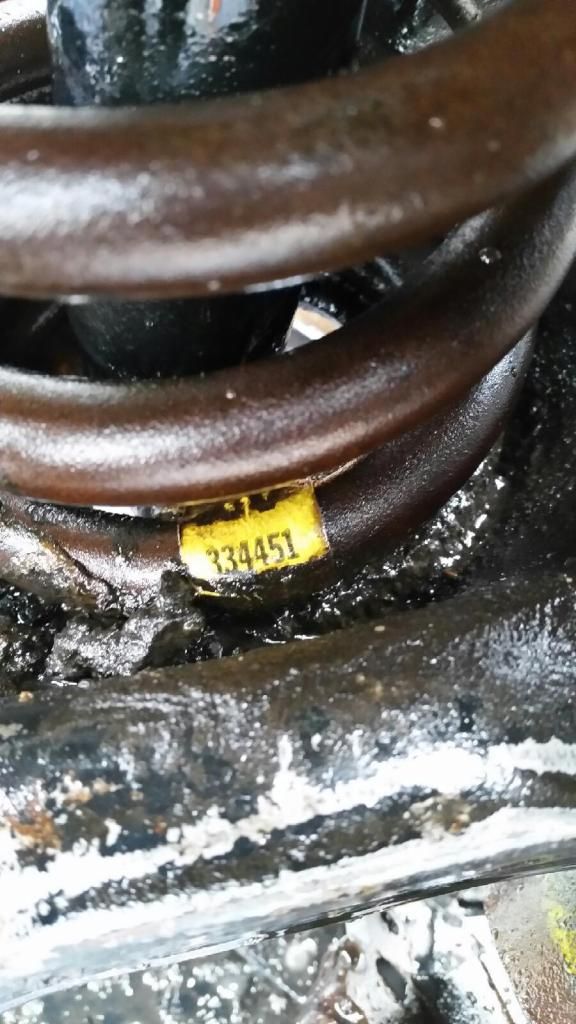
Interested to know if your coil & leaf spring factory tag letters match your build sheet? |
|
#429
12-29-2014, 11:53 AM
|
||||
|
||||
|
How about a better picture of that wall hanging you have above the new rack?
__________________
Some guys they just give up living And start dying little by little, piece by piece, Some guys come home from work and wash up, And go racin' in the street. Bruce Springsteen - Racing In The Street - 1978 |
|
#430
12-29-2014, 10:42 PM
|
||||
|
||||
|
Quote:
  Quote:
 Lastly, a few more pieces made it into the garage from the powder coater today. More specifically the inner fenders and master cylinder. They both look really good. I'm going to have to start reassembly soon as I am starting to run out of room.      
|
|
#431
12-31-2014, 09:01 AM
|
||||
|
||||
|
Looking great but you better drive it when you're done!
__________________
Some guys they just give up living And start dying little by little, piece by piece, Some guys come home from work and wash up, And go racin' in the street. Bruce Springsteen - Racing In The Street - 1978 |
|
#432
01-03-2015, 07:13 PM
|
||||
|
||||
|
Well, MPD and I got back in the garage today and started to get back into the groove. I had family visit for New Years and not much was accomplished the past few days, but a little got done even then. I put my 12 year old nephew to work using the blast cabinet and wire wheel, and he did an amazingly good job. Since the last update, the control arm painting has been finished, all the fasteners and line clips have been removed from the front subframe and cleaned and cleared, and the reverse lockout linkage got cleaned up and rehabilitated. In addition, MPD took the FD radiator and had the tanks removed so we could clean them up and prep them before the recore. He also had the tanks removed from the radiator that was in the car, and surprisingly the tanks were the originals and had been recored previously. Unfortunately, when this work was done the FD tag was not reinstalled. Here's a few pictures.
        
|
|
#433
01-03-2015, 09:32 PM
|
||||
|
||||
|
Looking good my friend. The control arms look awesome!!!!
|
|
#434
01-07-2015, 10:02 AM
|
||||
|
||||
|
Evapo Rust
So the Gold Car has some rust on the lower section of the core support, and in the area under the battery tray. I know it's just 12 more bolts, but I am doing my best to leave those 12 bolts alone and leave the front clip intact. I have been trying to figure out a way to deal with these areas in the least invasive way, and without dragging it into the driveway again and breaking out the sandblaster. I can't see a good outcome no matter how careful I am sandblasting with the car together. I finally decided to try Evapo Rust and 12 hours into the experiment I am pretty pleased. Most of the rust was surface, except in the area under the battery tray.
Since I couldn't submerge the whole front of the car, I soaked blue shop paper towels in the product and molded them to conform to the area. I then soaked microfibers with Evapo and put several layers over the paper towels to ensure they stayed damp. I then covered the whole mess with plastic grocery bags to help retain the moisture. All very scientific.... I was pretty surprised at how much of the rust was gone this morning after 11 hours of soaking. I have replaced everything except at the vertical center support and am going to let it go another 12 hours. The area under the battery tray is still very rough, but even it is greatly improved. Here's a mish mash of pictures.       
|
|
#435
01-07-2015, 01:16 PM
|
||||
|
||||
|
Be CAREFUL.....that sh*t is VERY addictive......
 Can you PM me your email address....thought I had it here somewhere.... 
__________________
Eye Candy......garage band? https://www.youtube.com/watch?v=QUPcHxHRx3s Go full screen & turn it UP! |
|
#436
01-07-2015, 06:13 PM
|
||||
|
||||
|
Nice Bob!  Being an "Old School" '78 Guy, 1st thing I noticed is the Grey color of the repop center spoiler...and not the OEM original gold color molded ABS factory issue that has gone the way of the DoDo Bird - just one "little" more thing to keep you up @ night? Just Kidding, no harm no foul...but something that "I" always look for on ANY 2nd Gen TA...but none of mine are as nice as yours, so... Being an "Old School" '78 Guy, 1st thing I noticed is the Grey color of the repop center spoiler...and not the OEM original gold color molded ABS factory issue that has gone the way of the DoDo Bird - just one "little" more thing to keep you up @ night? Just Kidding, no harm no foul...but something that "I" always look for on ANY 2nd Gen TA...but none of mine are as nice as yours, so... Question: Something I've thought of while reading on your other threads about your Y88 engine and clutch increased power and torque - with the add'l drivetrain output what are you going to do to keep that T-Top body from flexing? - bolton subframe connectors, or? Was amazing how stiff our T-Top '79 Y84 became with the simple bolt on "Lakewood" slapper traction bars back in the '90s...but I'm sure you want to maintain that stock stealth look, yes? Don't care what anyone sez - you do good work!!!! Thx for sharing with us. |
|
#437
01-07-2015, 08:56 PM
|
||||
|
||||
|
Quote:
Good eye and incredible timing on the spoiler. Not only is it a replacement, but it doesn't have the stripe decals either. After your Phoenix Graphix post last night I glommed around on their website today and found they sell individually the stripes for the front spoiler/air dam. They are now on order. In terms of stiffening, I don't plan to do anything. I don't plan to track the car and with the stock skinny tires I hope it won't be an issue. If it is, I'll deal with it then. I don't lose sleep over anything, but I do worry about having enough time to accomplish everything I want to do in life. Nothing worries me except the thought of getting stuck in the ditch and spinning my wheels with no forward progress..... |
|
#438
01-07-2015, 09:42 PM
|
||||
|
||||
|
Quote:
|
|
#439
01-07-2015, 11:27 PM
|
||||
|
||||
|
engine paint
Can anyone tell me where to get correct 78 engine paint
Thanks |
|
#440
01-07-2015, 11:58 PM
|
||||
|
||||
|
Quote:
__________________
Eye Candy......garage band? https://www.youtube.com/watch?v=QUPcHxHRx3s Go full screen & turn it UP! |
| Reply |
|
|
The PY Online Forums is the largest online gathering of Pontiac enthusiasts anywhere in the world. Founded in 1991, it was also the first online forum for people to gather and talk about their Pontiacs. Since then, it has become the mecca of Pontiac technical data and knowledge that no other place can surpass.







 Linear Mode

