


| FAQ |
| Members List |
| Social Groups |
| Calendar |
| Search |
| Today's Posts |
|
|
|
#1
 01-18-2022, 12:34 PM
|
||||
|
||||

Well all of that is great, how bout a pic or two to share with us on these BP filters? My old school point (and Smokey’s) is a large high quality oil filter, along with frequent oil changes, is just fine for 99% of the common hot rodders. And then 2 or even 4 filters are filtering the oil 2x or 4x better with less restriction. Sure, a bypass filter prob scrubs every little bit of crap out of the oil., but at what point are these approach’s somewhat overkill? The other factor is the PVC system, stock one’s just send the foul contaminated crankcase vapors back into the engine, where as valve cover breathers , or catch cans are better, or best yet is a Crankcase Evac set up.
This posts’ engine damage was assembly and parts issues causing internal damage., and maybe using 20w oil which can cause pump and filter bypass. And yeah, with the various ways mentioned in these posts to filter oil it may have reduced the carnage, but prob not totally prevented it. |
|
#2
01-18-2022, 01:01 PM
|
||||
|
||||
|
If you have an engine that ingests air from the atmosphere, you are inducing solid microscopic matter constantly. Does the furniture in your house get dusty, mine does. That stuff will pass through any air filter made for an automobile, eventually it ends up in the oil. In a dirt track car (which I'm very familiar with) the process is accelerated by the sheer numbers of particulate in the air.
You need to do more research about how filtering down to 5 microns extends the life of any engine roughly 7 fold over a conventional oil filter. The only way you can keep the microscopic dirt accumulation in check is the flush the crankcase with fresh oil repeatedly. The price of oil is rising constantly, but you can keep flushing the engine with it if you choose to. Or you can remove it with a filter designed to remove it, OEM filters are designed to keep flushing the system with fresh oil, they don't remove the fine matter from the oil. I really don't want to get further off topic here, since it isn't my thread. I'd be glad to speak about by pass filters in a thread devoted to that subject. 
__________________
Brad Yost 1973 T/A (SOLD) 2005 GTO 1984 Grand Prix 100% Pontiacs in my driveway!!! What's in your driveway? If you don't take some of the RACETRACK home with you, Ya got cheated    
|
|
#3
01-15-2022, 07:26 AM
|
||||
|
||||
|
Unfortunately that short block in my opinion now needs a complete rebuild with oversized pistons again and a cut crank that is polished the right way!
Cast cranks due to there nodular carbon content need to be rotated in the right direction so these nodules do not stand up and slowly grind up the Bearing surface and itself from the grit that gets put out. This added level of fiction also heats up the oil locally and can break down the oil film in that high load critical area! Some shops leave the crank polishing work to the low knowledge shop helper who does not know the proper way to polish a cast crank, ( no less one that has been cut also! ) and then results like yours take place , or even way more Bearing damage from the much higher rpm and loading of a race motor. Please also post up a few pictures of the rod caps without a Bearing in it and the back side of the Bearings that came out of it, Here is what the Ferderal Mogul Bearing catalog instructs about polishing a cast crank. PS. This time use a one piece rear seal!
__________________
Wernher Von Braun warned before his retirement from NASA back in 1972, that the next world war would be against the ETs! And he was not talking about 1/8 or 1/4 mile ETs! 1) 1940s 100% silver 4 cup tea server set. Two dry rotted 14 x 10 Micky Thompson slicks. 1) un-mailed in gift coupon from a 1972 box of corn flakes. Two pairs of brown leather flip flops, never seen more then 2 mph. Education is what your left with once you forget things! Last edited by steve25; 01-15-2022 at 07:45 AM. |
|
#4
01-15-2022, 08:18 AM
|
||||
|
||||
|
Also it’s no wonder that you drove the bottom of the exh retainer into the top of those positive valve guide seals with the lift of that Cam even with just stock 1.5 rockers, no less the 1.65 ratio ones!
The tops of those valve stems look beat, did a shop set those heads up for you?
__________________
Wernher Von Braun warned before his retirement from NASA back in 1972, that the next world war would be against the ETs! And he was not talking about 1/8 or 1/4 mile ETs! 1) 1940s 100% silver 4 cup tea server set. Two dry rotted 14 x 10 Micky Thompson slicks. 1) un-mailed in gift coupon from a 1972 box of corn flakes. Two pairs of brown leather flip flops, never seen more then 2 mph. Education is what your left with once you forget things! |
|
#5
01-15-2022, 03:08 PM
|
||||
|
||||
|
Quote:
Really appreciate all the insight and knowledge you all have provided. I feel like I've got the Pontiac A-Team on this. You never stop learning on these things. A rough measurement of the bores with my cheapie HF caliper has them at 4.15 which would mean it's .030 over, correct? There should be some meat left to clean things up. Regarding a Butler or Kauffmann stroker kit, any recommendations for what to shop for? It's another exercise in learning for me. I'm assuming I'll need -24cc pistons since I'll be running the iron RAII heads. I know they come balanced, but are all the rod and main bearing clearances set up as well? On the flip side, is there any reason I wouldn't want to build a stroker if I'm getting all new bottom end parts anyway? More pics of the dissection. Even after 9+ years, there are still tiny pieces of blue valve stem seal in the pickup... 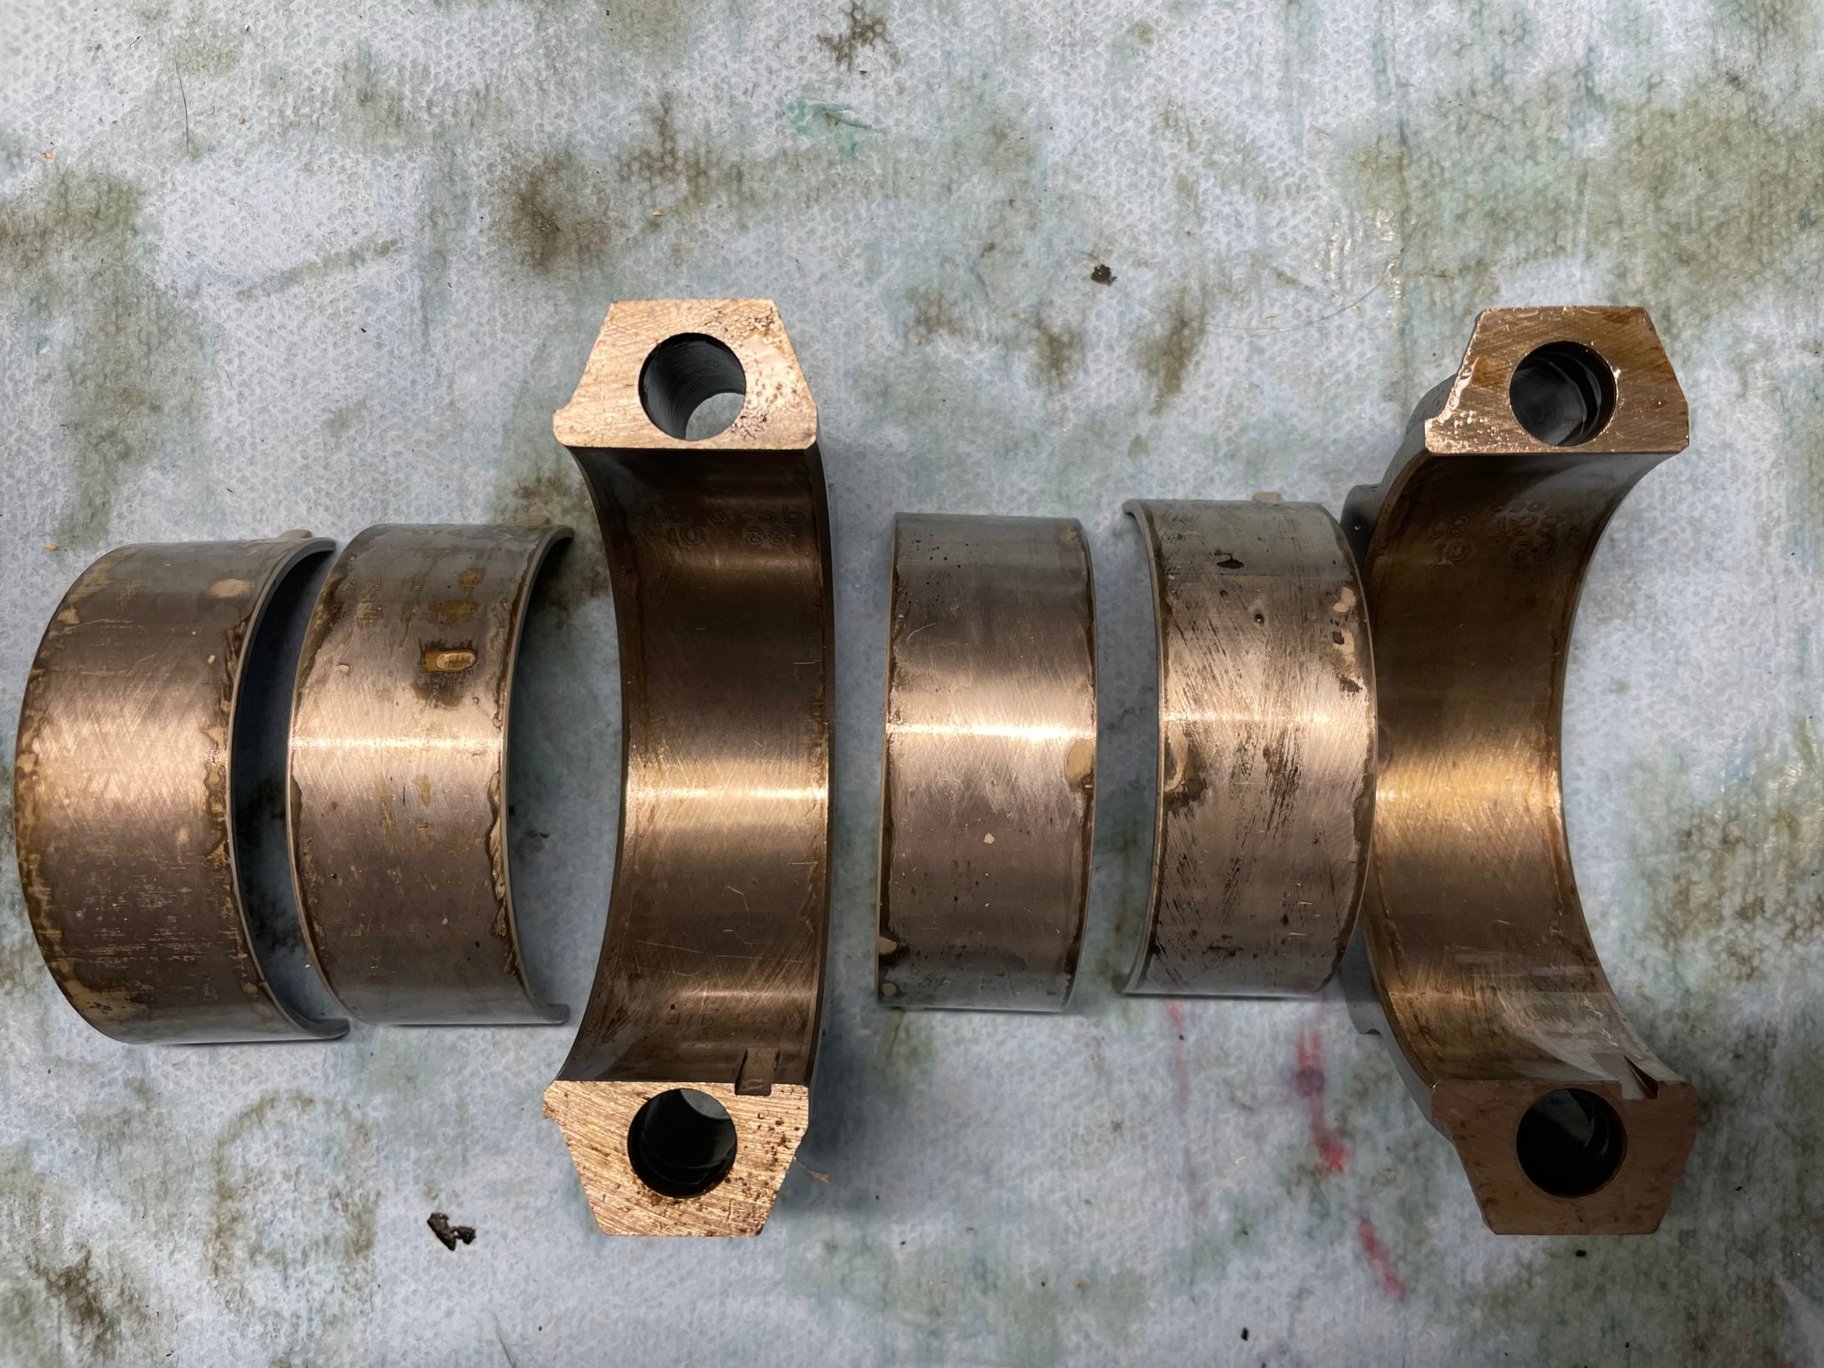 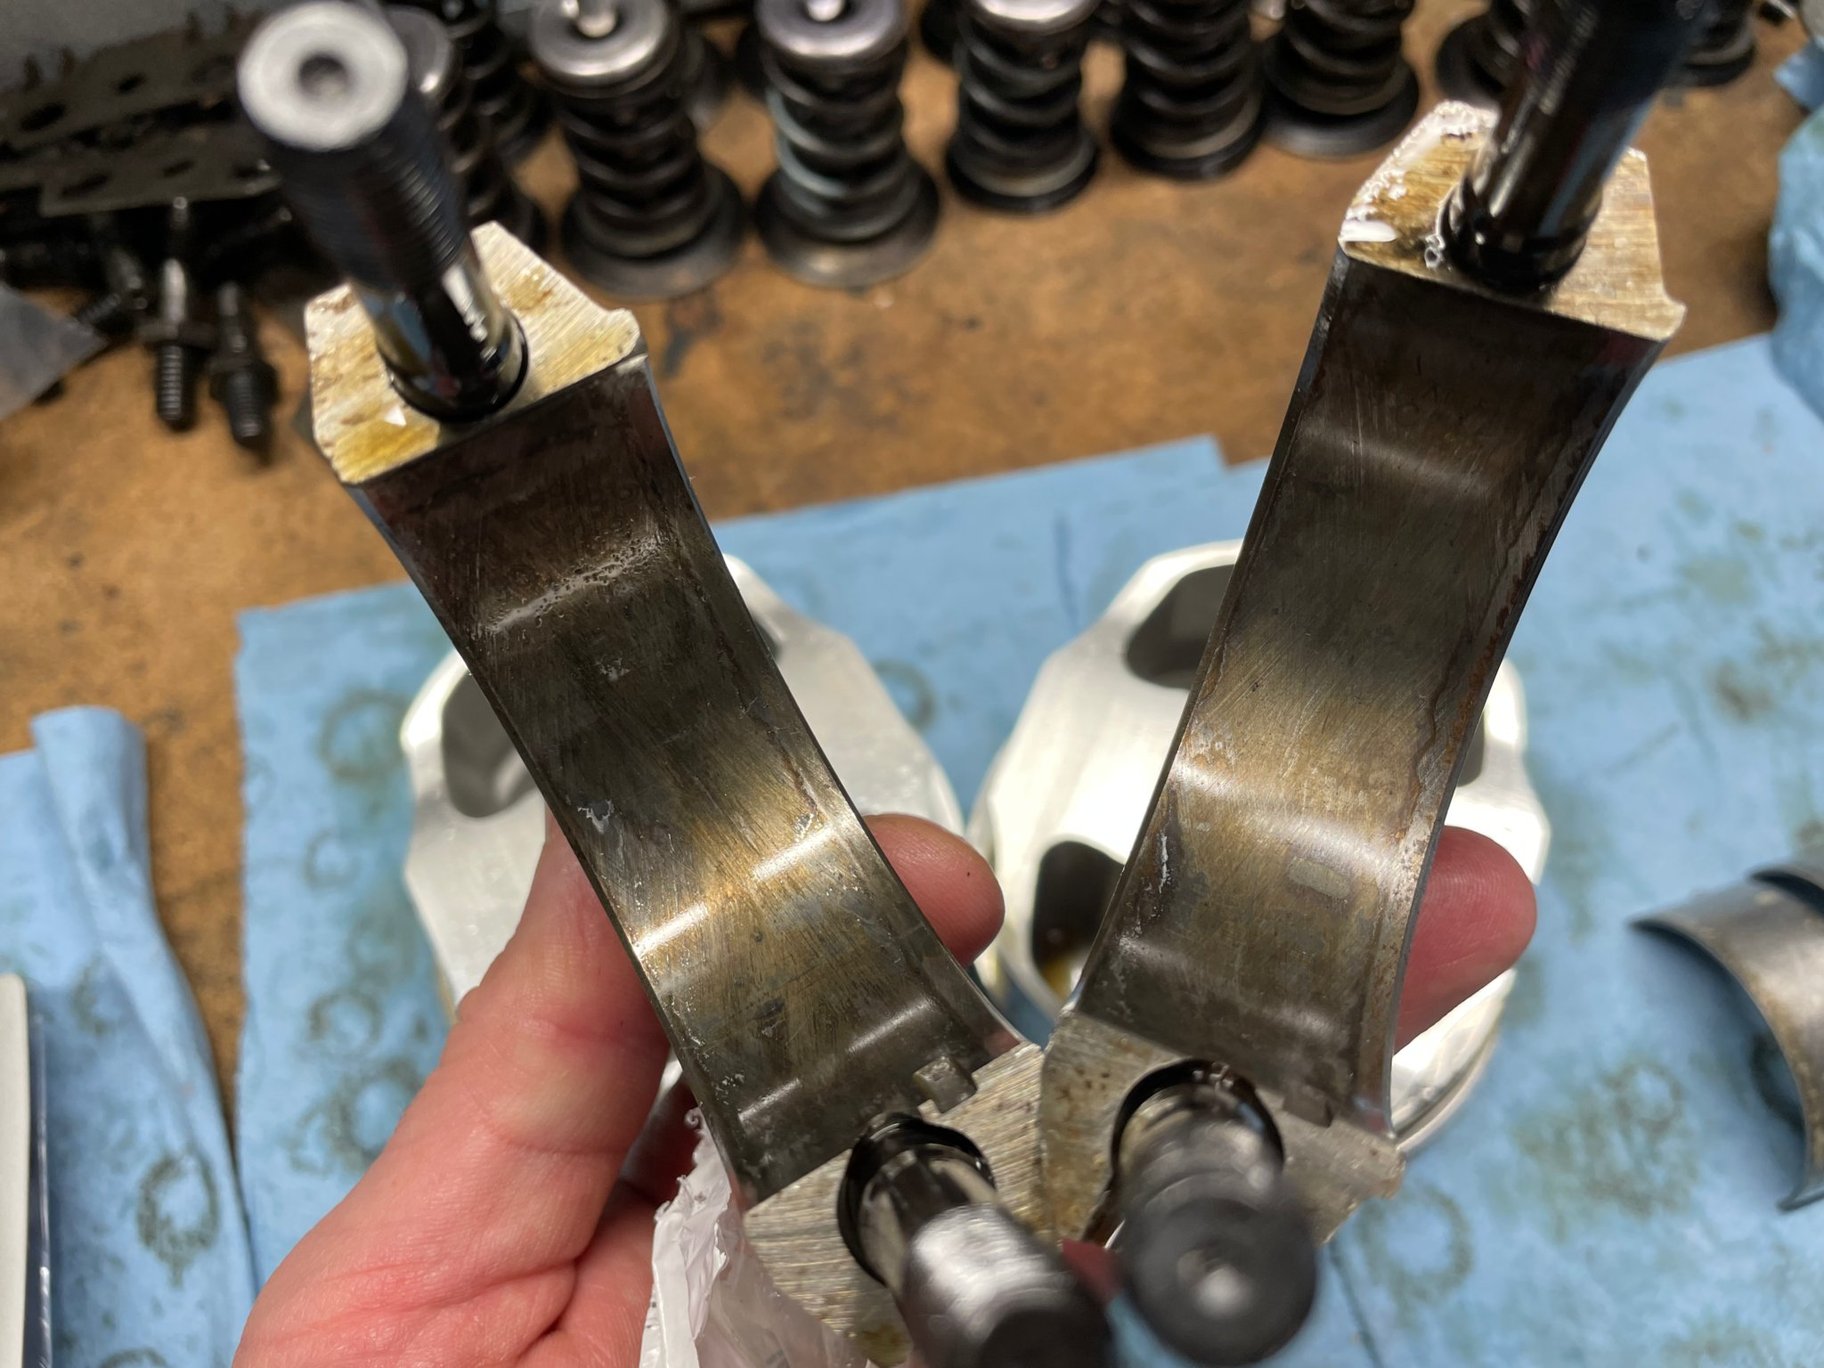  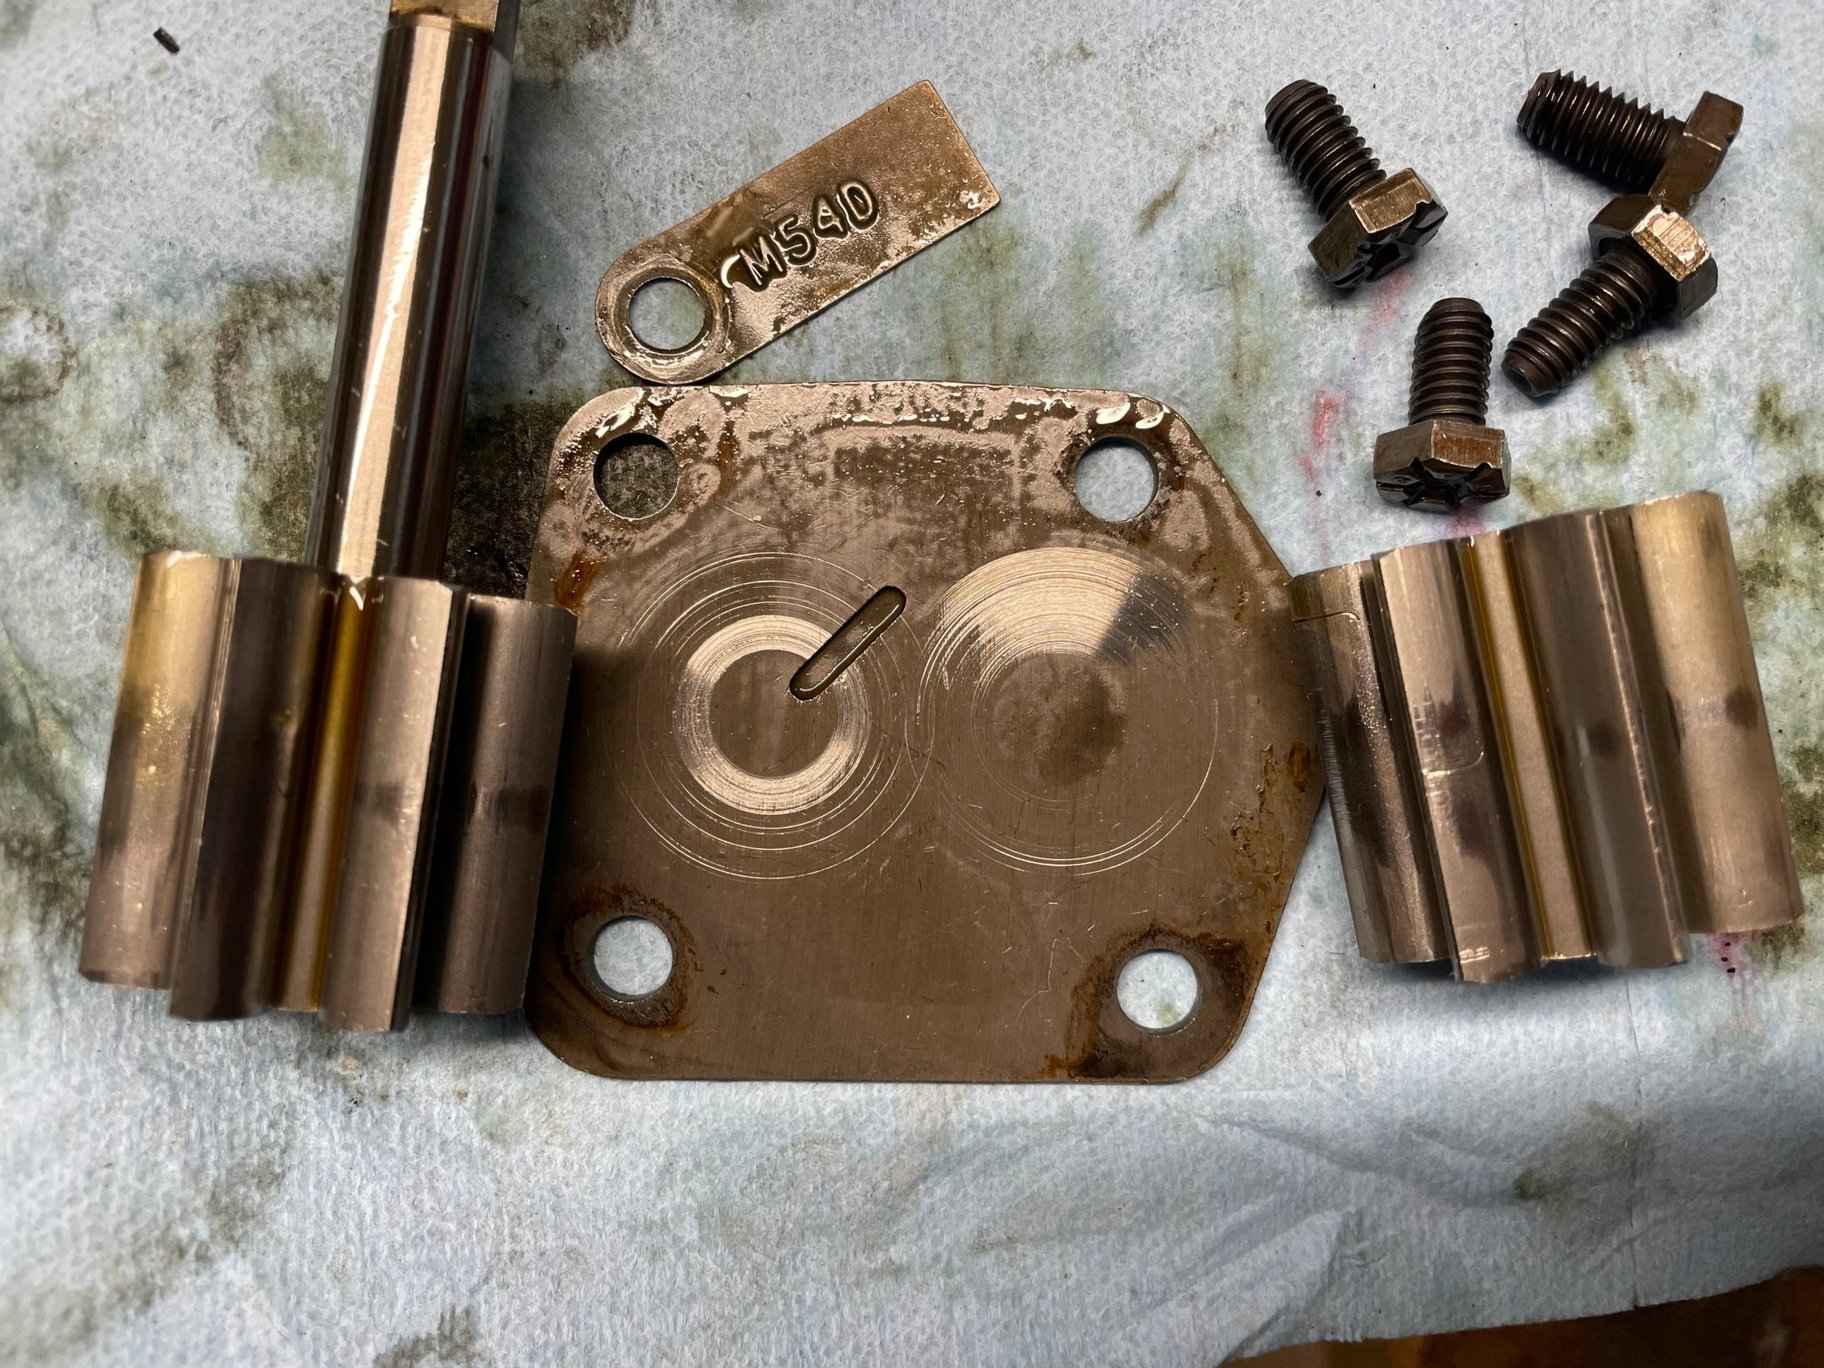 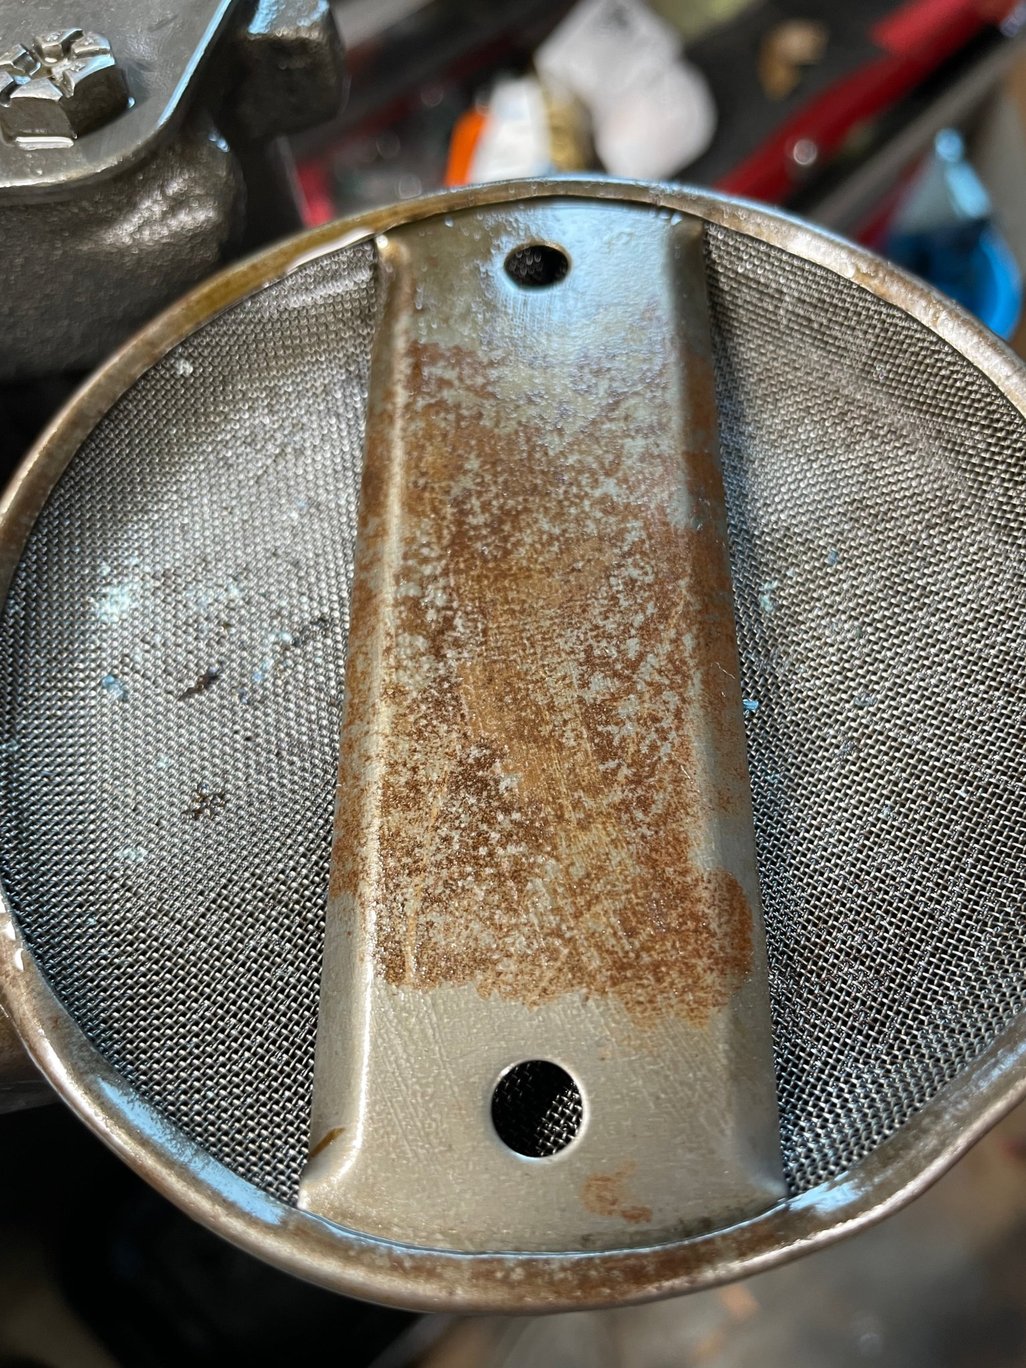 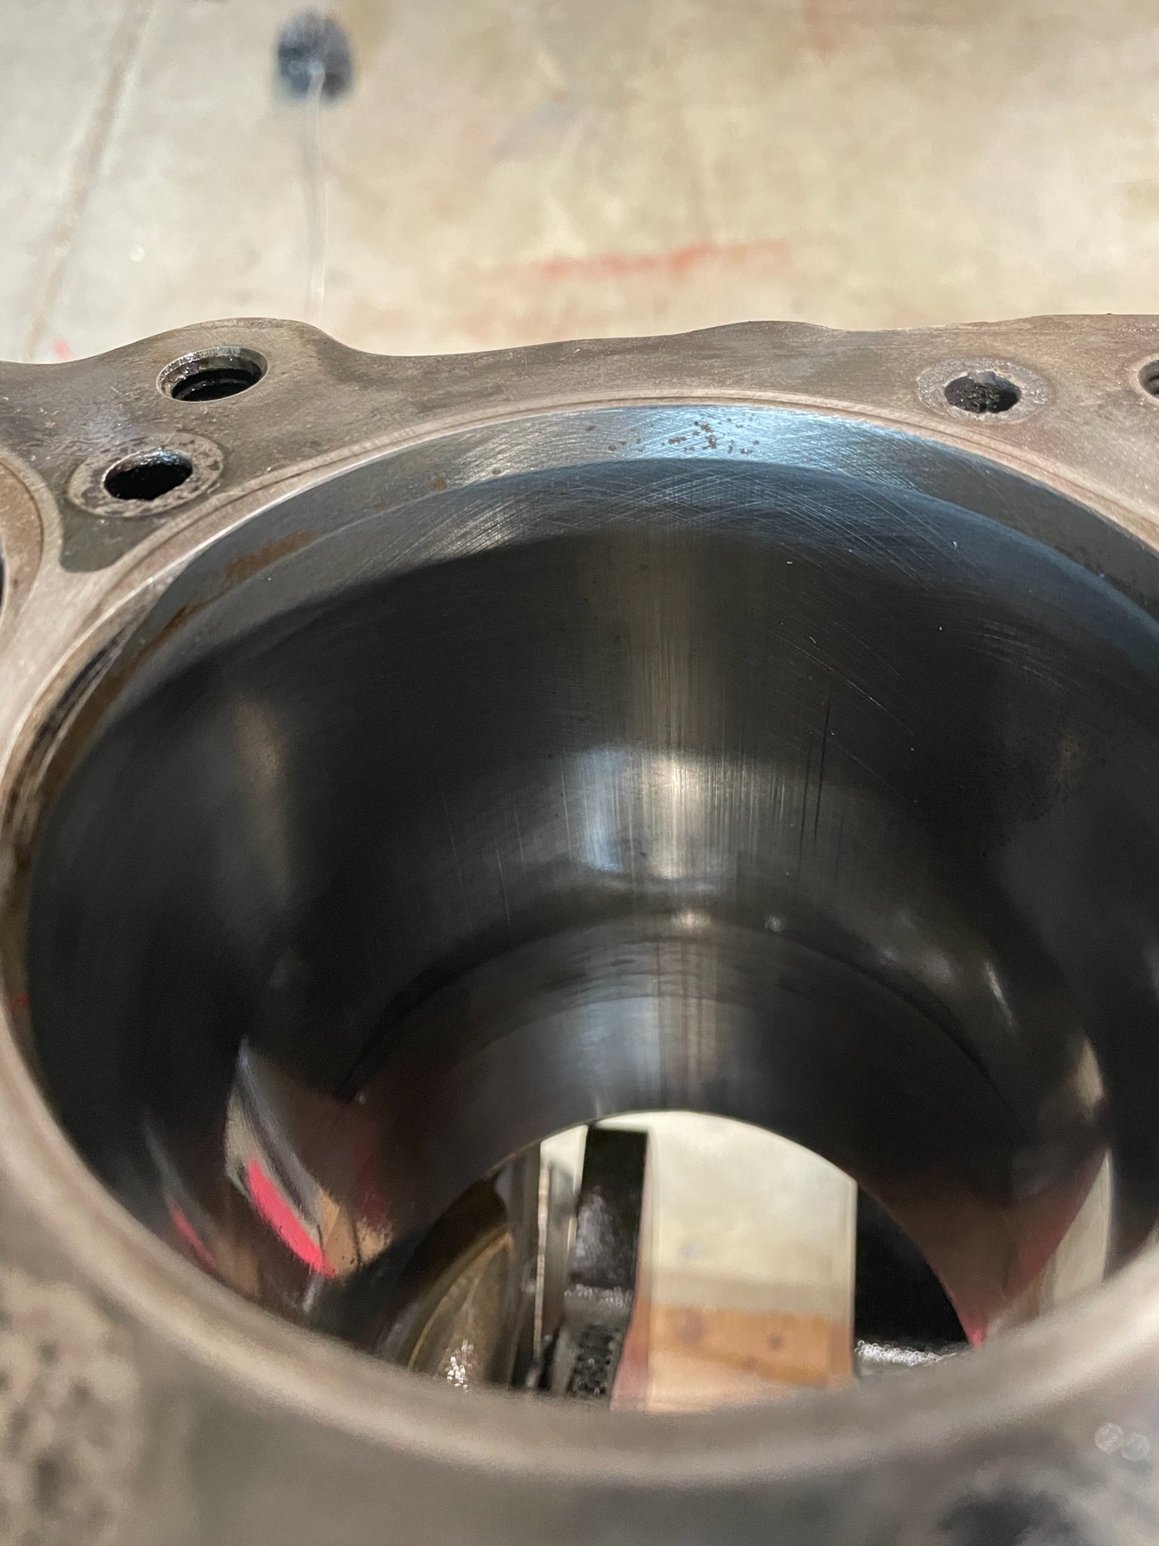 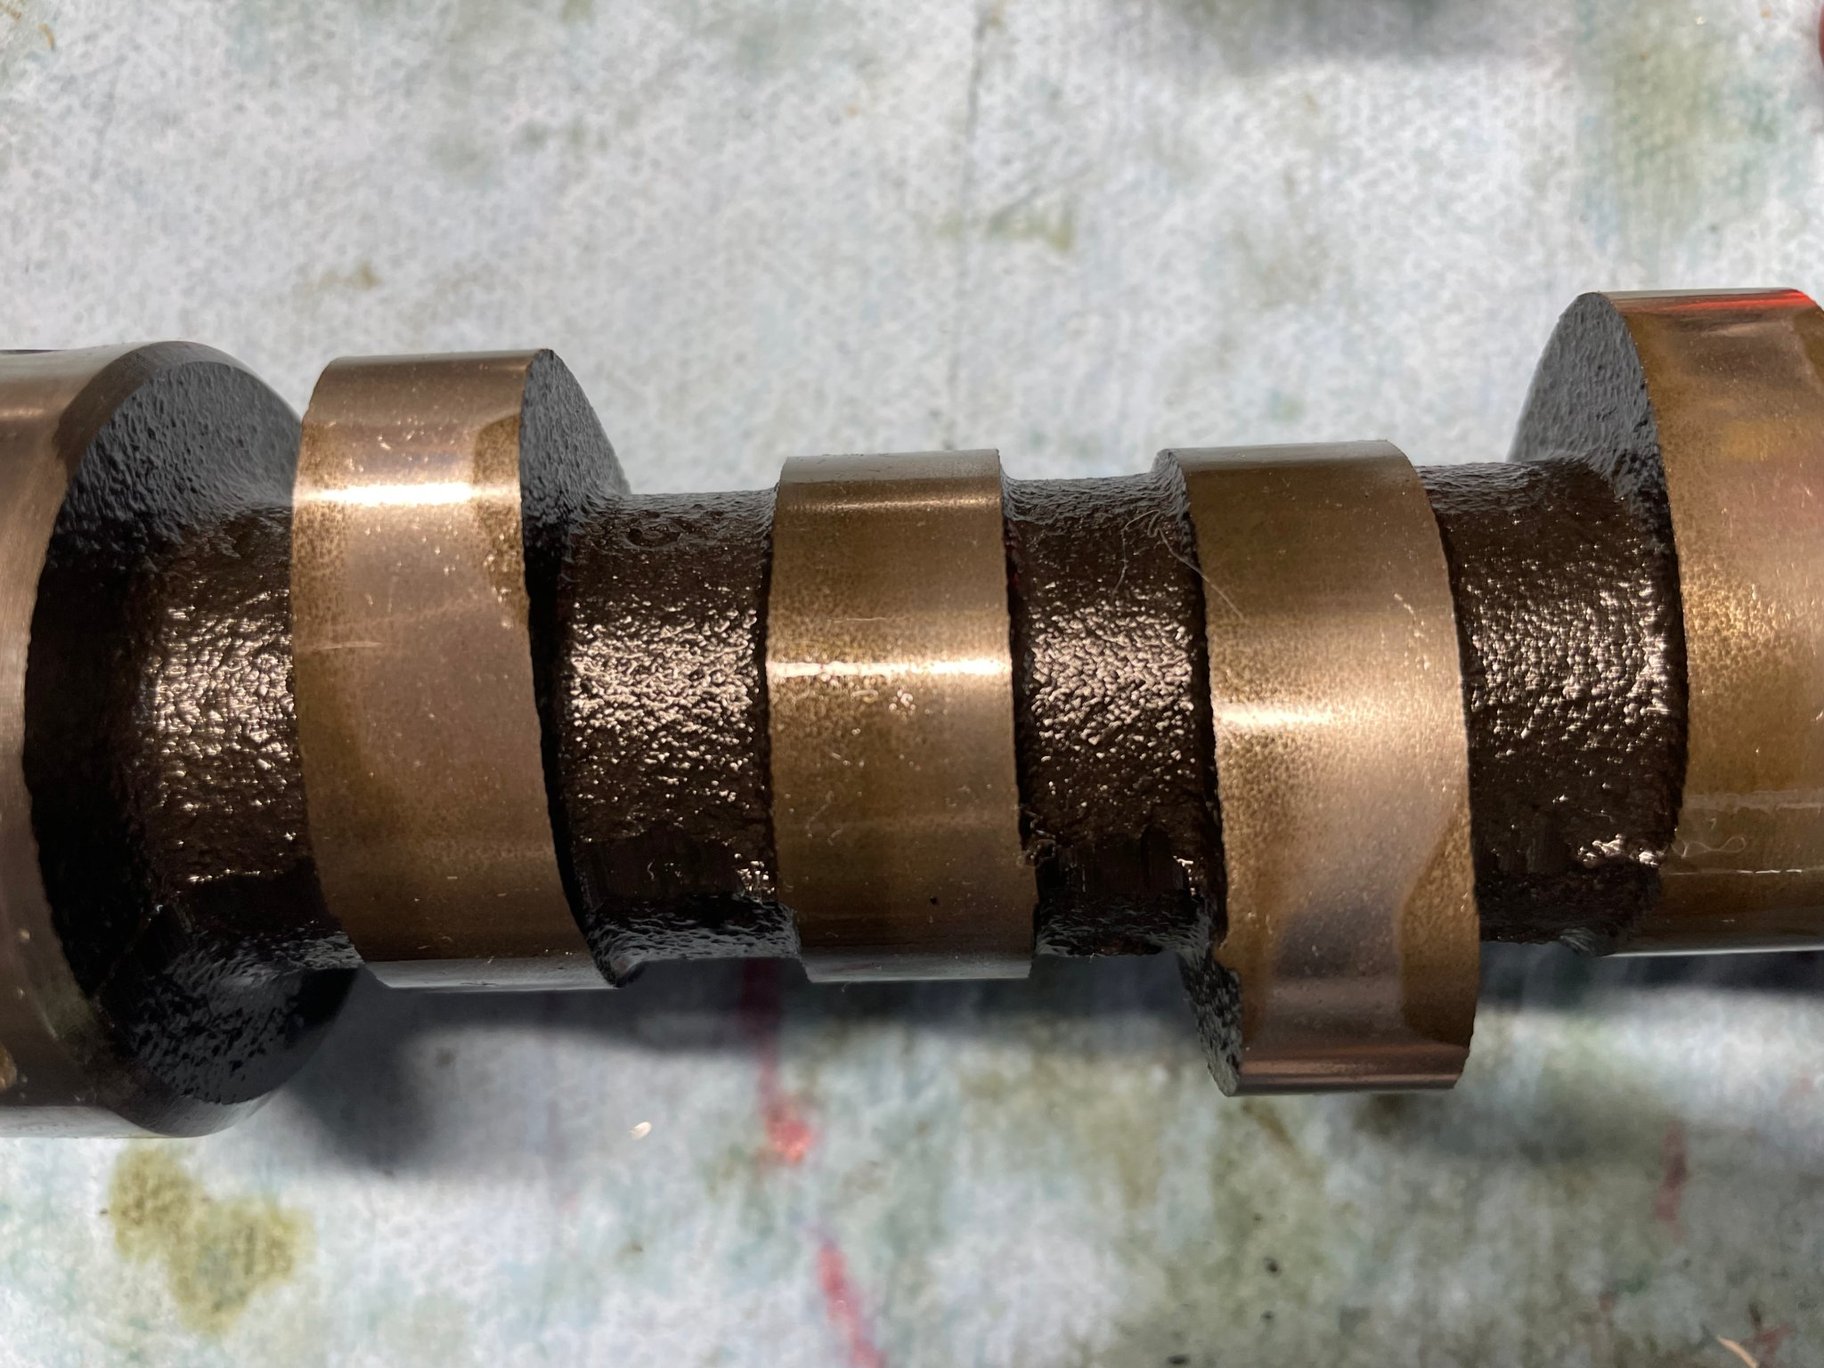 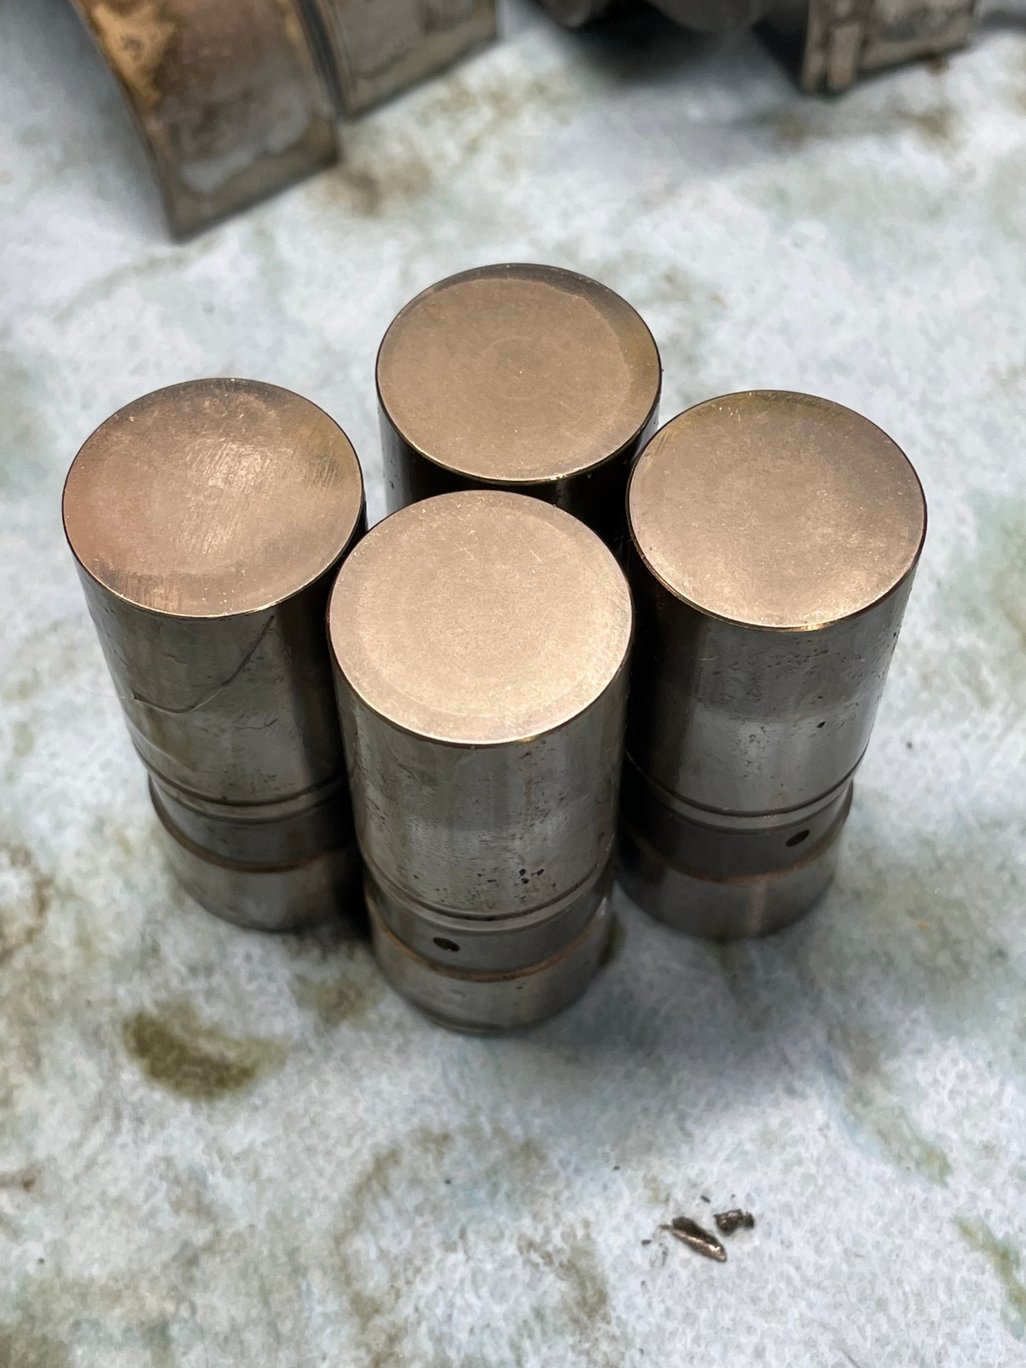
__________________
Ken '68 GTO - 464 - Ram Air II heads - 236/242 roller - 9.5” TSP converter - Moser 3.55 Truetrac (build thread | walk around) '74 Ventura 350 '69 AMC Javelin SST |
|
#6
01-15-2022, 03:50 PM
|
||||
|
||||
|
Wow pics!
Ya know, since the block was "Align" bored, I would FIRST get some new bearings and RE install Just your crank with lube and torque it down. Then install the timing cover with a good front seal, and balancer . Don't need a chain. put small light near crank and see if you can see light at bottom side of your front seal shining on the balancer. Be tough to check the rear main seal this way with the width of the seal area. ( engine being upside down on the stand) You MUST verify that the block will be able to run with No leaks.. You would not be happy to be back where this thread started, at a OIL Leak seal replacement. IF ,and when, you rebuild this, or ANY Pontiac you MUST get it "Smoked" Ask the machine shop for You to be PRESENT when the engine is smoked. You will see ANY and ALL possible Leak areas at the "smoking" session. I have seen in person engines that were align bored and all assembled on the engine stand and FAILED a Smoke test.... Just hoping it turns out right on this build so you can enjoy it again.
__________________
" Long may we DRIVE !" Last edited by Formulabruce; 01-15-2022 at 03:56 PM. |
|
#7
01-15-2022, 05:12 PM
|
||||
|
||||
|
I see a lot of specs of crap on the back side of those rod bearings that would have effected the local clearance, and the bearings look like they where wrongly assembled with oil on there back side.
The detail I am looking for in those rod cap and big end photos is the impression from the numbers and lettering on the back side of the bearings. If that impression is not clearly readable in the cap or the big end, then the bearing was moving, which is not good! The only reason to not go with a stroker other gas usage is your stock heads. If you’d making more then enough torque you will only havd more , and if you don’t then also add a bigger Cam then your HP peak will be attained at a even lower rpm then before. Stock iron heads used on a street type motor of 455 cid or larger are done to the point of sticking a fork in it by 5200 rpm.
__________________
Wernher Von Braun warned before his retirement from NASA back in 1972, that the next world war would be against the ETs! And he was not talking about 1/8 or 1/4 mile ETs! 1) 1940s 100% silver 4 cup tea server set. Two dry rotted 14 x 10 Micky Thompson slicks. 1) un-mailed in gift coupon from a 1972 box of corn flakes. Two pairs of brown leather flip flops, never seen more then 2 mph. Education is what your left with once you forget things! Last edited by steve25; 01-15-2022 at 05:30 PM. |
|
#8
01-15-2022, 09:42 PM
|
||||
|
||||
|
Quote:
Quote:
__________________
Ken '68 GTO - 464 - Ram Air II heads - 236/242 roller - 9.5” TSP converter - Moser 3.55 Truetrac (build thread | walk around) '74 Ventura 350 '69 AMC Javelin SST |
|
#9
01-16-2022, 06:25 PM
|
|||
|
|||
|
Those pics are really great and show allot. IMO, you have so much damage and variable amounts of wear throughout, the safest approach would just be a complete overhaul and measurement of all the components. Just no way to determine the level of parts replacement necessary to make the engine 100% again. I can determine a couple of things from the pics. No way in IMO, that crankshaft can be used again without grinding and polishing correctly. You can polish that thing till the cows come home and all your going to get is a smoother, out of round and tapered crankshaft. So it needs attention. While it is being reconditioned, the serrations can be dealt with as well. The root cause of the majority of the damage was a dirty assembly from what I see. I also see evidence of cap grinding that was done with a "packed" grinding wheel. Meaning the wheel was not dressed properly to open the grain and it leaves a burnished finish rather than a cool, clean ground surface. I can see this on the main caps and rod caps. Possibly the cylinders can be saved with just honing for a 2618 alloy forged piston. They can run up to .006 clearance which gives you some room to work with. The cam and lifters look to be in about the best condition of what I see in the pics. Sorry for the bad news. At least you caught it before something came apart or overheated and seized. It can all be fixed. FWIW, I prefer the 2-piece BOP seal. Easier to install and I have never had one leak. Other people have had different results.
|
|
#10
01-16-2022, 06:40 PM
|
||||
|
||||
|
Quote:
|
|
#11
01-16-2022, 07:10 PM
|
||||
|
||||
|
The BLOCK , FIRST.. Can it even retain oil ???
__________________
" Long may we DRIVE !" |
|
#12
01-17-2022, 01:13 AM
|
||||
|
||||
|
Quote:
Quote:
Quote:
At this point, it seems I should start by getting the block checked out to see if needs if it needs to be bored, then I can move ahead choosing the stroker assembly parts. Seems like a 4.25 stroke and 6.8 rods are a given, just need to figure out the specifics of the pistons. Quote:
Might be a dumb question, but presuming it has been align bored, couldn't you get a thicker bearing that would put the crank back in the right place? The other bright side to all of this is my 14 y/o son has taken a deeper interest in the car than he ever has. He was really into tearing it down and wanted to know about each part. He asked me why the cam and pushrods were in the trash today. In my mind I was like "Yes! He recognized a cam and pushrods!"
__________________
Ken '68 GTO - 464 - Ram Air II heads - 236/242 roller - 9.5” TSP converter - Moser 3.55 Truetrac (build thread | walk around) '74 Ventura 350 '69 AMC Javelin SST |
| The Following 2 Users Say Thank You to Verdoro 68 For This Useful Post: | ||
|
#13
01-17-2022, 05:08 PM
|
||||
|
||||
|
Some thoughts after looking at these pictures. It makes a perfect case for using a by pass oil filter to remove particulate that will continue to circulate right past a full flow filter, without being removed from the oil. All the fine abrasives are going through the engine over, and over, tearing up all the tightly clearanced parts.
Perhaps the engine wasn't properly assembled when it was built, but the damage could have been minimized had the fine abrasives been removed the first pass on the by pass filter. Recirculating for miles and miles did grind up all the wear surfaces within the engine, as evidenced by the pictures. These pictures also mirror an engine that has a lot of laps in a dirt track car. Fine abrasives enter through the air filter no matter how good the filter is, then work past the rings, and into the oil. If left in the oil, it produces results much like these pictures show. They recirculate over, and over, grinding away the wear surfaces. If the OP hadn't decided to repair his rear main seal leak, the carnage would have continued, until likely there was a mechanical failure, or he saw evidence that the engine was producing metal filings. I know, "By pass filters have no place in a hobby car", I heard that somewhere before. But when that one part fails, and starts producing fine grit, unknown to the owner, a better quality filter may at least be able to salvage some of the internals. It may also stave off spinning a bearing, causing catastrophic failure, namely a connecting rod through the block. The by pass filters I use, have all the removed particulate right at the end of the filter. If there is metal, you'll see it when you change the media, it can't be avoided. If you're not cutting open your oil OEM style filters, you have no idea if there is metal accumulating in the media. Carry on.... 
__________________
Brad Yost 1973 T/A (SOLD) 2005 GTO 1984 Grand Prix 100% Pontiacs in my driveway!!! What's in your driveway? If you don't take some of the RACETRACK home with you, Ya got cheated
|
|
#14
01-17-2022, 06:54 PM
|
||||
|
||||
|
I agree 100% with Brad, but First, ... BLOCK, BLOCK, BLOCK....... Can it hold the crank where it needs to be to SEAL...after it had an "align bore" ??
>>> POST # 1... >>>> OIL LEAK...........<<<< I see you addressed this in post #44 , and that's a relief! A true Align bore corrects the angle of the crank to the bores typically after the bore is done to correct an out of round bore. The goal is to "re" achieve the 90 degrees. Typically the bore plate corrects to the exhaust side of the block and therefore the crank has to get moved up. ( as I understand it and was explained to me ) If you have a 5 under chain, your block was Align Bored. You can't put "thicker" bearing half in the block and thinner in the cap to compensate. For the rear and front oil seals to work that crank has be dead on where it was when new. It will not take much to make it leak. I have seen 2 Pontiac blocks leak for this same reason ( other reasons too on 1975 and 76 455 blocks) . Even if you change Blocks, you still should get your final assembly smoked, even if you get it dynoed after. USA Made smoke machine >> https://www.amazon.com/AutoLine-Pro-.../dp/B07JVT1NG2 WATCH smoke leak out a Crankshaft seal.( Block was align honed) >>https://www.youtube.com/watch?v=tObnbOfo_ko
__________________
" Long may we DRIVE !" Last edited by Formulabruce; 01-17-2022 at 07:39 PM. |
|
#15
01-17-2022, 08:37 PM
|
||||
|
||||
|
Got my parts today and put together the front cover and balancer and .010 bearings. Looked for light and then ran some grease around the seal and checked the balancer to see where it was contacting. I couldn't see any indication that it wouldn't seal, but it's pretty tight in there. A smoke test seems like a good idea when the time comes.
I chatted with a tech from Butler this afternoon. They echoed formulabruce - make sure the block is good. Butler's rotating assemblies sound like the way to go since they're balanced and blueprinted. One thing I didn't consider was how upping the cubes would mess with the compression ratio. The Ram Air II heads on a 461 would need a ~30cc dish in the piston to keep the compression around 9.4/9.5:1. Seems like a lot of dish. Surprisingly, he recommended practically the same cam as what I got from Kauffmann for a 400. (276/282 224/230, .503/.510, 114 vs. 278/289 224/230 112 .502/.510). He said the RAII heads with a stroker would be good for around 425hp but would have great low end torque. I was expecting a higher HP number, seems like I could get that number out of the current displacement easy.
__________________
Ken '68 GTO - 464 - Ram Air II heads - 236/242 roller - 9.5” TSP converter - Moser 3.55 Truetrac (build thread | walk around) '74 Ventura 350 '69 AMC Javelin SST |
|
#16
01-17-2022, 09:20 PM
|
||||
|
||||
|
With 461 cubes and that small of a cam, with unported stock iron heads, he's probably pretty close to his HP estimate.
It would need quite a bit more camshaft and some cylinder head work to reach closer to the 500 mark. Maybe with the unported heads, and stepping up to a cam in the 230 @ .050 range close to RAIV spec might get you close to 1hp per CI. |
|
#17
01-18-2022, 09:35 AM
|
||||
|
||||
|
lol.....the parts sitting around thing......OMFG you have no idea how much WATER I was dealing with 2 months ago trying to put the short block together!!! Every day...start with scotchbrite grey and "hone" the rust out of the cylinders, then rub on the crank journals. As we had like %400 humidity. Finally after finish mocking everything we did one more "clean" and installed crank then next day the pistons (as everything was already for FINISH ASSEMBLY.)
|
|
#18
01-18-2022, 02:50 PM
|
||||
|
||||
|
Dont worry about the HP. You'll have GOBS of Torque most likely BELOW where most Dynos begin to estimate HP.
Thats where you drive..
__________________
" Long may we DRIVE !" |
|
#19
01-18-2022, 04:44 PM
|
||||
|
||||
|
Quote:
Quote:
Quote:
I put a call into a few shops today including one up in Sonoma that built a RAII a couple years ago.
__________________
Ken '68 GTO - 464 - Ram Air II heads - 236/242 roller - 9.5” TSP converter - Moser 3.55 Truetrac (build thread | walk around) '74 Ventura 350 '69 AMC Javelin SST Last edited by Verdoro 68; 01-18-2022 at 04:50 PM. |
|
#20
01-18-2022, 04:43 PM
|
||||
|
||||
|
I am a big fan of the 4" stroke engines. If it was my build I would go 4". Moves the rpm range up a little bit and kills a little bottom end.
__________________
65 GTO, Tiger Gold, Nostalgia Super Stock 421, 2-Carter AFB carbs, Stock Suspension, 3550lbs Full Exhaust-- 9.70's@135 66 GTO (Retired race car) 421 CID Multiple NSCA/NMCA World Champion 66 GTO 389 3x2, 4 speed, 3.90 gear, Montero Red 33K original Miles 67 GTO 2dr Post, 428, Tri Power, 3.55 Gears 80 Trans Am Black SE Y84 W72 WS6 |
| Reply |
|
|
The PY Online Forums is the largest online gathering of Pontiac enthusiasts anywhere in the world. Founded in 1991, it was also the first online forum for people to gather and talk about their Pontiacs. Since then, it has become the mecca of Pontiac technical data and knowledge that no other place can surpass.




 Hybrid Mode
