| FAQ |
| Members List |
| Social Groups |
| Calendar |
| Search |
| Today's Posts |
|
#41
|
||||
|
||||
|
__________________
Paul Carter Carter Cryogenics www.cartercryo.com 520-409-7236 Koerner Racing Engines You killed it, We build it! 520-294-5758 64 GTO, under re-construction, 412 CID, also under construction. 87 S-10 Pickup, 321,000 miles 99Monte Carlo, 293,000 miles 86 Bronco, 218,000 miles |
|
#42
|
||||
|
||||
|
Quote:
|
|
#43
|
||||
|
||||
|
OK, time to bore the rest of these cylinders out. Since I had bored some of the cylinders, and left a step at the bottom in case I had to install some sleeves, I had to dial indicate the boring bar to get it perfectly on center to cut the steps out. Here is a pic of the step.
 Here is some pics of the dial indicator setup.   Rough honing it to within .007" of final size before bolting on torque plate.  Here is the rustiest cylinder of them all after roughing it in. I think it will be fine.  Here is what this cylinder looked like before honing.  Here it is after honing to final size. One tiny patch about 1/8" diameter is all that was left. You can barely see it near the top center of the cylinder. 
__________________
Paul Carter Carter Cryogenics www.cartercryo.com 520-409-7236 Koerner Racing Engines You killed it, We build it! 520-294-5758 64 GTO, under re-construction, 412 CID, also under construction. 87 S-10 Pickup, 321,000 miles 99Monte Carlo, 293,000 miles 86 Bronco, 218,000 miles |
|
#44
|
||||
|
||||
|
Cleaning out the bolt threads for proper torquing of the torque plate. Torqued it down to 100 ft. lbs. with 30 w oil, with factory bolts.
 
__________________
Paul Carter Carter Cryogenics www.cartercryo.com 520-409-7236 Koerner Racing Engines You killed it, We build it! 520-294-5758 64 GTO, under re-construction, 412 CID, also under construction. 87 S-10 Pickup, 321,000 miles 99Monte Carlo, 293,000 miles 86 Bronco, 218,000 miles |
|
#45
|
||||
|
||||
|
Checked the SCAT rods out. All checked out almost perfect on size when I loosened up all bolts, and lubed with ARP Ultra lube, then re-torqued to 63 Ft. Lbs. Sizes ranged from 2.3746"-2.3748". A .0002" difference, not enough to justify re-sizing the rod. All were very round, and no taper or bellmouth from one side to the other. Had to hone a little more clearance into the pin bushing. Pin bushing holes were .0002"-.0003" out of round. The clearance was around .0003"-.0004". Not enough for an engine in this power range, so I opened them up to .0008", and tried to hone the "out of roundness" out of them. With some finesse, I was able to get most of the out of roundness, out of them. Some came out less than .0001", while the worst had .0001" still there, but as they say on Street Outlaws, "I ran out of real estate"! Couldn't get them perfectly round without making them too big.
The edges around the big end, and the small end, were like razor blades from the machining, so a little de-burring was needed.   De-burred.   Then I sanded the cheeks on some sandpaper on the granite slab to remove any burrs that might exist. Weighed all rods, and they were surprisingly close. IIRC, they were all within 2 grams of each other. Most were within 1 grams. There was one light one, which was around 2 grams light. Averaged their weight to come up with an average within 1 gram of any rod.
__________________
Paul Carter Carter Cryogenics www.cartercryo.com 520-409-7236 Koerner Racing Engines You killed it, We build it! 520-294-5758 64 GTO, under re-construction, 412 CID, also under construction. 87 S-10 Pickup, 321,000 miles 99Monte Carlo, 293,000 miles 86 Bronco, 218,000 miles |
|
#46
|
||||
|
||||
|
Here are some videos of the honing process. This first video shows the distortion of the cylinders when you bolt on a torque plate. You can see the gauge jumping around. The gauge measures the pressure on the honing stones, so when the pressure increases, the gauge jumps to the right. When the pressure decreases, the gauge jumps to the left. When the cylinders are straight and round, the gauge will jump no more, and will stay in one place. Notice how the gauge bounces in between it going from left to right? The bouncing is from out of round, and the jump from left to right shows the taper.
https://www.youtube.com/watch?v=-HGAe1Xkoac Here is another view. The yellow light flashes when the hone reaches the bottom of the stroke. This gives the operator a reference point so they know where the taper is. If the light flashes when the gauge is to the left, it indicates the cylinder is bigger at the bottom. If it flashes when the gauge is to the right, it indicates the cylinder is small at the bottom. How far it jumps from left to right indicates how much taper is in it. Here, the left/right jumps indicate about .0005" taper https://www.youtube.com/watch?v=C2GCkU7XEBE This one shows the cylinder almost completely round, and the jumping has slowed to a minimum. Forgot to get video of it when it was completely round, but you get the idea. Each bounce you see here equates to .0001"-.0002" taper. When the gauge bounces repeatedly, and erratic like in the first two videos, it is from out of round. When the gauge just goes to the right, then to the left at an even pace, without the erratic bouncing, it is showing taper in the cylinder. When you can only see a one bar rise in the gauge, that represents about .0001"-.0002" taper. https://www.youtube.com/watch?v=wIQ0WanpR38 All cylinder came out at 4.1552", with .0001" or less taper and/or out of round. This block was cryo treated, so it honed really nice. Un-cryoed blocks take a lot more finesse to get them this close.
__________________
Paul Carter Carter Cryogenics www.cartercryo.com 520-409-7236 Koerner Racing Engines You killed it, We build it! 520-294-5758 64 GTO, under re-construction, 412 CID, also under construction. 87 S-10 Pickup, 321,000 miles 99Monte Carlo, 293,000 miles 86 Bronco, 218,000 miles Last edited by gtofreek; 05-28-2016 at 12:54 PM. |
|
#47
|
|||
|
|||
|
That's pretty impressive to get those kind of taper and roundness numbers on that size/length of a bore. What a nice result given what I started with, a block with cylinders so rusty it was even odds they would never clean up. Paul is truly a craftsman and a pleasure to work with.
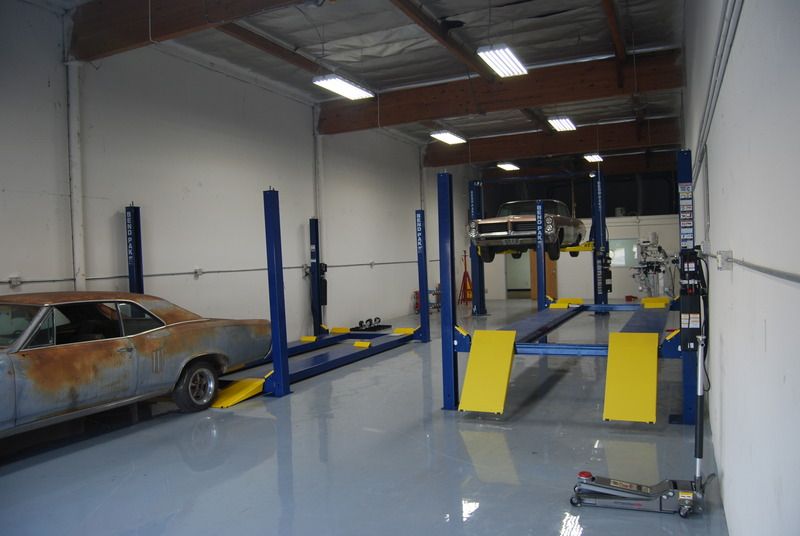
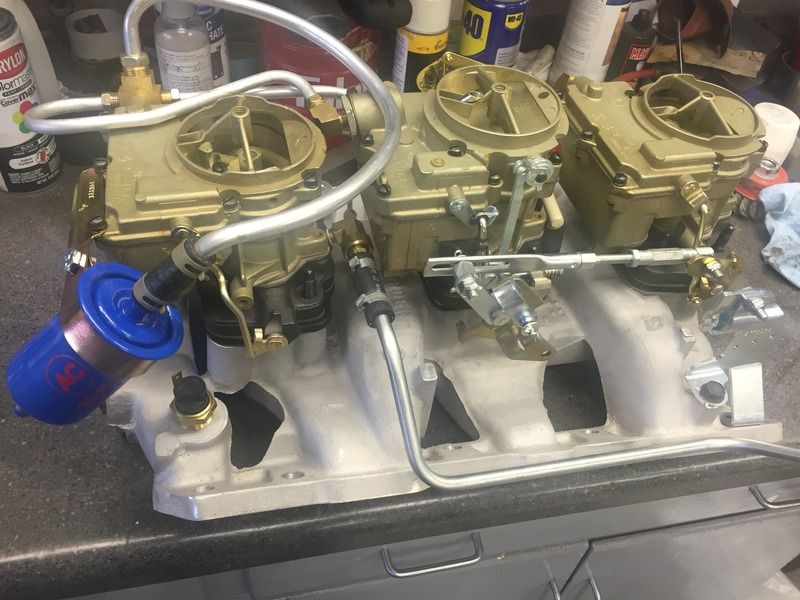
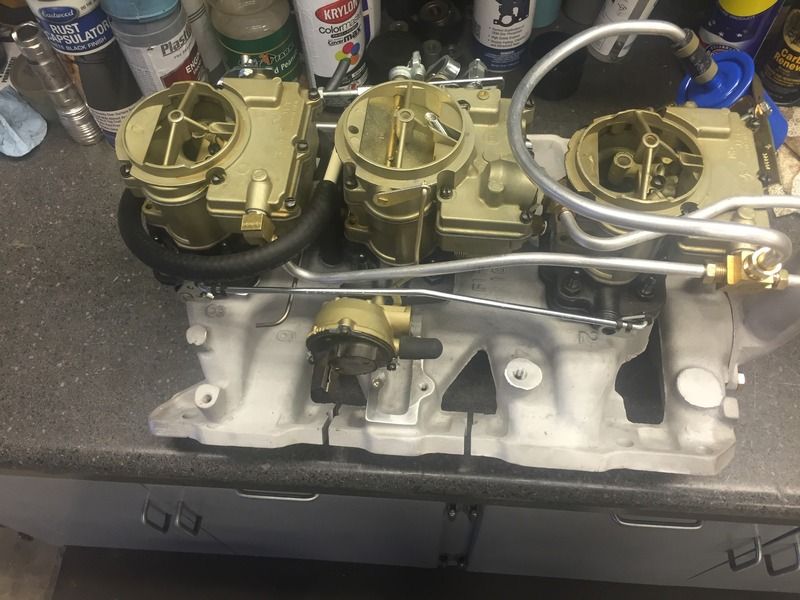
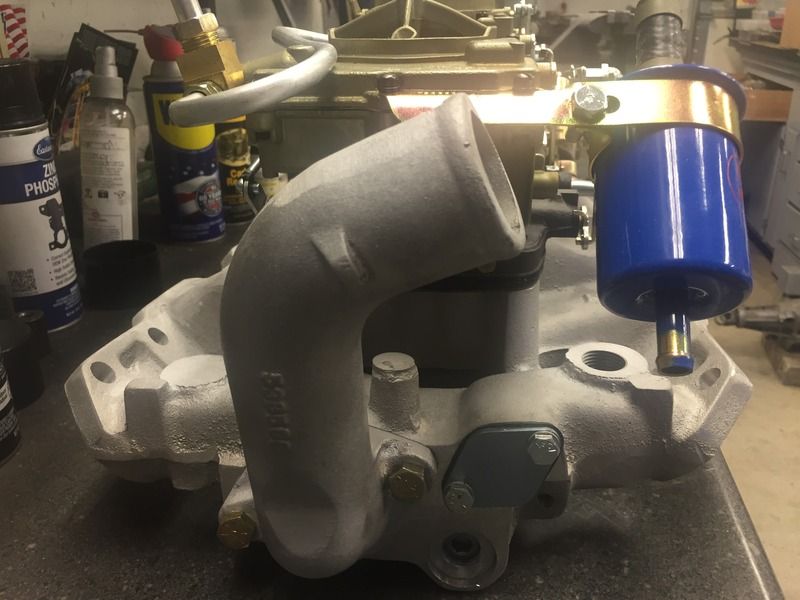
This engine gets a Tri-Power and a custom ground Lunati solid lifter flat tappet cam- and a date on the engine dyno to see how the power turns out. In the meantime, the lifts are installed in the new shop, and the Pontiacs are taking up residence...  Dick Boneske has finished up the tri-power, and it has sure turned out nice. We went with an aluminum intake, which took an awful lot of welding and porting to get the ports to match with the SD Performance ported cast iron heads. Dave also ported the intake.  We added the electric choke to give it some street manners:  Aluminum water neck: 
__________________
1964 Catalina 2+2 4sp, 421 Tri-power 1965 GTO, Roadster Shop chassis, 461, Old Faithful cam, KRE heads 305 CFM, Holley EFI, DIS ignition. 1969 GTO 467, Edelbrock 325 CFM, Terminator EFI 1969 Firebird Convertible |
|
#48
|
||||
|
||||
|
Wow, that's looking great!!
|
|
#49
|
||||
|
||||
|
So I spun the crank in the balancer to see how far off it was since the rods, and pistons are considerably lighter than stock. It was off 118.9 grams in the front, and 79 grams in the rear. This was without a flywheel/flexplate bolted on. I was able to neutral[or internally] balance it.
  Front was easy. Just had to drill a big hole where no hole exists. By doing the math, I figured a 1 1/6" hole, 1" deep, would net me 104 grams. So I drilled a 1" deep hole.   The rear was a different story because of this step, which was right where I needed to drill.  So I ground it flat, so I could drill it.  
__________________
Paul Carter Carter Cryogenics www.cartercryo.com 520-409-7236 Koerner Racing Engines You killed it, We build it! 520-294-5758 64 GTO, under re-construction, 412 CID, also under construction. 87 S-10 Pickup, 321,000 miles 99Monte Carlo, 293,000 miles 86 Bronco, 218,000 miles |
|
#50
|
||||
|
||||
 Spun it again, and now I am only 12.5 grams in the front, and 14.3 grams in the rear.  Only I went a little too far on the front[didn't compensate for the step I ground out], so I had to grind off some from the side of the rod journal, and the corner of the counterweight.   Spun it again, now off 4.2 grams front, and rear.  Made another correction, now it's .4 grams front, and .5 grams rear. 
__________________
Paul Carter Carter Cryogenics www.cartercryo.com 520-409-7236 Koerner Racing Engines You killed it, We build it! 520-294-5758 64 GTO, under re-construction, 412 CID, also under construction. 87 S-10 Pickup, 321,000 miles 99Monte Carlo, 293,000 miles 86 Bronco, 218,000 miles |
|
#51
|
||||
|
||||
|
__________________
Paul Carter Carter Cryogenics www.cartercryo.com 520-409-7236 Koerner Racing Engines You killed it, We build it! 520-294-5758 64 GTO, under re-construction, 412 CID, also under construction. 87 S-10 Pickup, 321,000 miles 99Monte Carlo, 293,000 miles 86 Bronco, 218,000 miles |
|
#52
|
||||
|
||||
|
Ordered a custom cam from Lunati, with UD lobes. It is a solid, flat tappet. It was nitrided. Checked it for straightness, it was bent .0015", so I straightened it. Here is a pic of it in between centers, being checked, and how I straighten it.
 This is the tool I use.  Got it to less than .0005".
__________________
Paul Carter Carter Cryogenics www.cartercryo.com 520-409-7236 Koerner Racing Engines You killed it, We build it! 520-294-5758 64 GTO, under re-construction, 412 CID, also under construction. 87 S-10 Pickup, 321,000 miles 99Monte Carlo, 293,000 miles 86 Bronco, 218,000 miles |
|
#53
|
||||
|
||||
|
I tuned up the bearings before installing them in the block. Here are some pics of the bearings afterwards. If you look closely at the bearing shell on th efar right, you will see that it is not finished, and ready to use yet. If you look at the very edge of it, on both sides, you can see it's shiny, but then there is a dark line just inboard of the shiny edge, Then there are fresh sand marks again. This is because the edge of most all bearing shells is raised up slightly. This raised area will push the outside edges of the bearings into the crank, causing shiny edges on the bearings, after being installed. this adds excess heat to the bearings, and oil. I purposely left this bearing shell unfinished to show the raised edge more clearly. I then take this raised edge off to make the back of the bearing shell, flat. No more raised areas to rub the crank.
  Bearings installed in block, ready for crank.   Also, the thrust flanges were off by .003" from one half to the other, on the rear side. I had to sand them so both halves were the same thickness. One started out at .122", and the other was .119". Finished, they were both .1185".
__________________
Paul Carter Carter Cryogenics www.cartercryo.com 520-409-7236 Koerner Racing Engines You killed it, We build it! 520-294-5758 64 GTO, under re-construction, 412 CID, also under construction. 87 S-10 Pickup, 321,000 miles 99Monte Carlo, 293,000 miles 86 Bronco, 218,000 miles |
|
#54
|
||||
|
||||
|
Paul, this whole thread is a great tutorial for all the details and tips to build a Pontiac engine. Add all these attention to detail items to my book by Rocky Rotella and hopefully I'll be able to build my engine successfully. Thanks for taking the time to post all the photos and detailed explanations.
Tony |
|
#55
|
||||
|
||||
|
You're welcome!
__________________
Paul Carter Carter Cryogenics www.cartercryo.com 520-409-7236 Koerner Racing Engines You killed it, We build it! 520-294-5758 64 GTO, under re-construction, 412 CID, also under construction. 87 S-10 Pickup, 321,000 miles 99Monte Carlo, 293,000 miles 86 Bronco, 218,000 miles |
|
#56
|
||||
|
||||
|
Subscribing...
Just a thought, on the EFi topic, you can use gutted carbs as throttle bodies and hide pretty much of the rest of the EFi setup. .
__________________
. 1970 GTO Judge Tribute Pro-Tour Project 535 IA2 http://forums.maxperformanceinc.com/...d.php?t=760624 1971 Trans Am 463, 315cfm E-head Sniper XFlow EFI, TKO600 extreme, 9", GW suspension, Baer brakes, pro tour car https://forums.maxperformanceinc.com...ght=procharger Theme Song: http://www.youtube.com/watch?v=7zKAS...ature=youtu.be |
|
#57
|
|||
|
|||
|
I did see a guy who took a Tri-power and retrofitted it with EFI, and it was pretty much hidden from the outside.
For this build, I'm going old school with the carbs and solid lifter cam. Maybe that '67 Tempest in the background of my shop will get something interesting....
__________________
1964 Catalina 2+2 4sp, 421 Tri-power 1965 GTO, Roadster Shop chassis, 461, Old Faithful cam, KRE heads 305 CFM, Holley EFI, DIS ignition. 1969 GTO 467, Edelbrock 325 CFM, Terminator EFI 1969 Firebird Convertible |
|
#58
|
||||
|
||||
|
The Holley and other ECUs handle 2x4 and 3x2 setups. Was just throwing it out there. There's places that specifically convert carb to throttle bodies just for the purpose. If you really wanted to, you can drill the back of the intake and hide an IAC.
Nice. I got home and now can see the pics! I do all my work in a 20x20 garage, and that's with 2 cars and stuff in it. No air tools. I can only imagine what I could get done in a place like that! Heh-heh! Thank you Paul for taking the time to doc your efforts, and post here! Much appreciated! .
__________________
. 1970 GTO Judge Tribute Pro-Tour Project 535 IA2 http://forums.maxperformanceinc.com/...d.php?t=760624 1971 Trans Am 463, 315cfm E-head Sniper XFlow EFI, TKO600 extreme, 9", GW suspension, Baer brakes, pro tour car https://forums.maxperformanceinc.com...ght=procharger Theme Song: http://www.youtube.com/watch?v=7zKAS...ature=youtu.be |
|
#59
|
||||
|
||||
|
Got it all wrapped up, and on it's way back to darbikrash.
 Should be there tomorrow. Slipped the crank, and cam in to be more secure during shipping. Should be there tomorrow. Slipped the crank, and cam in to be more secure during shipping.
__________________
Paul Carter Carter Cryogenics www.cartercryo.com 520-409-7236 Koerner Racing Engines You killed it, We build it! 520-294-5758 64 GTO, under re-construction, 412 CID, also under construction. 87 S-10 Pickup, 321,000 miles 99Monte Carlo, 293,000 miles 86 Bronco, 218,000 miles |
|
#60
|
||||
|
||||
|
I have that exact stand, guess I know how I'm shipping my IA2 to you now! Hoping this coming spring I can get to that.
.
__________________
. 1970 GTO Judge Tribute Pro-Tour Project 535 IA2 http://forums.maxperformanceinc.com/...d.php?t=760624 1971 Trans Am 463, 315cfm E-head Sniper XFlow EFI, TKO600 extreme, 9", GW suspension, Baer brakes, pro tour car https://forums.maxperformanceinc.com...ght=procharger Theme Song: http://www.youtube.com/watch?v=7zKAS...ature=youtu.be |
| Reply |
|
|