


| FAQ |
| Members List |
| Social Groups |
| Calendar |
| Search |
| Today's Posts |
|
#41
 05-27-2007, 02:58 AM
|
||||
|
||||
 Linkage and fuel lines completed
I have made some progress on the bathtub intake setup.
 I made up some progressive carb linkage using as many parts as I could from a Pontiac Tri-Power (courtesy of Dick Boneske). I want it to look as though it came from the factory even though none if this setup is even close to being 'correct'. I fabbed the two carb linkage arms from 1/4" thick aluminum plate and the throttle return spring bracket for the rear primary carb from 1/8" aluminum. A bracket made from 1/4" aluminum for the forward secondary carb return spring will attach to the front of the driver's side cylinder head. I also bent up and flared some 3/8" fuel lines using inverted flare fittings, my intent is to make them look like GM issue as well. I installed (set) the manifold on my engine in the car and checked the actuation of the carb linkage, it uses the stock '64 throttle cable. The pedal effort is about half that of my '66 Tri-Power setup. I was very happy to see that it worked smoothly and opened both carbs up all the way with ease.      
__________________
1964 Tempest Coupe LS3/4L70E/3.42 1964 Le Mans Convertible 421 HO/TH350/3.08 2002 WS6 Convertible LS1/4L60E/3.23 1966 VW Type 2 Single Cab Pickup 140hp 2276 1956 VW Type 2 Panel Van 36hp 1200 1957 VW Type 1 Beetle 180hp 2276 |
|
#42
05-27-2007, 12:21 PM
|
||||
|
||||

That is some nice fabricating B-Man.
I would say though that unless the lower lever arm in the rear is about 1.8-2.0 times longer vs the front lower arm you will never get the front carb primaries to open fully. The 1.8-2.0 ratio multiplier gives you some primary movement (about 50%) and will still have all of the primaries to be open at full WOT. I see you do have some ratio difference but not sure from the pics if it is around 2 to 1. Tom V.
__________________
"Engineers do stuff for reasons" Tom Vaught Despite small distractions, there are those who will go Forward, Learning, Sharing Knowledge, Doing what they can to help others move forward. Last edited by Tom Vaught; 05-27-2007 at 12:28 PM. |
|
#43
05-27-2007, 12:59 PM
|
||||
|
||||
|
Quote:
The rear primary carb linkage arm has 2.4" of linear travel measured at the linkage arm attachment hole, the forward secondary carb arm has 1.7" of linear travel at the same point. This way the rear carb primary throttles are opening about 1/3 of the way before the primaries on the front carb start to kick in. Hoping this makes the car easy to drive around town upon light throttle application. I did some messing around with a few different thin cardboard patterns while I was figuring out the exact geometry I wanted. I put the pivot points in a place where they would have equal travel distance fore and aft from center, and stay on the same plane at the beginning and ending points of their travel to prevent any binding and provide smooth actuation. Seems to have worked out so far. Both carbs open fully with no problems and pedal effort is very light, much lighter than I expected. After I got it working I was concerned that it might be too stiff, but after heading out to the garage and actuating my '66 Tri-Power a few times I knew it would take less pedal effort than I had anticipated. Kicking in the outer carbs on the Tri-Power always seemed to take quite a bit of effort when I had that setup on my Temepst, there are some fairly stiff springs keeping them shut. Of course until I get a chance to actually drive the car with the linkage progressing as it does now I won't know if the front carb seems to be kicking in sooner or later than I'd like. Bart  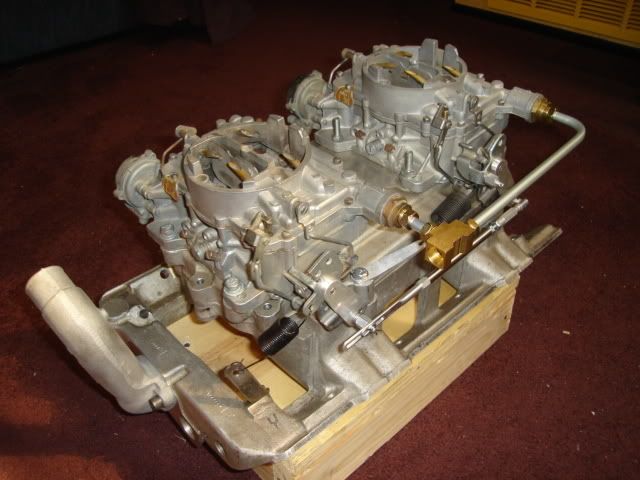
|
|
#44
05-27-2007, 02:53 PM
|
||||
|
||||
|
I would like to dedicate this thread to the memory of Dave Johnson, he passed away this morning.
 http://forums.maxperformanceinc.com/...d.php?t=522069 A fine man and a truly dedicated Pontiac racer who clearly went to great trouble and expense to produce this intake that is my new favorite toy. I originally thought that this rare intake (one of 22 that Dave reproduced in order to make his 'White Warrior' more competitive in his racing class) would make a cool addition to my old GTO, so I bought it even though it was pretty expensive. Now it holds even more meaning for me, even though I've never met Dave he treated me with respect here on the board in our conversations and that means a lot. This carefully sculpted aluminum casting will always be more than just a super-neat part to me, only someone who was truly dedicated to the Pontiac hobby could have made something like this happen and I'll think of Dave every time I look at it or turn the key to fire it up. Looking back on his racing endeavors it's clear to me that it would be hard to find a more hard-working and hard-core Pontiac racer and enthusiast than Dave Johnson. Rest In Peace Dave, you are already missed. 
|
|
#45
05-27-2007, 05:12 PM
|
|||
|
|||
|
Dave was my inspiration for building my 63 Lemans after 25 years away from the hobby.He sold me my Bathtub,980 heads,Carillo rods and was always eager to help.The bathtub on my 63 now has a DJ ingraved on it and will never leave my collection.Im going out to my garage,put a fresh engine in my 61 Ventura and try not to think about Norwalk without him.Tom
|
|
#46
05-27-2007, 06:18 PM
|
||||
|
||||
|
I watched and met Dave at the old NMCA events, since NSS classes to me are what I grew up watching.The fast car was fun to watch,although watching Dave flog a clutch swap in the pits confirmed my switch to auto trannies for racing! Dave would always give good advice freely, not one that kept everything a secret. He will be missed.
__________________
Skip Fix 1978 Trans Am original owner 10.99 @ 124 pump gas 455 E heads, NO Bird ever! 1981 Black SE Trans Am stockish 6X 400ci, turbo 301 on a stand 1965 GTO 4 barrel 3 speed project 2004 GTO Pulse Red stock motor computer tune [email protected] 1964 Impala SS 409/470ci 600 HP stroker project 1979 Camaro IAII Edelbrock head 500" 695 HP 10.33@132 3595lbs 1964 Corvette Coupe 327 4 speed |
|
#47
05-27-2007, 10:49 PM
|
||||
|
||||
|
hi guys,
sad news indeed; i was here to say how cool the intake setup looks and read about him passing away. can't not fully admire the wherewithal it took to get a casting like that done so well and for such a small run. i never met him; my loss, it seems. our condolences to his friends and family. have a safe holiday, mike
__________________
is this thing on? |
|
#48
05-28-2007, 07:20 PM
|
||||
|
||||
|
Keepin' on it.....
Thinking about Dave yesterday inspired me to push further ahead, I'd be lucky to have 1/100th of the ambition that Dave had for this hobby.
 I tried fitting up the intake using all the gaskets on the intake, heads and front cover. I wanted to see how much I'd have to move the 8 bolt holes next to the intake runners to make it line up properly. Surprisingly enough, I was able to easily start and snug down all 8 bolts (okay 7, I didn't have a socket head cap screw long enough on hand for #8) without doing a thing to the intake. I could hardly believe my luck. Thanks Dave.    Of course the 2 bolt holes up front at the water crossover will need some 'attention' since they are in a completely different location. This intake is made to fit '61 -'64 heads, the Edelbrock heads are '65 and later style so the '61 -'64 water crossover design doesn't mate up. Driver's side head:  Passenger side head, here you can see the front upper corner of the intake water passage that won't seal:  I'm not going to modify the intake to make it work. The E-heads will need a little bit of welding to add some material in the front upper corner. I will also need to plug the front water passage holes with some 3/4" aluminum pipe plugs and weld them in place, the new hold down bolts need to go right near the bottom edge of the water passage holes that are there right now. Driver's side head:    Passenger side head:   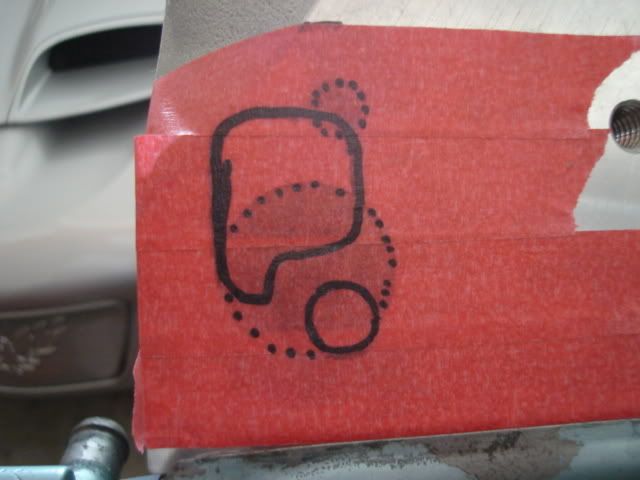 Now it's time to tear down the heads and try to find someone who can do some aluminum welding. I need somebody who knows how to deal with type of alloy used in the cast aluminum E-heads, as I've read that welding on them can be a bit tricky. 
|
|
#49
05-28-2007, 07:26 PM
|
||||
|
||||
 Cool parts...........
You are the master fabricator
. Les
__________________
Les Iden ---------------------------- '65 Buick Sport Wagon Custom, 340, T350, 3:23 '66 GTO Post/468, 700R4, 3.31 (Mike's as of 9-16) '68 Grand Prix/455, dual AFBs, T400, 2:93 posi (sold) '72 TA tribute/461, T400, 3.08, (Russ's as of 9-16) '97 Mitsubishi Eclipse Spyder Turbo, Konis, 5 speed '09 Torrent GXP, nav, Sun & Sound pkg., Bilsteins |
|
#50
05-28-2007, 08:08 PM
|
|||
|
|||
|
I found it much easyer (not cheaper)to replace the water X over with one from a alu tripower intake.You need to take a drive down and see it.Tom
|
|
#51
05-28-2007, 09:42 PM
|
||||
|
||||
|
Removing the water cross-over to use the 66 aluminum tripower one is the easiest way to use the head as is and to still keep the rest of the bathtub looking original looking.
If you pay attantion to what you are doing you can cut the intake in only two spots and use it for both style heads. I modded a M/T crossram to go on a later model head and the intake required a lot of work to look close to stock BUT any Pontiac enthusiast would tell you the cross-over had been reworked. The Bathtub deal is much easier but you would still have a bunch of welding on the intake. Now that I said that, Bill Banks "The Bopping Bear" had a original bathtub and did not want to cut it up either. He wanted to run late model heads. What he did (when he was alive) was he machined the intake flange of the head surface to allow installation of a recessed steel plate into the head casting. (he had a cast iron head). You could do the same but use an aluminum plate recessed into the head with the correct bolt pattern/ port pattern in the heads. Then the intake would need NO Modifications. The plate could be attached to the head with fasteners and epoxy with little if any welding. Tom V.
__________________
"Engineers do stuff for reasons" Tom Vaught Despite small distractions, there are those who will go Forward, Learning, Sharing Knowledge, Doing what they can to help others move forward. |
|
#52
05-28-2007, 10:09 PM
|
||||
|
||||
|
Tom,
The plate idea is certainly worth some serious consideration. If I did that I could even at some point use the heads in their original configuration again by substituting another plate that could just simply just cap off the head. Then the heads could be swapped side-for-side with the 'block-off' plate at the rear. I won't cut up this intake no matter what, the E-heads are easily replaced and cost less too. Thanks again for your help and insight Tom. Bart. |
|
#53
05-28-2007, 11:44 PM
|
|||
|
|||
|
the one I cut and welded has DJ ingraved on #1 runner.Tom
|
|
#54
05-29-2007, 12:23 PM
|
||||
|
||||
|
Quote:
I'll try to make it down there sometime this summer, I would love to drop on by for a visit. Bart
|
|
#55
05-31-2007, 06:07 PM
|
||||
|
||||
|
Tom V.- thanks for sharing the plate idea with us. I have an old Edelbrock 6x2 set up I want to run and don't want to cut. Now I know why I love this board. Pat
|
|
#56
06-02-2007, 12:17 AM
|
||||
|
||||
|
Another small step forward.....
Made up a throttle cable bracket.
I was able to use the cable mounting section off of a '64 Tempest 215 6-cylinder throttle cable bracket. Good thing I don't ever throw any old Pontiac parts away. I cut the rest of the bracket out of 1/8" steel plate and welded the cable mount piece to it. As long as you have a sharp hacksaw blade, a good selection of files and a decent set of drills and taps you make a lot of stuff at home in your garage.    Started mocking up the airbox base using some thin cardboard. 
__________________
1964 Tempest Coupe LS3/4L70E/3.42 1964 Le Mans Convertible 421 HO/TH350/3.08 2002 WS6 Convertible LS1/4L60E/3.23 1966 VW Type 2 Single Cab Pickup 140hp 2276 1956 VW Type 2 Panel Van 36hp 1200 1957 VW Type 1 Beetle 180hp 2276 |
|
#57
06-02-2007, 09:37 AM
|
||||
|
||||
|
I'd still bet there would be a market for a new batch of them!
__________________
Skip Fix 1978 Trans Am original owner 10.99 @ 124 pump gas 455 E heads, NO Bird ever! 1981 Black SE Trans Am stockish 6X 400ci, turbo 301 on a stand 1965 GTO 4 barrel 3 speed project 2004 GTO Pulse Red stock motor computer tune [email protected] 1964 Impala SS 409/470ci 600 HP stroker project 1979 Camaro IAII Edelbrock head 500" 695 HP 10.33@132 3595lbs 1964 Corvette Coupe 327 4 speed |
|
#58
06-02-2007, 12:58 PM
|
||||
|
||||

Quote:
Just out of curiousity, does anyone know how much these actually sold for when Dave first started selling them?  I'd like to know much it would cost to make one now. Certainly the market would be much better for the version that fits '65 and later heads. |
|
#59
06-02-2007, 06:58 PM
|
||||
|
||||
|
From what I remember they were well over $1000.00 for one of the D. Johnson Intakes. The R. Williams would bring more money as it was an improved design.
Tom V.
__________________
"Engineers do stuff for reasons" Tom Vaught Despite small distractions, there are those who will go Forward, Learning, Sharing Knowledge, Doing what they can to help others move forward. |
|
#60
06-02-2007, 07:22 PM
|
||||
|
||||
|
A guy here I bought my first M/T crossram from said he had bought one then sold it for around $1000-1200.
I've got close to $1200 in my current late model head M/T with the first one and the mods from Tom V.'s buddy, and it hasn't even been finished up on a vehicle. The guy bringing the aluminum 409 heads to casting is figuring $3000 assmbled so I would think just a manifold could be made cheaper as they are less complex.(I've got a deposit down! My other love beside Ponchos)
__________________
Skip Fix 1978 Trans Am original owner 10.99 @ 124 pump gas 455 E heads, NO Bird ever! 1981 Black SE Trans Am stockish 6X 400ci, turbo 301 on a stand 1965 GTO 4 barrel 3 speed project 2004 GTO Pulse Red stock motor computer tune [email protected] 1964 Impala SS 409/470ci 600 HP stroker project 1979 Camaro IAII Edelbrock head 500" 695 HP 10.33@132 3595lbs 1964 Corvette Coupe 327 4 speed |
| Reply |
|
|
The PY Online Forums is the largest online gathering of Pontiac enthusiasts anywhere in the world. Founded in 1991, it was also the first online forum for people to gather and talk about their Pontiacs. Since then, it has become the mecca of Pontiac technical data and knowledge that no other place can surpass.






 Linear Mode

