


| FAQ |
| Members List |
| Social Groups |
| Calendar |
| Search |
| Today's Posts |
|
#1
 03-31-2025, 04:58 PM
|
|||
|
|||
 72 T/A restoration
Hello fellow enthusiasts.
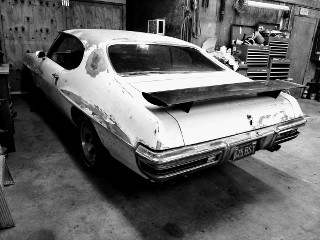
After many years in storage (in my family 40+ years) its now time to give the car the TLC it deserves. I got the PHS documentation. VIN 2V87X2N****** I think it is on the dealer order form? the following codes; Radio code 405 Elec-r-wi-de code 534 cstm trm grp code 724 glass s/r al code 531 air cond man code 582 The car also has color code F (lucerne blue) and 221 trim ivory vinyl. I now have collected (expensive) a lot of parts for the car, new headliner, floor carpet, window moldings, weatherstripping, fasteners kits, 455 engine rebuild kit (Butler) and much more. Still missing the correct 7F6 heads+exhaust manifolds. Car will soon be ready for the paint booth. Just got a paint sample(attached), but not sure we got it right? Also need tips reg. correct white color for the (discolored) white interior plastic parts. Any forum feedback appreciated. Cheers |
| The Following 2 Users Say Thank You to Mediumrare72TA For This Useful Post: | ||
|
#2
03-31-2025, 05:51 PM
|
|||
|
|||
|
Colors are hard to tell from pictures, but if you had the formula mixed from a code or scanned an area of original paint on the car that has not seen much sunlight, you should be very close. Good luck!
|
|
#3
03-31-2025, 06:53 PM
|
|||
|
|||
|
Is it a 4spd without console ?
Or column shift Automatic ? With AC and De-Ice together they used an extra idler pulley on one of the fan belts. Color spray out looks good in the picture. Park 10 LuBlu cars together and get at least 5 different shades of blue these days. Welcome to PY and Congrats for holding onto the car. |
|
#4
03-31-2025, 08:45 PM
|
||||
|
||||
|
Very nice I’ve been looking for a 70-73 myself haven’t found the right car yet.
I used to really not like them Something always bothered me about the A pillar not meeting the top of the fender. But they’ve grown on me My dad has a 69 mustang he bought new that color so I like it but my wife calls it greaser blue lol But it’s a very nice color and if it’s original even better. Happy to see your putting the effort into the old poncho And welcome.
__________________
Happiness is just a turbocharger away! 960 HP @ 11 psi, 9.70 at 146. Iron heads, iron stock 2 bolt block , stock crank, 9 years haven't even changed a spark plug! selling turbos and turbo related parts since 2005! |
|
#5
04-02-2025, 02:46 AM
|
|||
|
|||
|
Thank you for the feedback(s).
I also need to figure out the correct white color for the shaker scoop (to match the white stripe). Some underbody coating/protection would be wise? After getting the car back from the painter (all the body parts separately and as an empty shell), I would like some tips reg. assembly strategy. Maybe reassemble like this(comments/suggestions)?; 1. Headliner 2. Dash 3. Front and rear window 4. Instrument cluster/under dash components incl. wiring. 5. Steering column/wheel 6. Interior parts, parcel shelf, carpet 7. Seats 8. Filler panel between rear window and trunk lid (maybe this should be #2) 9. Trunk lid 10. Engine and transmission 11. Master cylinder/booster 12. A/C unit (next to engine) 13. Doors (adjust gaps) 14. Radiator support with radiator. 15. Inner front fenders 16. Front fenders (adjust gaps). 17. Front bumper 18. Hood (adjust gaps and check with shaker height first) 19. Undercar components brake/fuel lines, exhaust, fuel tank. Any feedback/suggestions appreciated Cheers! |
|
#6
04-02-2025, 01:43 PM
|
|||
|
|||
|
Might ck out the stickys @ the top of '70-73 Bird Tech section to get a good idea on reassembly. Bob & Keepat, 165th, NJ Steve, all have long build (serious restoration) threads on '72's that each own/have owned. There are multiple ways to approach reassembly, personally would reinstall the restored subframe & have a couple very picky old guys (long time body guys) assemble the front sheetmetal. For individual detail questions, feel free & ask away.
Welcome to the board, before I get back to it, would be remiss in not asking you if your '72 is a late build car (12D-04A) body build? My '72 T/A M22 project is near identically optioned like yours. It is a very late build (03E) originally white w 226 black deluxe interior. Only option Im seeing that is different w your list, is my '72 was equipped w a console.
__________________
Buzzards gotta eat... same as worms. |
| The Following User Says Thank You to 'ol Pinion head For This Useful Post: | ||
|
#7
05-11-2025, 01:07 PM
|
|||
|
|||
|
Update;
Just started painting the car (roof decal not yet in place). Been advised to also put clearcoat on the decal(s). Also, I will have the (discolored) plastic interior trim pieces painted (white). The back side of the seat cover can be color matched to get as close as possible to a "new" look? Engine block/crank etc now in the machine shop. Still undecided on heads/intake/ cam. Cheers! |
|
#8
05-11-2025, 02:26 PM
|
||||
|
||||
|
I wouldn't spray a clear coat over the decal stripes for several reasons. One is the clear may peel off of the vinyl stripes (adhesion problems) and second if you ever need to replace one of the decals down the road it'll be nearly impossible to remove the vinyl without paint work involved.
|
| The Following 2 Users Say Thank You to steve v For This Useful Post: | ||
|
#9
05-11-2025, 03:12 PM
|
|||
|
|||
|
Thanks for your reply.
Surely the decals were never clear coated from the factory? |
|
#10
05-12-2025, 09:56 AM
|
|||
|
|||
|
Yes, decals on any 2nd gen firebird or any other GM vehicle did not clear over the decals.
Some people do that but IMO it doesnt look right, the decals had a flatter sheen to them, not glossy like the paint, and it will eventually crack around the edges or on the decal itself due to different flex rates of paint vs vinyl decal. If you want a totally smooth appearance then paint on the stripes & clear over them, but its correct to apply the decal after the paint is cured & wet sanded/buffed out. |
| The Following User Says Thank You to 78w72 For This Useful Post: | ||
|
#11
05-12-2025, 03:53 PM
|
||||
|
||||
|
Assembly plant steps after paint were:
Hard Trim Department - Install all components to make the body watertight including exterior trim, mirrors, light fixtures, wiring harnesses, internal door mechanisms, heater core, A/C evap core, HVAC box, Steering column, pedal assembly, glass and weatherstripping. Then it went through water test. Chassis Department - On the body: All rear suspension components, muffler and tailpipes. On the front subframe: Control arms, springs, knuckles with rotors already in place, steering gear and linkage, brake & fuel lines, sway bar,core support, shroud and radiator. Engine line - Install carb, starter, accessories, and transmission. Then engine was mated to the subframe. Body drop - Subframe is mated to the body, driveshaft, front exhaust pipes, all linkages for throttle, clutch, brakes and transmission, e-brake cables, fuel and brake lines lines connected, hoses, and wheels mounted Soft Trim Department - Instrument panel, dashboard, headliner, speakers, carpet, trim panels, door panels, seats, seatbelts, front bumper, fenders and hood. Final Assembly - Special emblems, decals, fluid fills done and pressure tested, A/C charged, roll-test for engine performance, transmission shifting, gauge operation, A/C function, front toe-in set. |
| The Following User Says Thank You to srmmmm For This Useful Post: | ||
|
#12
04-12-2026, 05:44 AM
|
|||
|
|||
|
72 T/A Restoration update
Some of the parts in/done;
All body parts finally painted (Lucerne blue). New seat covers installed (white, deluxe). Interior plastic trim pieces painted (to match scanned insides) New floor mats. AMK hardware kits (1.436 pieces total). 17" Honecomb rims. Engine parts; 455 Block bored 030 Forged pistons Scat H beam rods Eddie roundport heads/ 1.6 roller rockers RPM intake BP /Comp 8022SP hyd roller 230/236 (050) 112 0.544/0.555 lift. C.R. around 10:1 ARP main studs. No exhaust manifolds yet. And much more. New headliner to be installed -please advise (rod style). Unfortunately the mounting holes for the wheel spoiler flares were bondoed/painted shut -for the rear holes I will maybe try to from inside the door jamb air vent hole put som strong magnets -and then put som metal shavings from the outside to locate/drill? Cheers! |
| The Following 2 Users Say Thank You to Mediumrare72TA For This Useful Post: | ||
|
#13
04-12-2026, 08:24 PM
|
||||
|
||||
|
Quote:
|
|
#14
04-13-2026, 01:05 PM
|
|||
|
|||
|
529... believe yours is as well.
Highest VIN "72 T/A I've ever seen is the lucerne blue original owner car that was shown at MCACN 7 or 8 years ago How are you on condition of your late "72 model Irvin seat belt tags? Will be ordering at least two sets of repro seatbelt tags. Staggering the dates same as on originals.
__________________
Buzzards gotta eat... same as worms. |
|
#15
04-13-2026, 01:08 PM
|
|||
|
|||
|
Quote:
What line of paint product was used? Thanks!
__________________
Buzzards gotta eat... same as worms. |
|
#16
04-14-2026, 05:38 PM
|
||||
|
||||
|
Quote:
|
|
#17
04-15-2026, 08:04 PM
|
||||
|
||||
|
Quote:
|
|
#18
04-15-2026, 08:38 PM
|
|||
|
|||
|
Paint the stripes and then you can clear coat.That is how I did my 69 T/A.Tom
|
|
#19
04-16-2026, 06:09 PM
|
|||
|
|||
|
Quote:
__________________
Buzzards gotta eat... same as worms. |
|
#20
04-16-2026, 06:14 PM
|
|||
|
|||
|
Quote:
__________________
Buzzards gotta eat... same as worms. |
| Reply |
|
|
The PY Online Forums is the largest online gathering of Pontiac enthusiasts anywhere in the world. Founded in 1991, it was also the first online forum for people to gather and talk about their Pontiacs. Since then, it has become the mecca of Pontiac technical data and knowledge that no other place can surpass.






 Linear Mode

